It’s safe to say the ASUS ROG Ally has had a rocky launch for some. There is hope, though. ASUS has been responsive and is constantly releasing updates to fix any problems as they crop up.
With that in mind, I can’t emphasize enough how important keeping your device up to date is. Not only will updates fix things, but in some cases you may see overall performance gains, too.
Updating the ASUS ROG Ally isn’t a difficult endeavor once you know where everything is. ASUS decided to split updates across two separate apps instead of having a single app do all the work, which has led to some of our readers getting a little confused when it comes to updating everything properly (understandable!)
Below is how I do it and, as I say, it’s not hard once you’ve got the hang of it.
Step 1: Load Up My ASUS App

To update the ASUS ROG Ally BIOS, the first thing we need to do is load up the My ASUS app. You can find this app by pressing the Windows icon to go into the Start Menu, then under All Apps you’ll find My ASUS under ‘M’.
Once the app loads and you’ve logged in, you should see the screen pictured above.
Click on the Updates option to move on to the update page.
Step 2: The Update Screen Explained

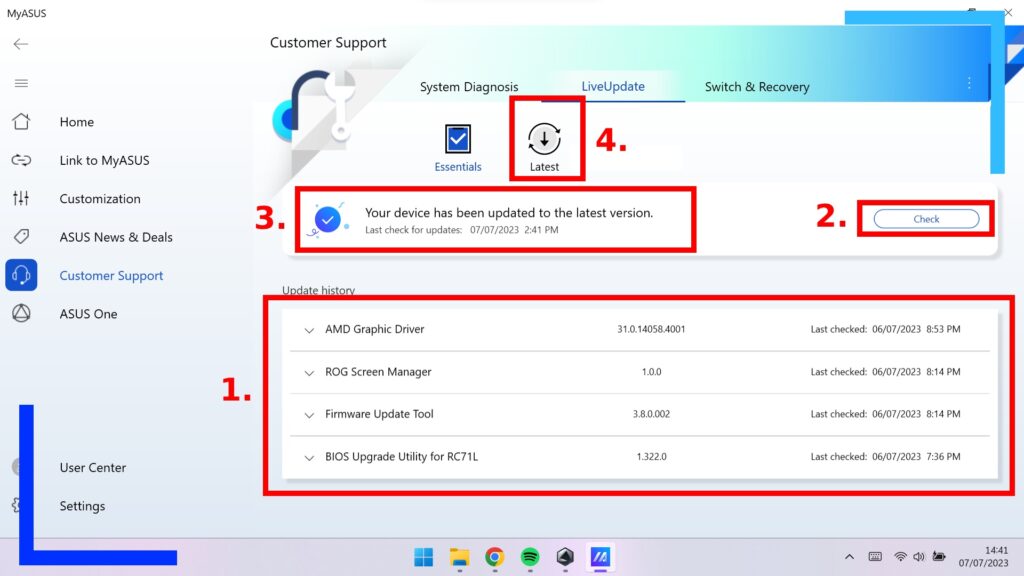
Once on the update screen, it’s easy to get overwhelmed by all the different options, so let’s break them down.
- This section shows all the different elements that need updating.
- If you don’t see any updates, click on Check to see if any are available.
- Take a look at this section to see if anything needs an update.
- To download each update file yourself, click on Latest and you’ll have the option to install files manually.
To use this screen, click on Check then the My ASUS app will connect to the Internet and tell you if any updates are needed.
If any updates are available, an Update button will appear, and clicking on the button will begin the update process.
If you find you’re having any errors with the installation of updates (I have several times), click on Latest and download the updates manually. I tend to download them to my desktop area, which allows me to click on them once to boot them up. An installer will then appear on the screen and walk you through the rest of the process.
If you only want to install the BIOS update and nothing else, just click on BIOS Upgrade Utility for RC71L to begin the update process.
Once it’s installed, you’ll then need to reboot the ROG Ally. Upon reloading, you’ll be asked if you want to upgrade the BIOS. Click on Yes and give the ROG Ally around five minutes to complete the task. DO NOT reboot the ASUS ROG Ally while this task is being performed as this could damage your device.
That’s it! If you’re curious about how to update the rest of the ROG Ally (yes, there’s more), keep reading to learn how.
How to Update The ASUS ROG Ally

The ASUS ROG Ally splits its updates across both the My ASUS app and Armoury Crate, which has led to multiple people not realizing and only updating through one channel, meaning they’re missing out on some important changes.
If you’re wondering how to update the ROG Ally, here’s how it’s done.
Begin by pressing the Command Center button (the white recycle-looking button to the right of the screen but before the face buttons). This will bring up the main Command Center app where you can change the power profile, tweak settings, and most importantly, update the ROG Ally.

You should now be looking at the Library section. From here, either click on Content with your finger or use the sticks and the ‘A’ button to navigate and select.

Under the content section, you’ll find Update Center. This is what we want, so click on that once to enter it.
Tip: If you ever need to see your system stats, access the media gallery, or want to install more game launchers like EA or Ubisoft, Content is where you’ll do that.

Once inside the Update Center you’ll be faced with all the tech components that make the ASUS ROG Ally move. If you don’t see any updates, click on Check for Updates (2.) to let the ROG Ally search online.
Then it’s just a simple case of clicking on the update button for either Armoury Crate (2.) or the button to update all (3.).
It really is that easy.
All screenshots captured on the ASUS ROG Ally.

