Starfield doesn’t run well on the Steam Deck. I said as much in my review. When multiple characters occupy the same space, you can almost always count on the framerate tanking.
But never one to be defeated, I set out on a journey to try and increase performance in Starfield with the help of mods. While this won’t fix every problem in Starfield, my testing so far is showing promising results. 60 frames per second is still out of the question, but if you want to keep the framerate above 30 more often, read on to learn how.
Before We Start.
Before we do anything, let me explain what this mod will do and what you can expect.
The mod works by modifying Starfield’s settings further than they would normally be able to. It’s kind of like instead of setting shadows to low, we’re modifying it to be ultra-low.
Once you’ve applied these mods, keep in mind Starfield wasn’t designed to be tweaked this hard and doing so may introduce some unexpected bugs or graphical glitches. One example I’ve spotted goes back to the shadow setting. By dropping it so low, some areas can appear brighter than they should. It’s quite off-putting. Switching the shadow setting to a higher value in-game can help to alleviate this problem, though.
That’s the current trade-off. In exchange for more frames per second, the visuals need to take a hit. Although thanks to this mod you can up the resolution scale above 50 percent to 75 percent in some areas. It’s definitely a trade-off many will want to try.
Step 1: Download the Mod.
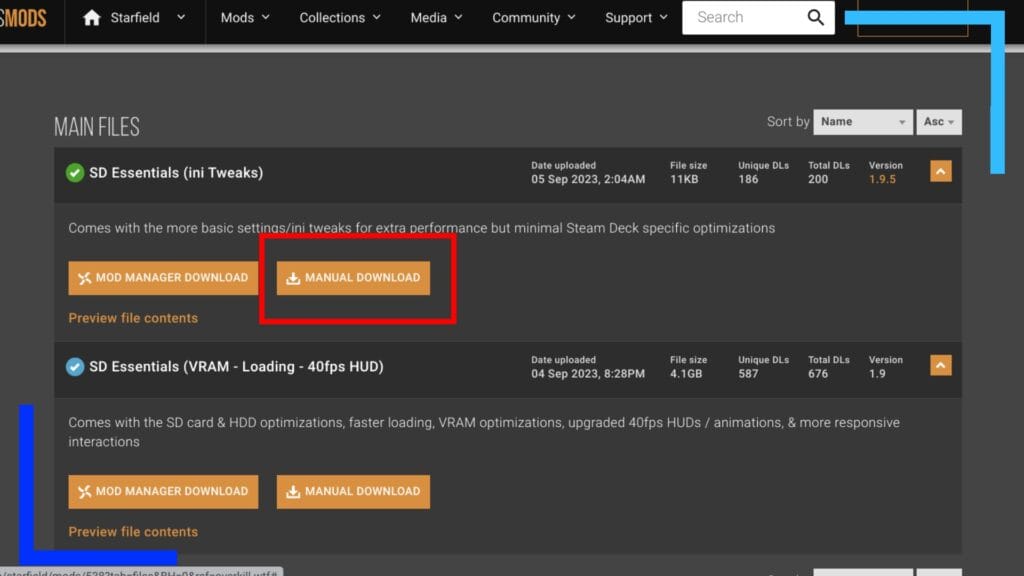
Head on over to the Nexus Mods website page for Steam Deck Essentials and click on Manual Download to grab the file. If you don’t have a Nexus Mods account, you may need to sign up for one now.
The file itself is quite small so it should only take a few seconds to download.
Step 2: Extract the Mod File.
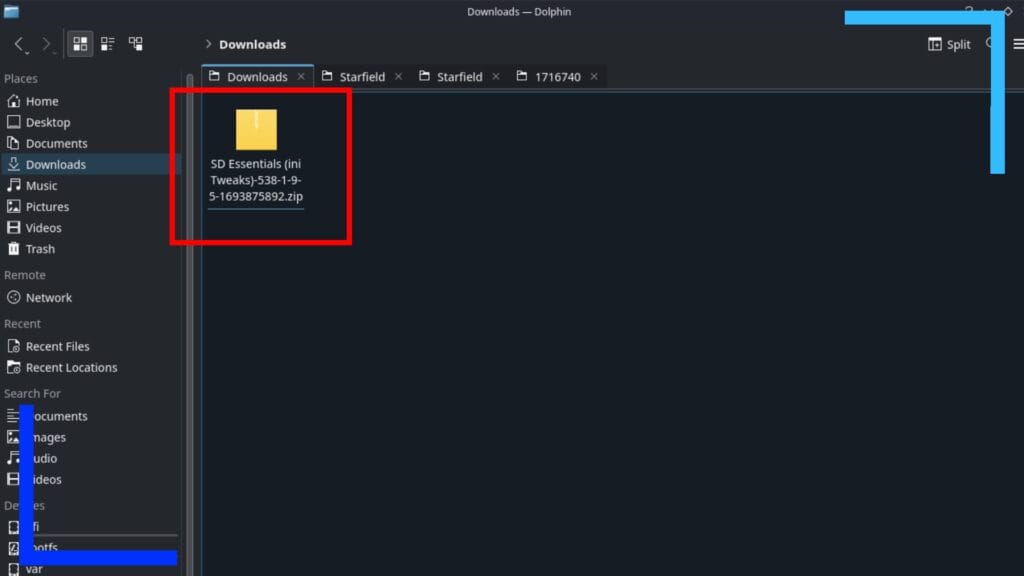
Next open up the Dolphin File Explorer (the blue folder icon) and click on Downloads. Inside you should see the file we just downloaded. In my case it was named “SD Essentials” but that name may change as time goes on.
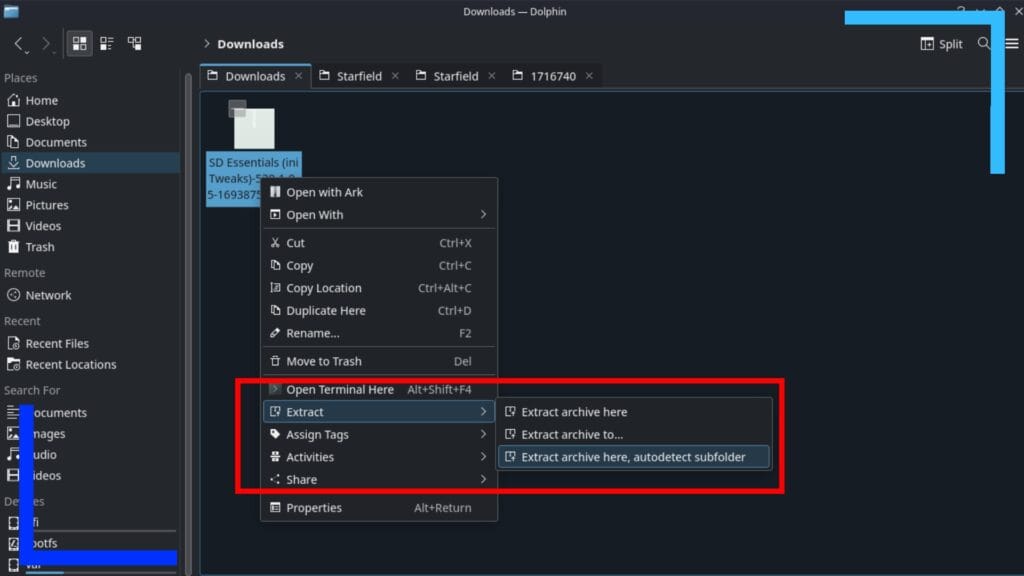
If you’re familiar with how to extract files go ahead and do that now. But if you’re still new to the Steam Deck read on to learn how.
Inside the Downloads folder, use the left trigger to click on the Steam Deck Essentials mod file. Doing so will open a submenu pop-up. From here click on Extract with the right trigger and then Extract archive here.
The Steam Deck will then extract the zip file and place it in its own folder.
Step 3. Enable Show Hidden Files.
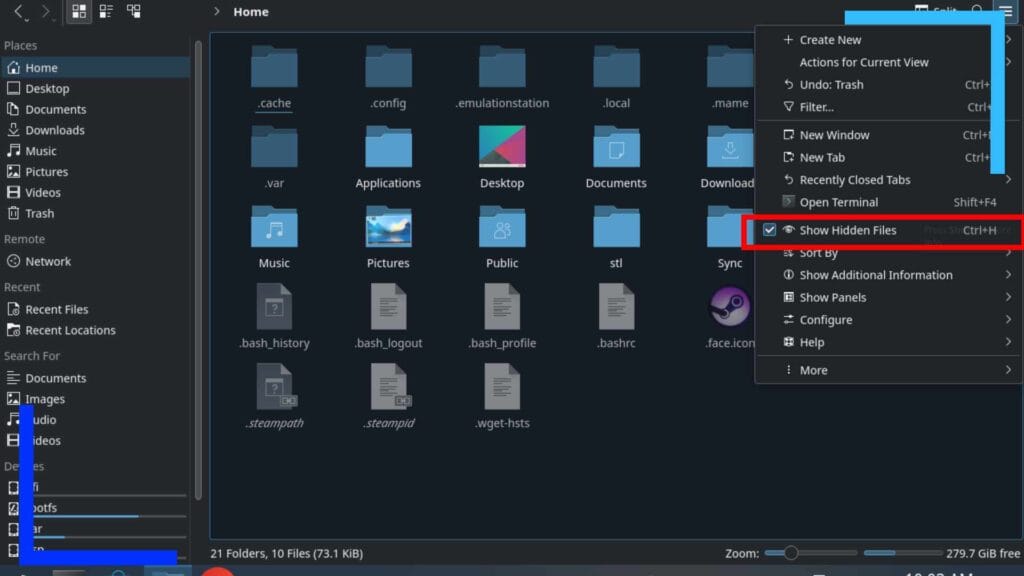
Before we move on, we need to make sure the setting Show Hidden Files is enabled. Click on Home and if you see a bunch of grayed-out folders, you’re good to move on to the next step. If you don’t, let’s enable that now.
Look to the right corner of the window. See that three-line button that looks almost like a burger? Click on that now. A new menu will open and one of the options there is Show Hidden Files. Click on Show Hidden Files now and a tick should appear next to it signalling that it’s been enabled.
Step 4: Install the First Mods.
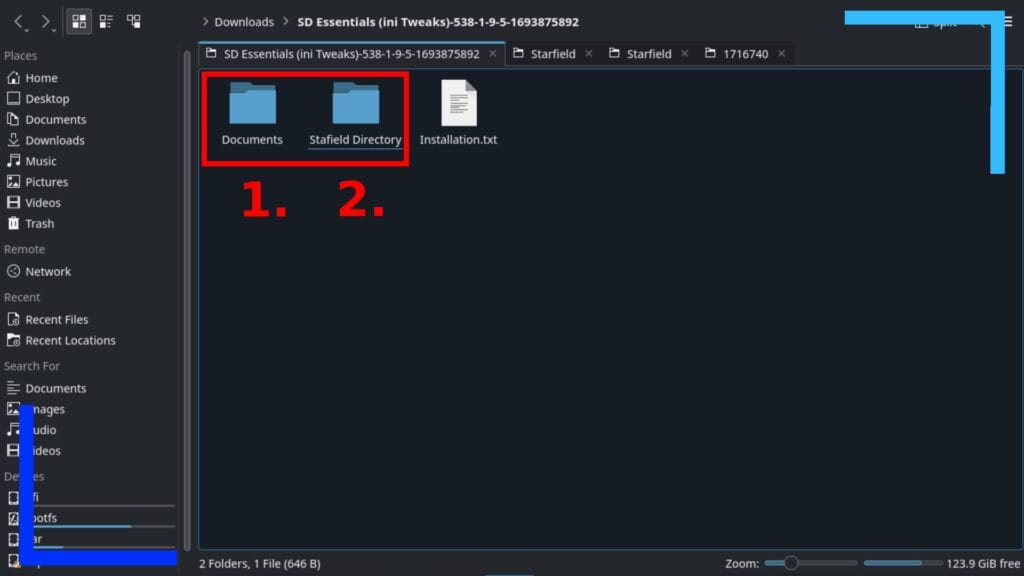
Now we’ve got access to hidden files and folders we can start moving over the mod files to the right places.
Open up the Downloads folder once more and go inside the Steam Deck Essentials folder. You’ll see the following folders:
- Documents.
- Starfield Directory.
Go into the Starfield Directory folder now.
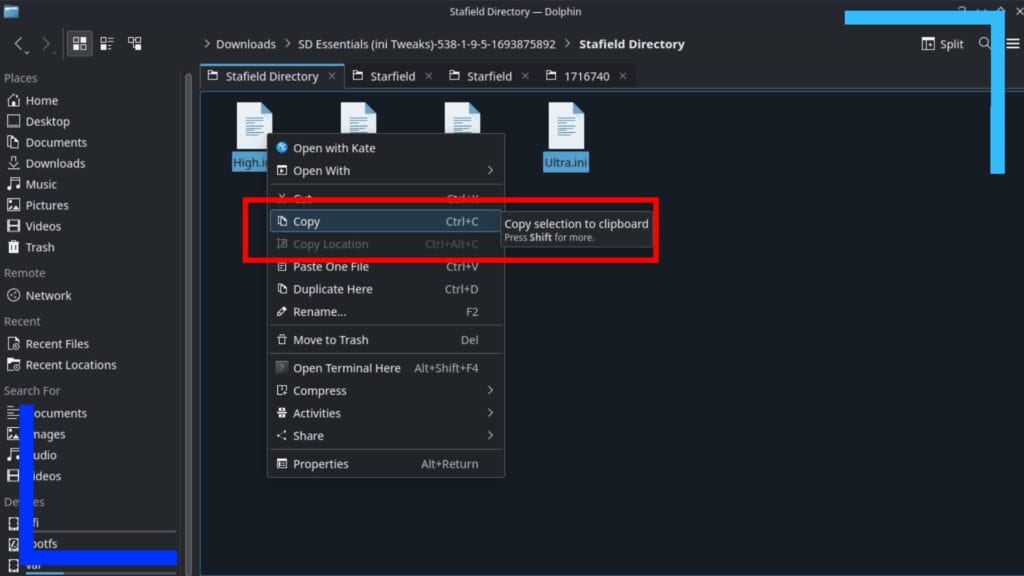
Inside the Starfield Directory folder will be four ini files we need to copy. To do this, hold down the right trigger on an empty space and drag your thumb across the right trackpad to highlight all four files. Now just click any of the files with the left trigger and from the submenu that opens, click on Copy.
Try to keep this step in mind as we’ll be using the copy function again later.

We now need to navigate through the following path to the main Starfield folder.
Home > .steam > steam > steamapps > common > Starfield.
Once you’re inside the Starfield folder, use the right trigger to click on an empty area and select Paste and the four files from earlier will be copied into the directory.
Step 5: Install the Second Mod Files.

Go back into the Downloads folder and to the Steam Deck Essentials folder. Head inside and into the Documents folder. Inside will be a single lone file. Click on it with the right trigger and hit Copy.
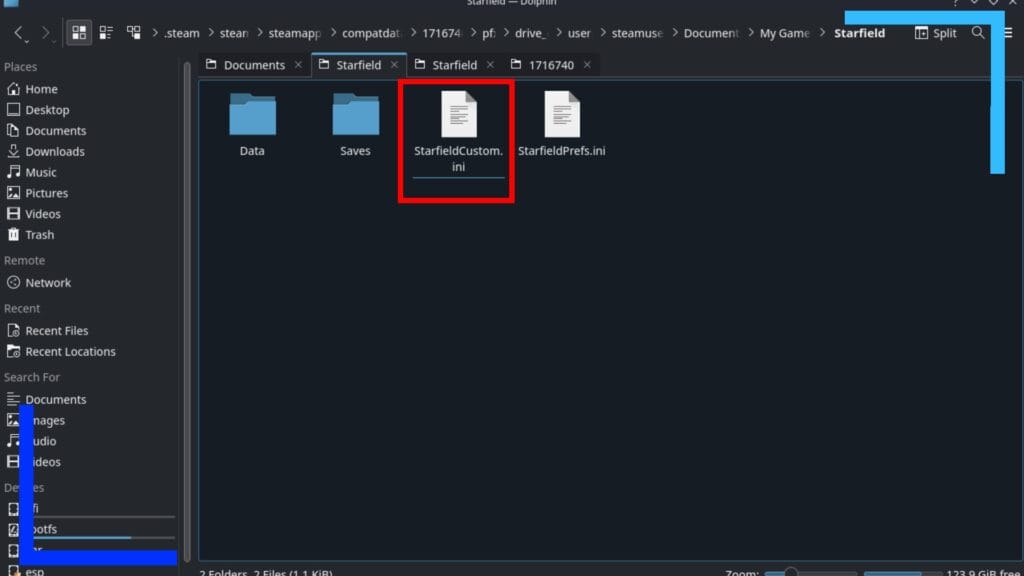
We now have a bit of a trek to find the next folder due to how Windows folders are set up on Linux. Take a deep breath, then make your way through the following path:
Home > .steam > steam > steamapps > compatdata > 1716740 > pfx > drive_C > user > steamuser > Documents > My Games > Starfield.
Once you’re in the Starfield folder, click with the right trigger on an empty space and hit Paste.
Step 6: Delete the Starfield Shader Cache.
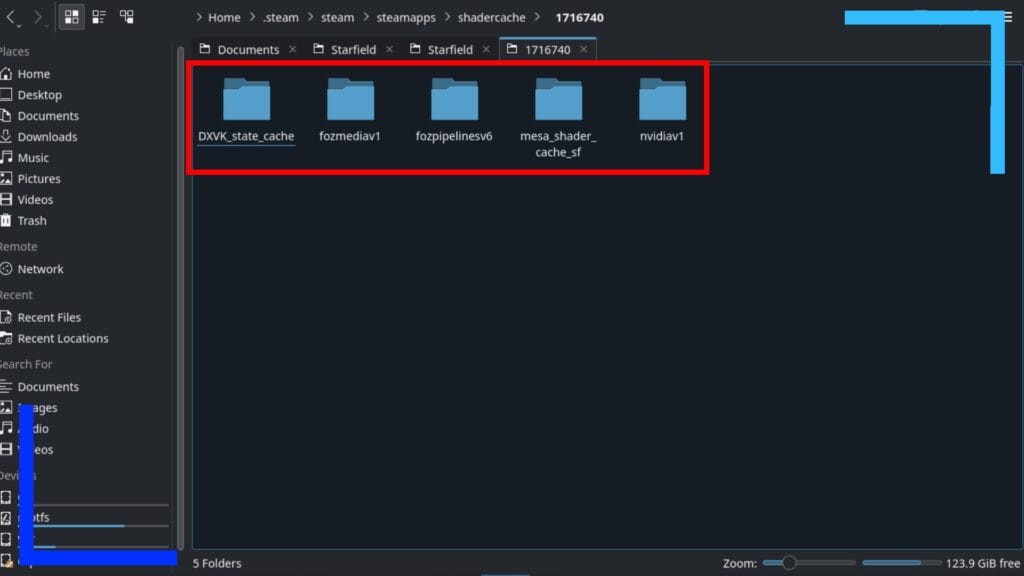
All the files are in the right place but before we load anything up, we need to delete the Starfield shader cache otherwise the mod won’t work correctly.
Make your way, once again, through the next path.
Home > .steam > steam > steamapps > shadercache > 1716740.
For me there were five folders. Delete all of them. Don’t worry, there’s nothing we can’t get back in there. In fact, booting the game up will remake those folders in a way that plays friendly with our mods.
Step 8: Load Up Starfield and Change the Preset.
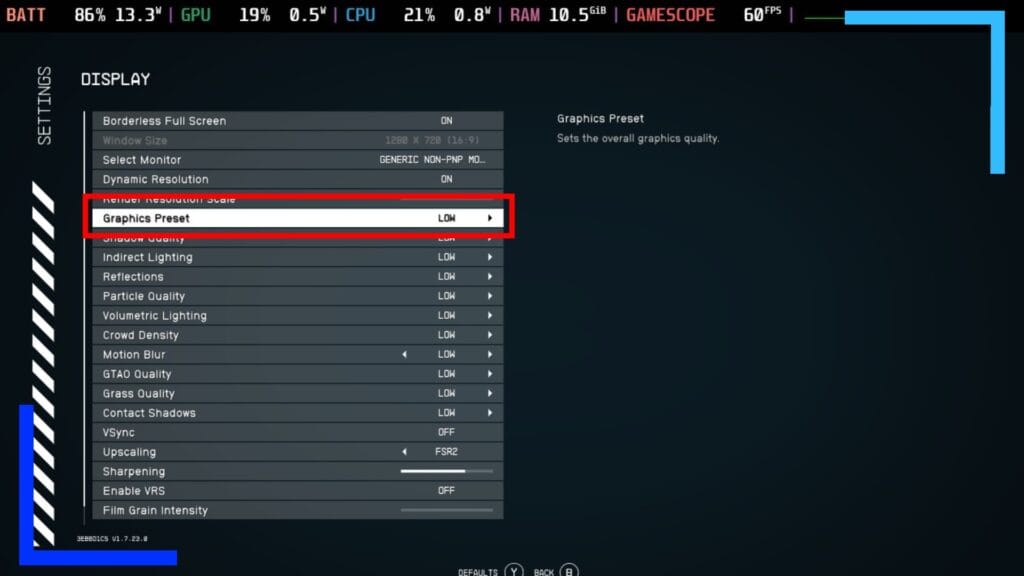
Go back into Gaming Mode and load up Starfield. You will have to sit through the building shaders screen again, but that’s a good sign.
Now head into the Settings and under Graphics Preset change it to anything else then back to Low. This helps to fix a problem introduced by the mod so do not skip it.
You’re now free to go off and play if you want but I’d first suggest checking out the graph lower down the page to get an idea of the difference between running the mod by itself and running it paired with CryoUtilities. If you want even better Starfield performance on the Steam Deck, keep reading to install CryoUtilities to get an even higher framerate.
Step 9: Install CryoUtilities (Optional).
I previously made an in-depth guide to running CryoUtilities on Steam Deck, simply because it’s the quickest way to improve performance in most games. Some games – like Red Dead Redemption 2 – will actually be worse, but on the whole, a lot of games with low framerates will perform better.
Begin by going to the CryoUtilities GitHub repository and downloading the latest version (look under “releases” on the right side of the screen).
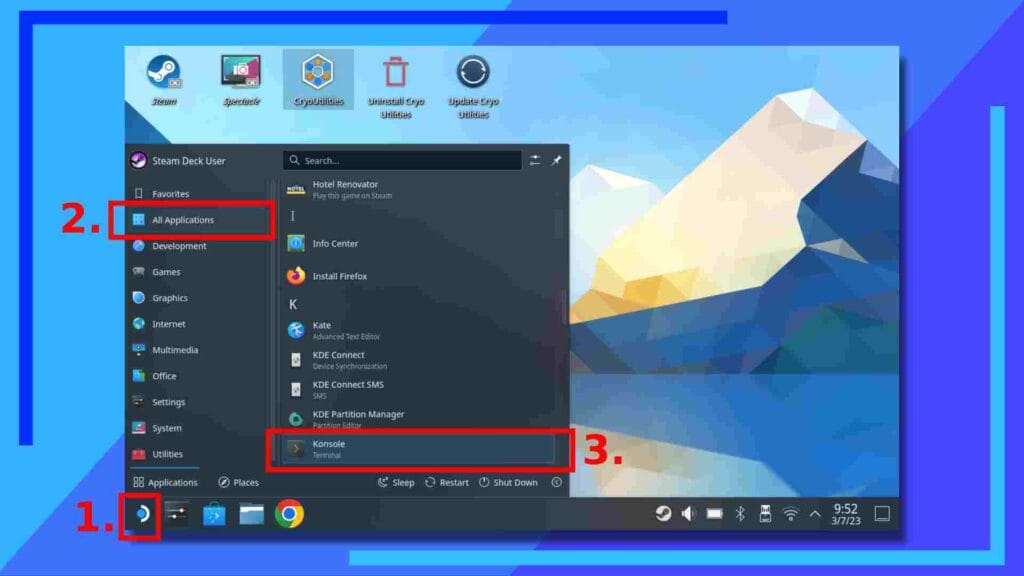
Next we need to set a password if you haven’t already as CryoUtilities will need root access.
Open the Start Menu (1.) and click on All Applications (2.) then scroll down to Konsole (3.) and open it.
In the Konsole window type in “passwd” and press the right trigger to execute the command. Note that you don’t need the quotation marks but you do need to keep it case-sensitive. Also, yes, the command reads “passwd” not “password”.
Follow the on-screen prompts and complete the password setup and you’ll be good to move on.
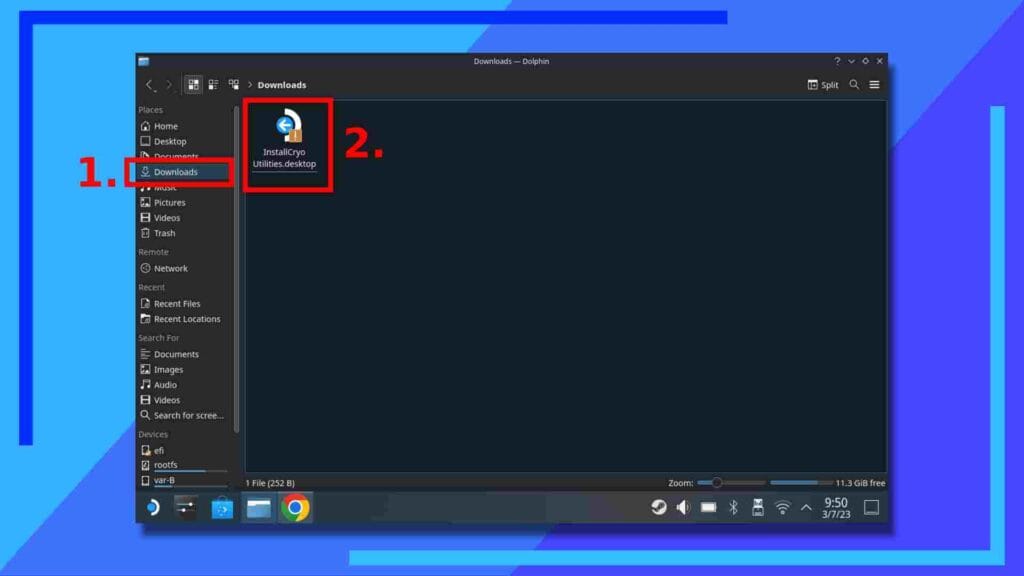
Back in the Downloads folder click on the CryoUtilities file we downloaded twice quickly to launch it and follow the on-screen prompts. There’s nothing complex here don’t worry.
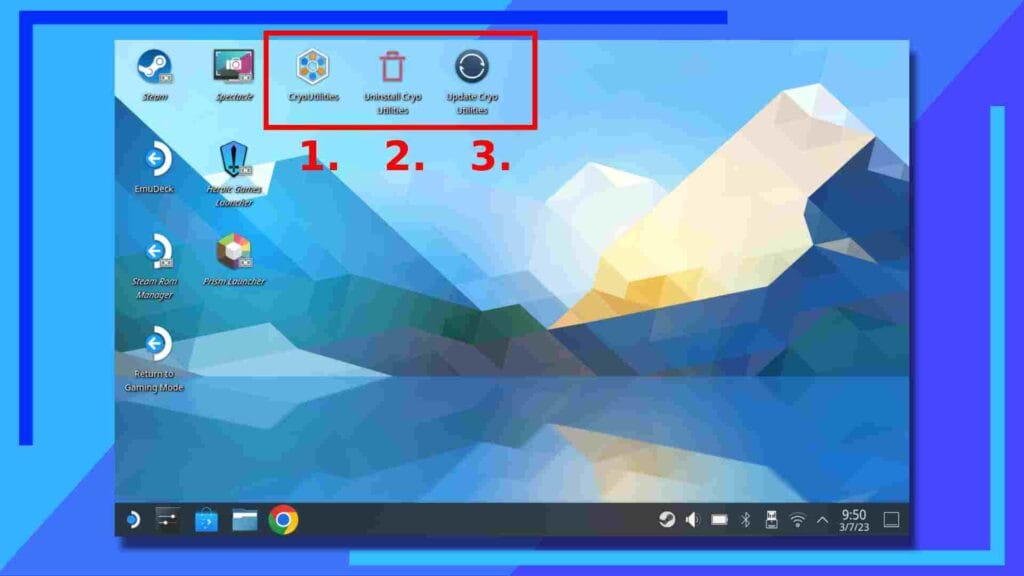
Once it’s installed go to the desktop (where all your icons are) and three new icons will have been added. Click twice on the main CryoUtilities icon and it’ll open.
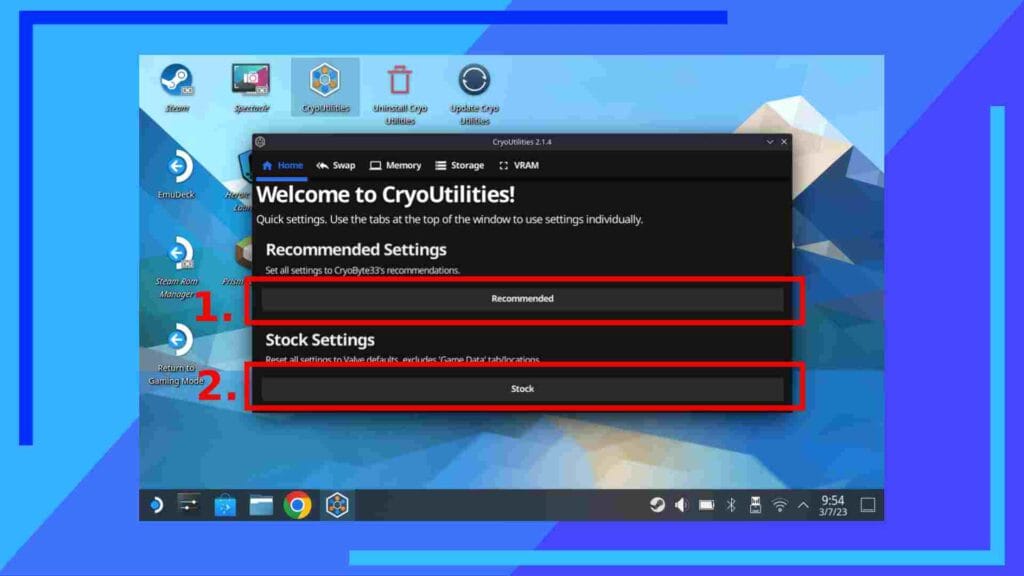
You’ll now be presented with two options:
- Recommended.
- Stock.
If you ever run into problems or you want your Steam Deck back to its original settings, hit Stock (2.) and it’ll change everything back. For now, though, click on Recommended (1.) and let CryoUtilities do its thing.
This may take some time, so if it does, don’t panic. That’s normal. After a while, CryoUtilities will have changed a bunch of settings that will in turn work with our Starfield mod and give us greater performance benefits.
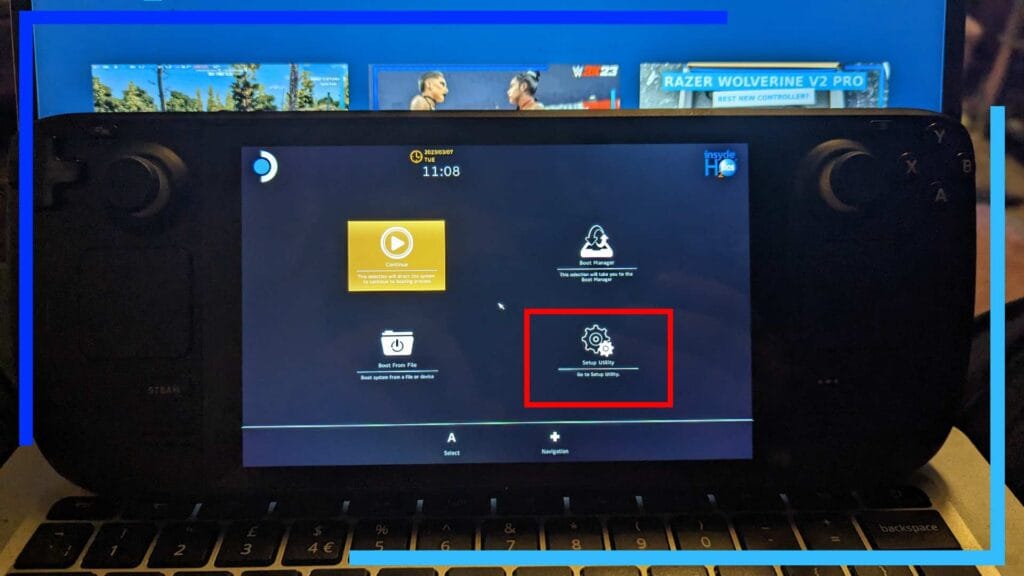
The final change we need to make is to the Steam Deck’s UMA buffer size so we’ve got a larger RAM allocation. By default the Steam Deck has 1G set aside. We’ll now be changing that to 4G.
Power down the Steam Deck and once the fan has stopped spinning and the screen is off, hold down the Volume Up button (located at the top of the console) and press the Power Button.
You will now have four options. Use the d-pad and the right trigger to select and enter the option named Setup Utility.

Click on Advanced (1.) then near the bottom you’ll see UMA Frame Buffer. Click on that and change it to 4G. Now just click the back button (the one to the upper right of the screen) to save and exit and the Steam Deck will reboot with the new settings applied.
You’re now free to go off and play Starfied with an increased framerate.
Starfield Performance Results.
I’ve been testing out the following setups for Starfield on the Steam Deck to see which combination works best:
- Starfield with the default Steam Deck settings.
- Starfield with the Steam Deck Essentials mod installed.
- Starfield with both the Steam Deck Essentials mod and CryoUtilities installed.
I’ve tested multiple areas, cities, and combat scenarios and for the most part, the results remain the same. The stock version consistently throws up the worst performance, while modded Starfield greatly improves the framerate. It’s at the cost of the visuals, but if you want a smoother framerate, that’s a fair trade-off given the Steam Deck’s lesser-powered hardware.
I’m yet to test the mod out on the ASUS ROG Ally, but as I noted in my review of Starfield, the Ally version looks and runs well anyway. The battery life is poor at 55 minutes, but it’s manageable. I’d argue the mod simply isn’t needed as much for the Ally version as it is for the Deck.
How CryoUtilities factors in is interesting. In the areas where performance was passible to begin with, CryoUtilites doesn’t really add much. But in the sections with the lowest framerates, CryoUtilites used in conjunction with the mod boosts the framerate further.
In short, if you want better performance, install the Steam Deck Essentials mod. And if you want even better performance than that, install the mod and CryoUtilities.
If you want to see what it looks like in action, check out the video below from our friends at SteamDeckGaming.
All screenshots were captured on Steam Deck hardware by Wesley Copeland.

