The ASUS ROG Ally is a killer device with some killer tech. Whether you’re playing for emulation, high-end PC gaming, or you just want to kick back in bed and play some games, it’s got something for everyone.
One of the biggest complaints about the ROG Ally is that it ships with a double-edged sword in Windows 11, which, as you probably have learned, can be a tough beast to tame.
Thankfully, there are several quality-of-life improvements that make the ASUS ROG Ally a much easier device to control. If you’ve run into any minor annoyances and want to know some better alternatives, keep reading to learn all the accessibility tips I’ve found so far.
Tip 1: Wider Scroll Bars
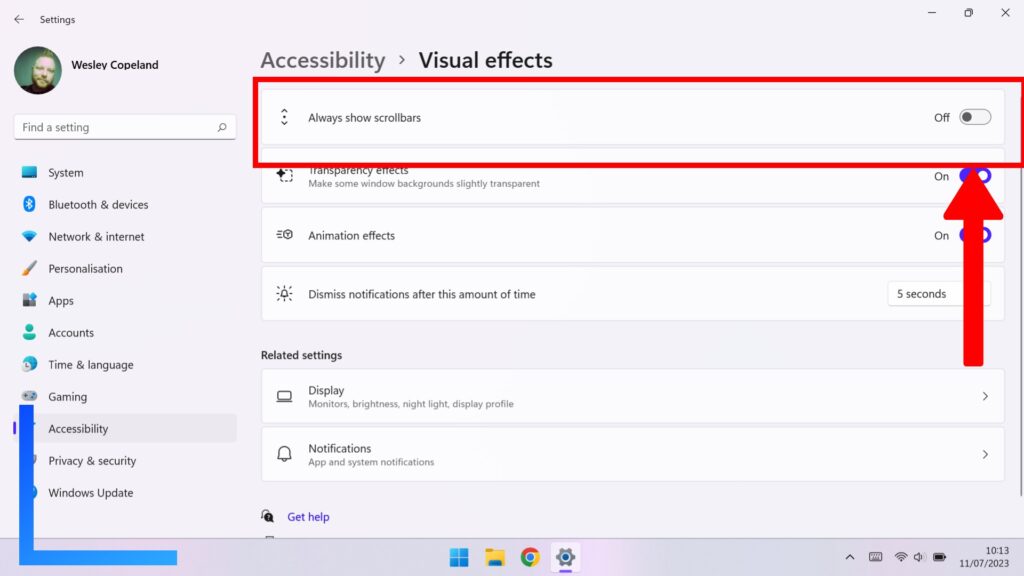
For navigating most of Windows 11 on the ROG Ally, scrollbars are fine for the most part. But the moment you install a third-party app, spotting them on the Ally’s seven-inch screen instantly becomes more effort than it should be.
One way I’ve found to solve this is to have ‘always show scrollbars’ enabled. By default, Windows will shrink them to make them thinner. If you toggle this option off, scrollbars will be thicker and much more visible.
To do this, head into Accessibility then under Visual Effects you’ll spot Always Show Scrollbars. Click on the toggle button to the right and your scrollbars will be much easier to see.
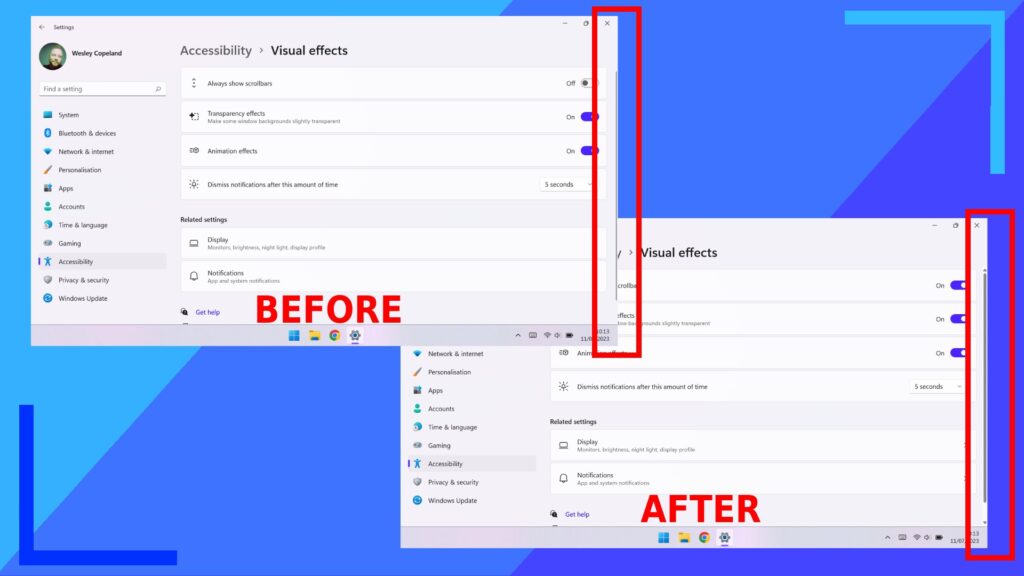
It’s clearer to see in action, but the above screenshot shows the before and after. See how much thinner it is in the left image? This is a small tip for sure but it has made my time with the ROG Ally so much smoother.
Tip 2: Stop the Taskbar from Disappearing
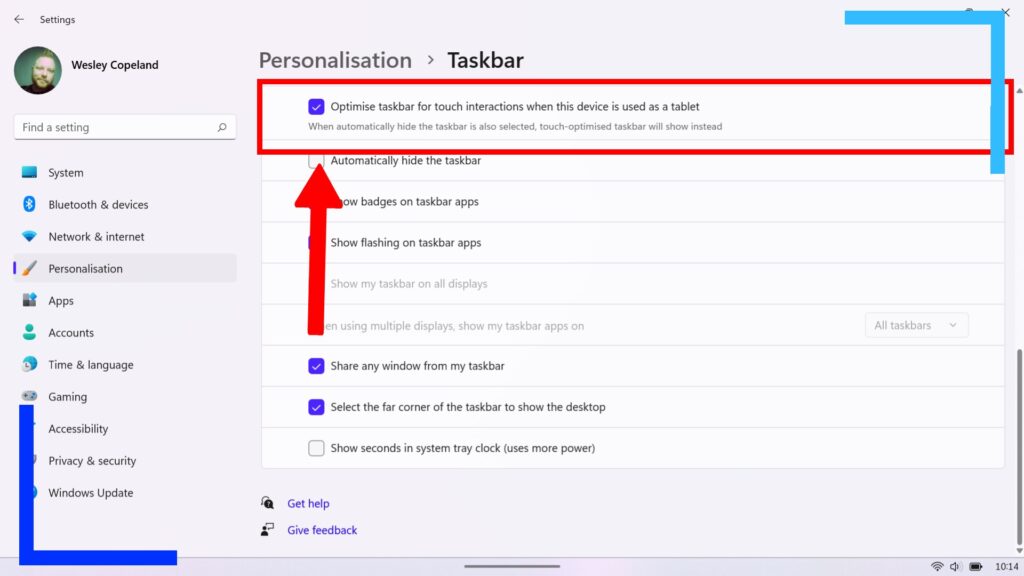
Another irritating default option sees the taskbar disappear when it’s not in use. The logic here is sound enough: You get more screen real estate. In practice, though, it just adds an extra step. One that you’ll end up activating multiple times by accident.
To fix this, open up the Settings app then head into Personalisation. Click on Taskbar then find the option named ‘Optimise taskbar for touch interactions when device is used as a tablet.’ Toggle this option to off and the taskbar will always remain on the screen unless you’re in a game or app that runs in fullscreen.
Tip 3: Add a Keyboard Icon to the System Tray
![]()
ASUS has done a solid job of getting the on-screen keyboard to appear when it’s needed. But, it’s not always 100 percent accurate, which leaves me and many other Ally users wondering how to bring it up.
One simple solution I found was to enable the touch keyboard button. This button will sit in the system tray so whenever you need it, it’s just a tap away.
Load up the Settings app, then go through Personalisation then Taskbar. Under the System Tray Icons area you should see Touch Keyboard with a drop-down box to the right. Click on the box and select Always to have the on-screen keyboard icon visible on the ROG Ally.
Tip 4: Map the On-Screen Keyboard to a Button

The default combo for manifesting the on-screen keyboard is the left back button and up on the d-pad. It’s not the most intuitive way to do things so let’s change it up a little bit as this command is especially useful when in-game and you need to bring up the keyboard but don’t want to exit the game to do so.
Go into the Armoury Crate (accessible through the button to the right of the main screen) and navigate your way to Settings then Control Mode. Although you can map it to the gamepad operating mode, I ended up whacking it on my desktop layout so I don’t access it by accident while gaming.
Once you’ve picked an operating mode click on it, then use the d-pad to move the cursor over to the button you want to map it to. I went with the right bumper as that’s harder to hit unintentionally. Now just click on the button, and from the next menu that appears go to Action. This is where all the special ASUS ROG Ally-specific options are. Inside, you’ll find Show Keyboard. Click on it once and that button will now cause the on-screen keyboard to appear.
Tip 5: Change Left and Right Click
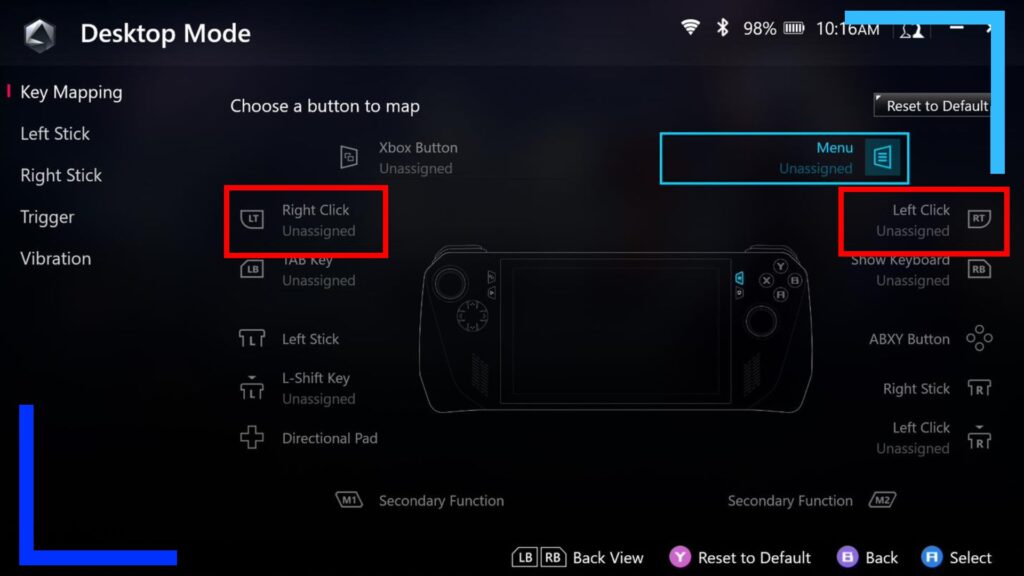
ASUS, for reasons I’m still fathoming, decided to have left-click mapped to the right bumper and right-click on the right trigger. I’m sure everyone will have their own feelings on this but for me, this doesn’t work.
Controllers, and the ROG Ally, are designed to make the triggers the main focal point of index fingers. Pulling a trigger feels natural, whereas moving that same finger to a bumper requires slightly more effort. Put simply, having the clicks of a mouse mapped to the same side and on a bumper, feels unnatural.
You can fix this issue really easily. As we did with the keyboard button above, just map right-click to the left trigger and left-click to the right trigger and the ROG Ally will instantly feel more intuitive.
Load up Armoury Crate, then head into Settings then select the desktop option from the Control Options. Click on each of the triggers, and from the menu that pops up, select the corresponding mouse buttons. It’s that simple.
Tip 6: Switch Back to Double-Click to Open Apps
This isn’t going to be for everyone, but I much prefer clicking once to select an icon, and twice to open something. It’s the Windows 10 way of doing things and for me, it makes more sense.
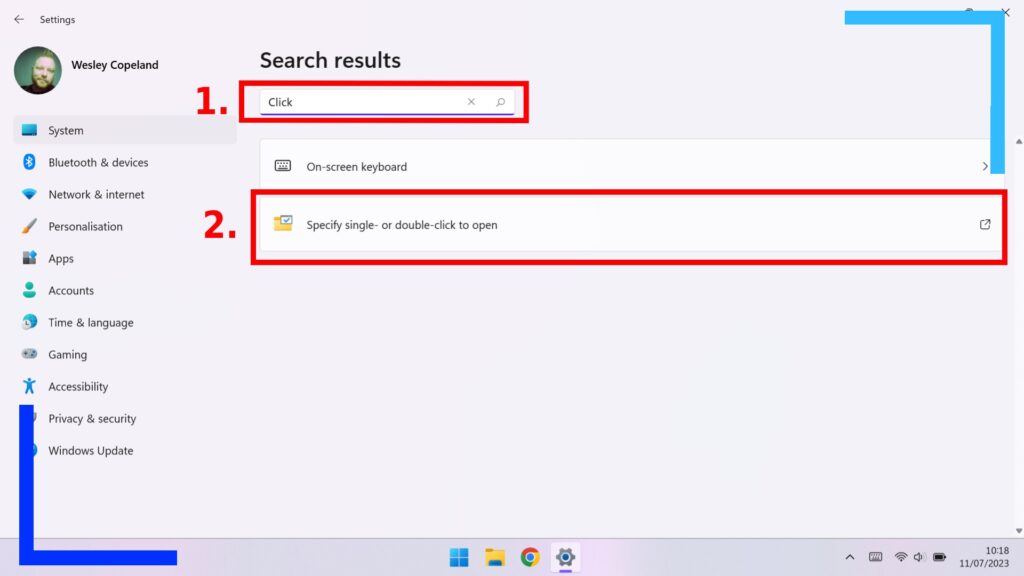
To change this up, open up the Settings app and in the search bar type ‘Click’ and hit enter. The second option in the newly-populated list will be Specify Single- or double-click to open. Click on that and a new window will materialize.
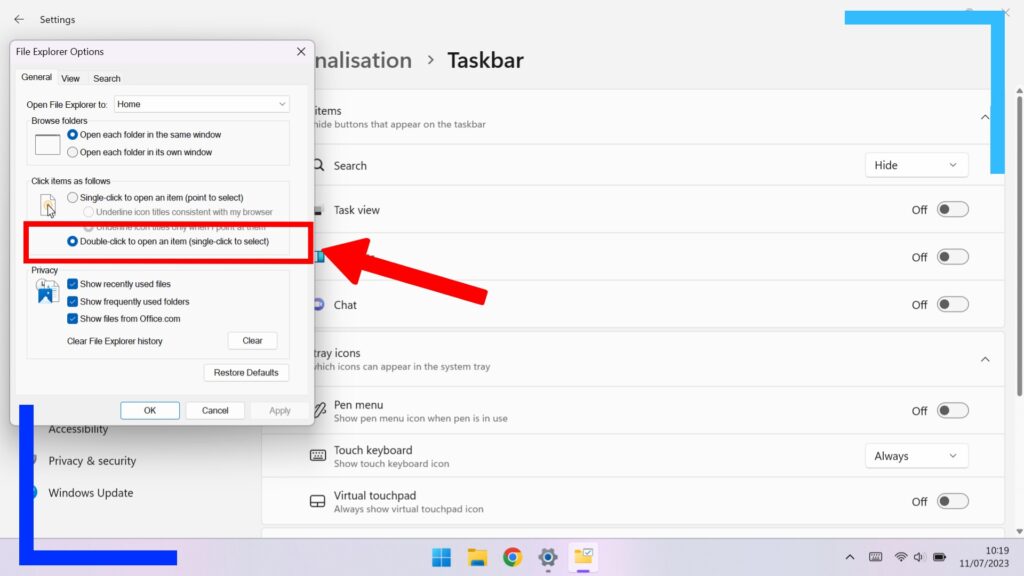
In the new window will be an option labeled ‘Double-click to open an item’. Click that, then hit OK and you’ll now need to press an icon twice to open it up.
Tip 7: Disable Windows Updates
This one is important and there’s a bit I need to dig into.
Normally I wouldn’t ever suggest disabling Windows updates. New updates can bring in new features, optimizations, and security fixes. In short, it’s imperative to keep your device updated.
What I do recommend, however, is performing updates manually. The reason being, any new system update from Windows has the potential to break something on the Ally – be it performance, features, and anything in between. That’s the nature of an operating system from a different company on a handheld.
When it comes to Windows updates, you’re best to check online – either RetroResolve or the ASUS ROG Ally Discord – to see how people are getting on with the update. If there are zero issues, by all means upgrade. But if there’s something that’s going to cause you a headache, maybe put it off until ASUS has it under control (providing the Windows update isn’t integral).
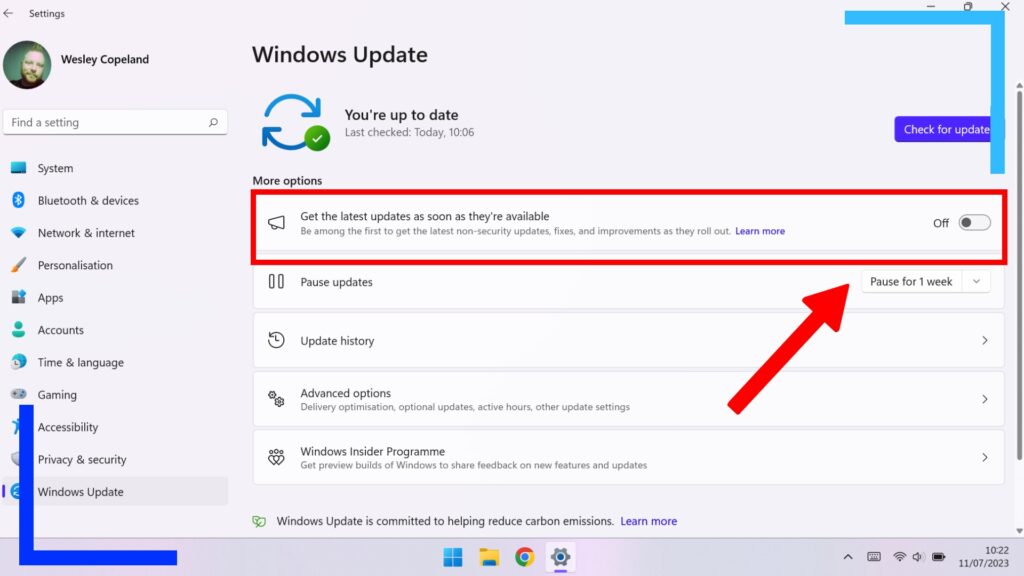
How do you disable Windows 11’s ability to auto-update? Head into the Settings app, click on Windows Update, then on the right side of the screen turn off ‘Get the latest updates as they’re available’. There’s also an option directly below this to pause updates should you wish.
All screenshots were captured on my ASUS ROG Ally.

