I’ve been emulating games for well over a decade now. There’s something fun about getting a game up and running on a system it wasn’t designed for. That, and there are loads of classics that look and play better on modern hardware like the Steam Deck.
Obviously, I was going to get to PS2 emulation. I’ve spent far too much time playing PS2 games, so of course I was going to get them running on the Steam Deck. What can I say, emulation is fun!
I’ve broken my guide into two sections below. One is for people who want some quick, bite-size info, while the other is for those who are still working out how to use Linux and need extra guidance to get PS2 games up and running on the Deck. Feel free to use whichever version works best for you and your time constraints from the menu below.
Quick Version for Advanced Users
If you know your way around a Steam Deck and don’t need an in-depth walkthrough, here’s how to get PCSX2 up and running quickly.
- Boot into Desktop Mode.
- Install PCSX2 via EmuDeck or through the Discover Store.
- Load up PCSX2 and go into Settings.
- Click on BIOS and select your PS2 BIOS.
- Add PS2 games to your PS2 folder.
- Your games should now be playable in PCSX2.
In-Depth Walkthrough
If you’re new to the Steam Deck or Linux in general and need some clear advice, with pictures, use this part of the guide to get PS2 games working on Steam Deck.
1. Boot into Desktop Mode
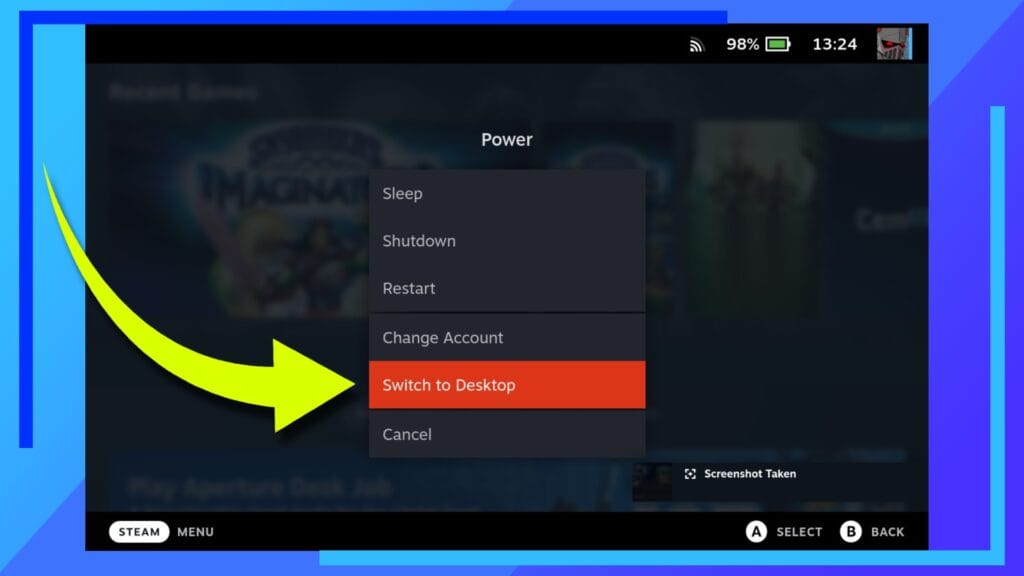
As with most Steam Deck things, we’ll be working in Desktop Mode. To enter this mode, boot up the Steam Deck as normal, then hold the Power Button until a menu appears. Click on Switch to Desktop, and after a few seconds you’ll be where you need to be.
2. Install PCSX2 via EmuDeck.

I made a full guide to install EmuDeck, but the quick version is to go to the EmuDeck website, and click on Download Installer.

Once that’s downloaded, open up the Dolphin File Explorer (the blue bag icon) and navigate to your Downloads folder. You should see a file named “EmuDeck.desktop”. Use the right trigger to click on this file twice to open it up.
Click on Execute and follow the on-screen instructions to install EmuDeck.
3. Where to Place PS2 Games

Go back into the Dolphin File Explorer and locate the PS2 ROMs folder. For me, it’s installed on my SD card, so the path is as follows:
Primary > Emulation > Roms > PS2
Once you’re inside the PS2 folder, this is where you can place your ROMs (or likely ISO files).
If you’re unsure how to transfer files to the Steam Deck, specifically files from Windows to the Steam Deck’s Linux environment, I’ve got a guide that covers how to do that through a program called Warpinator.
4. How to Install PS2 BIOS Files

I can’t tell you where to get PS2 BIOS files for legal reasons. So let’s assume you already have one ready to use.
Click on the start menu (the blue and white icon in the bottom-left of the screen), then go into All Applications, scroll to P, and click on PCSX2 with the right trigger.
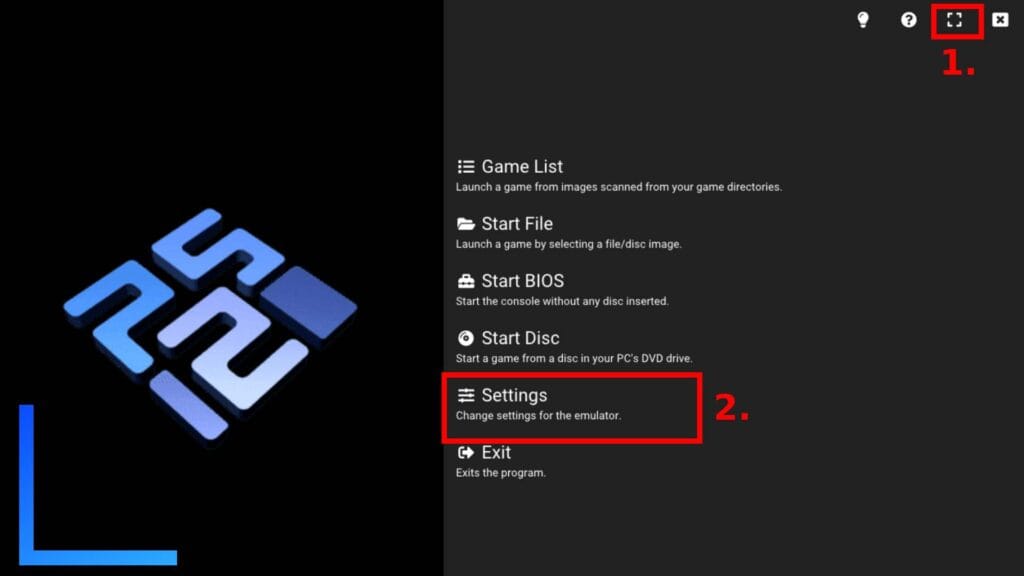
PCSX2 will now open up in fullscreen mode. To make life easier, click on the fullscreen icon shown above to bring up the windowed version of PCSX2, then click on Settings.
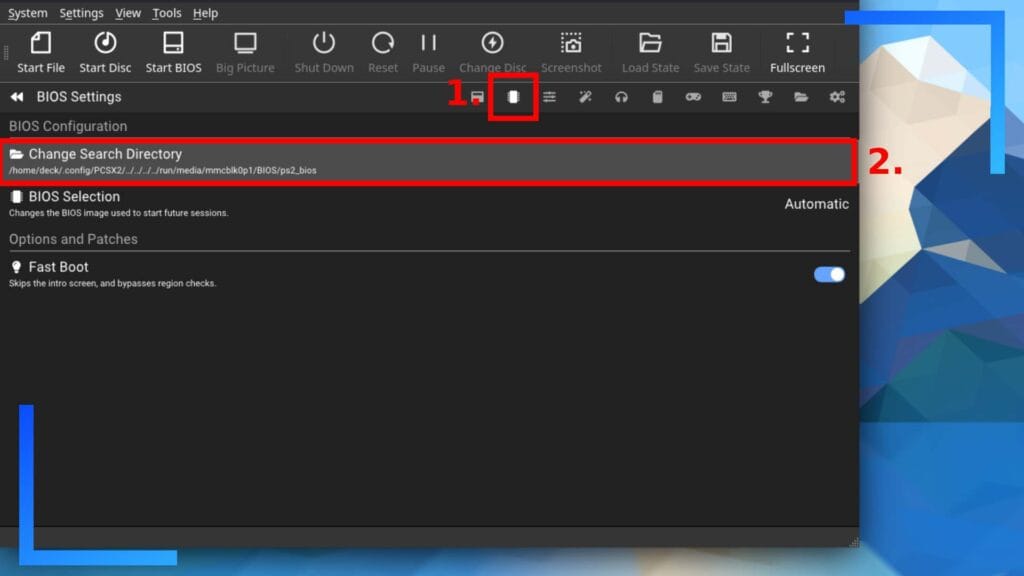
Click on the Processor Icon to bring up a selection of settings. Now click on Change Search Directory. Click on that and you’ll be asked to point to where you keep your BIOS file or files.
The path to my BIOS files is as follows:
/ > Run > Media > Mmcblk0p1 > Bios > PS2_Bios
Hit Open when you’re in your BIOS folder and PCSX2 will add all the files inside to the main emulator.
5. How to Create a PS2 Memory Card in PCSX2
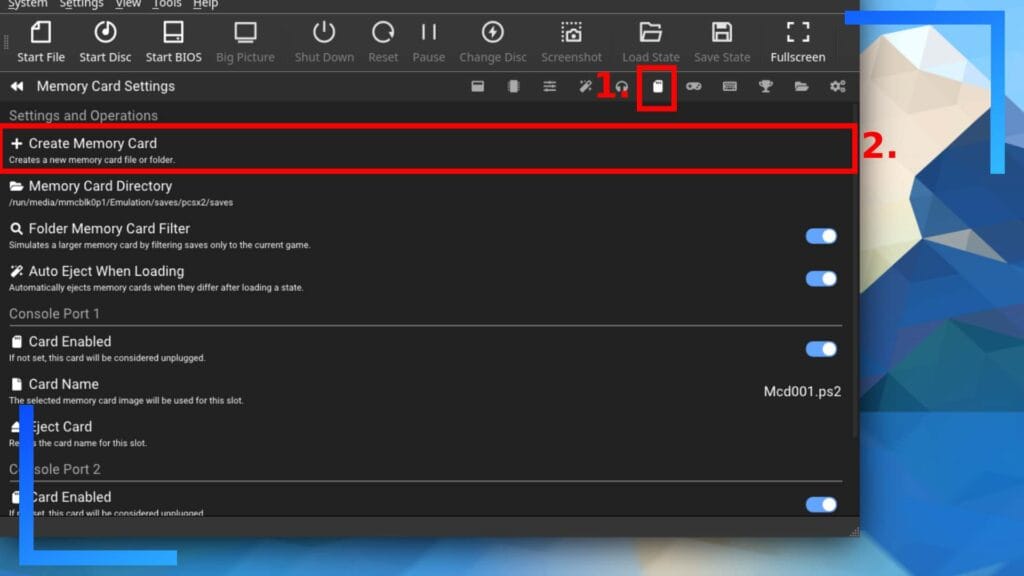
PCSX2 has a save state function but it’s rubbish. Whenever you update PCSX2 via the online updater, there’s a chance your save states will become incompatible. That’s why you need to set up a PS2 memory card as this bypasses that problem.
To do this, head into Settings and click on the SD Icon shown above. One of the options in the storage settings will be Create Memory Card. You guessed it, click on that.

Give your memory card a name in the top box, then select how much space you want to devote to the card. I went with 8 MB as this is the most compatible. Should you run out of space, you can create a new memory card and switch the old one out for the new one in the PCSX2 settings. It’s just like the actual PS2 experience in that regard, only virtual.
When you’re done, hit Create and that’s the PS2 memory card set up in PCSX2.
6. How to Format the Memory Card in PCSX2
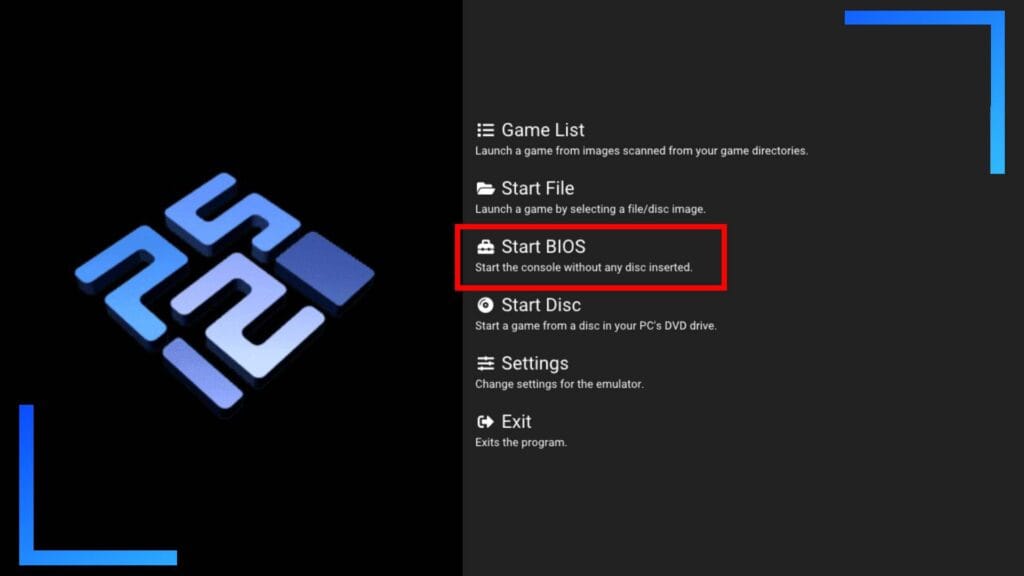
This is important: Close down PCSX2 and boot back into the main Gaming Mode. The reason for this is PCSX2 in Desktop Mode treats the Steam Deck as a PC, so when you boot into the BIOS, you won’t be able to control it properly.
Once the Steam Deck reloads and you’re looking at your game collection on the home screen, head into your Library, then non-Steam Games, and find and open PCSX2. Once it loads, use the D-pad to scroll to Start BIOS and click the A button to open it.

Once you’ve basked in the glow of PS2 nostalgia (we all do), press the Steam Deck’s A button on Browser.
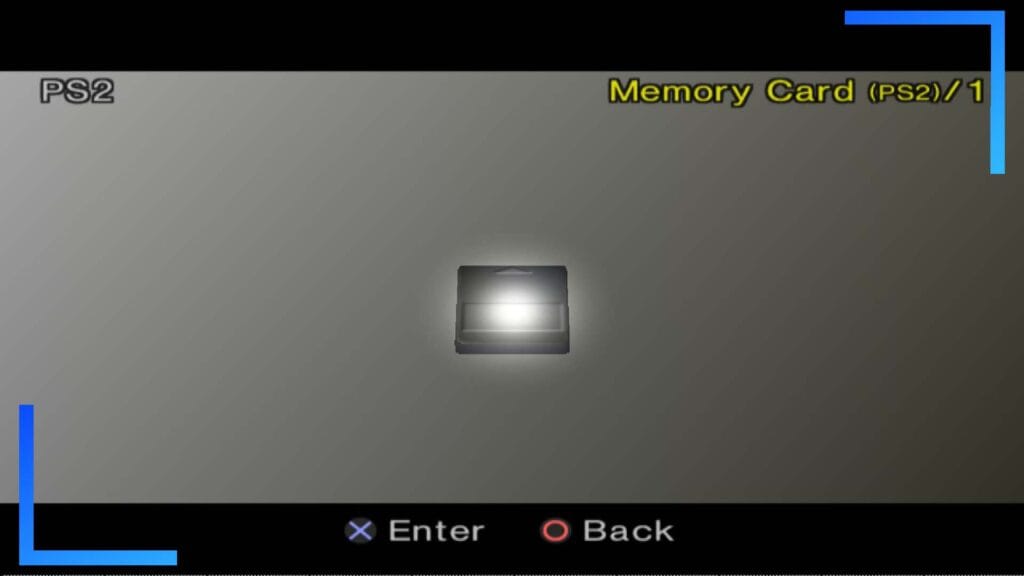
Click on the memory card as shown above and follow the on-screen instructions to format the memory card. Now whenever you boot up a PS2 game, the game will use this memory card as its place to store save game files. To save to the card, use it exactly like you would a real PS2 memory card (normally there’s an option in-game you’ll need to click to manually save).
7. How to Configure PCSX2 on Steam Deck

Now let’s get into the fun stuff about see about making those games look their best. If you’re still on the memory card screen, press the Steam button and close PCSX2. Now open PCSX2 back up.
Head into Settings and click on the wand icon shown above. Although EmuDeck should have pre-configured this, it’s worth double-checking what matters: Your renderer should be set to Vulkan and the aspect ratio to whatever you prefer. I’m a fan of 16:9 widescreen, but you may want it as 4:3. It’s up to you.
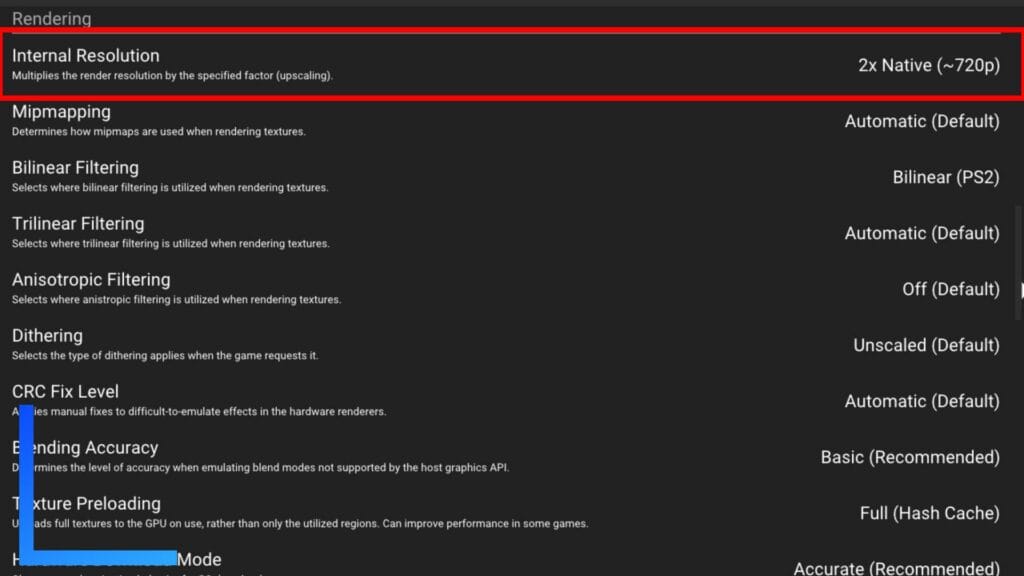
Once that’s done, scroll down slightly. Just a quick heads up, you may need to hold the Steam button in then use the right touchpad to bring up the mouse to let you scroll.
Under Internal Resolution, set this to 2x Native 720p if you’re playing in handheld mode. The Steam Deck’s resolution is capped at 720p, so going higher than this while in handheld mode isn’t worth it. If you’ve got your Steam Deck set up to play on the TV, however, that’s when you’d need to change the resolution.
Note: If you are using PCSX2 on a TV, it may be worth checking to see whether the resolution bump is worth it over using the Deck’s in-built FSR.
Useful Hotkey Commands
Hotkeys make life a lot easier. Press two buttons, something happens. Simple stuff. Plus knowing them also means you won’t accidentally hit a combo and screw your game up as well.
Below you’ll find the button presses worth knowing about. I will point this out now, though, I’ll also be referring to the picture and three lines buttons as Back and Start (back is on the left of the screen, start is on the right), because it’s much, much easier to understand.
- Back and Start – closes the game
- Back and R1 – creates a save state
- Back and the tight trigger – fast-forward
- Back and up on the D-pad – increases image scaling (sharper image)
- Back and down on the D-pad – decreases image scaling
- Hold the Steam button and click the right trigger twice – enable/disable fullscreen
All images captured on Steam Deck hardware by Wesley Copeland.