On PC, you plug in a hard drive and within a few seconds, it’ll be usable. Windows is great like that.
The Steam Deck, though? Nothing is ever simple. To get a hard drive working, and set up so the Steam Deck boots it each time you reload, it takes a few tweaks in Desktop Mode to get everything running smoothly.
One word of warning, this isn’t a straightforward task like resetting the Steam Deck. You’ll need to follow what we say to the T to get things working. That said, while inputting code in Linux can sound taxing, it’s not anywhere near as stressful as it sounds. If I can do it, you can too.
Also, make sure you’ve got a USB keyboard. There’s a point in the guide where you need to use a keyboard combo and that isn’t possible with the on-screen keyboard.
Set an Admin Password
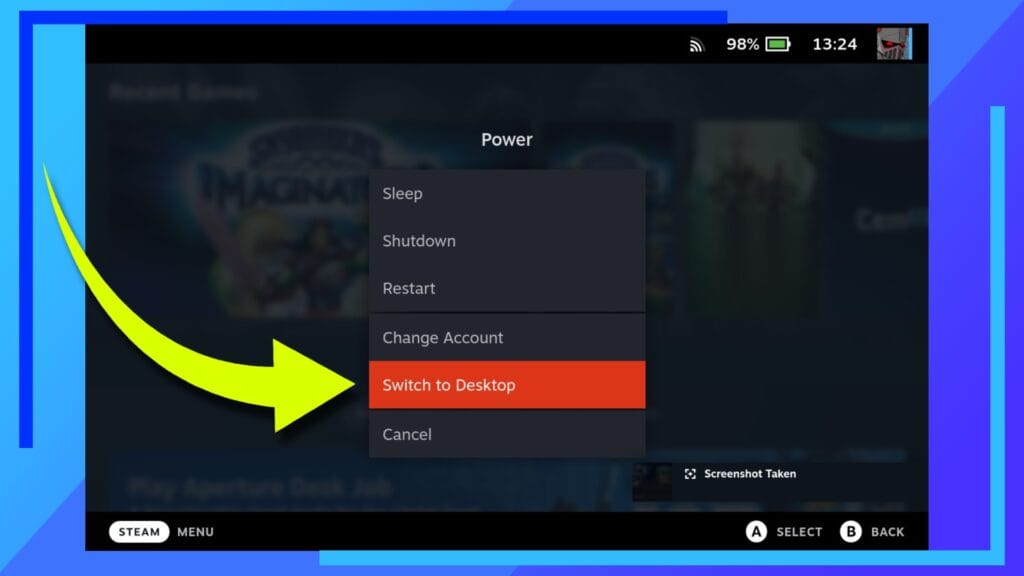
Step 1: Boot to Desktop Mode
The first thing we’re going to want to do is set up an admin password. We’ll need this later on, so it’s best to get it out of the way before we move on.
Begin by booting into Desktop Mode. To do this, hold down the power button and when the menu pops, select Switch to Desktop mode.
Step 2: Load this Guide on Steam Deck (Optional)
This step is optional but it’ll save you a lot of time. If you’re reading this guide to set up an external hard drive on the Steam Deck on a mobile device or PC, bookmark it and load it up on the Deck itself through a web browser (I use Chrome on the Deck but Firefox will also do).
The reason being, it’s much easier to highlight any code we’ll be using and then use left-click to select Copy. When you then need to enter a string of code later, you can left-click again and select Paste to drop in the previously copied code into place. It saves you from needing to type it all out yourself, in other words.
Step 3: Open Konsole
Once Desktop Mode has loaded, enter the start menu from the bottom-left corner of the screen and find the application named Konsole.
You can use an external keyboard hooked up via USB or the Steam virtual keyboard that’s accessed by pressing the Steam button and X simultaneously.
Step 4: Enter Code
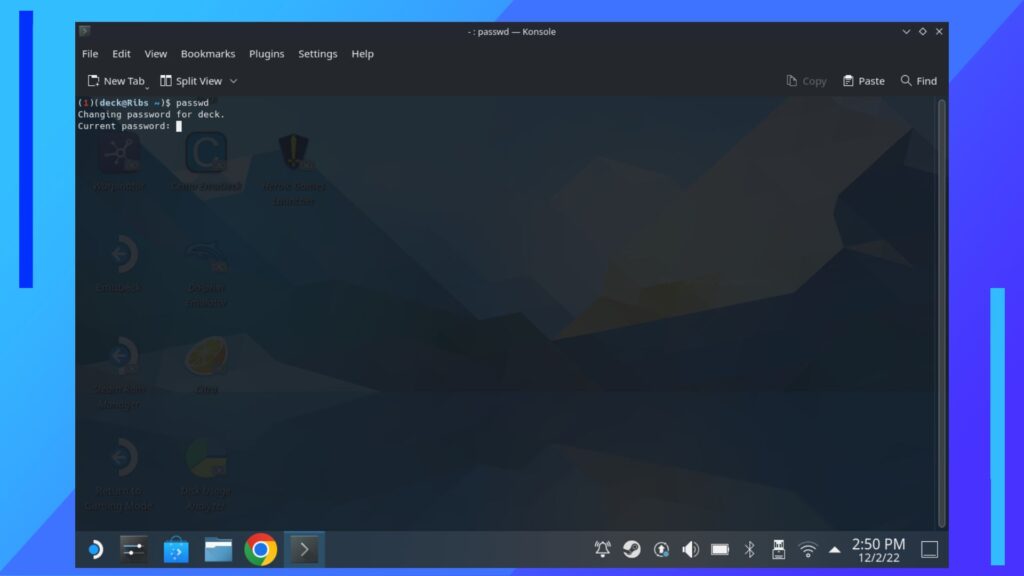
With Konsole open, type in the code below and hit enter. Note: This doesn’t say “password,” it says “passwd.”
- passwd
Once the text is entered, hit enter or the right trigger on the Deck to launch the code. You’ll now be asked for a password. Enter it, hit enter, type it once again to confirm they match, then hit enter.
That’s it. Your admin password will now be set.
Formatting a Hard Drive for Use on Steam Deck
In this next part, we’ll be formatting a hard drive for usage on the Steam Deck. It’s important to think about how you want your hard drive to work. Do you want it as an external drive for the Steam Deck to store more content? Are you installing Windows on it? Are you splitting it to have half for Windows and half for the Steam Deck? There are a few options!
If you’re installing Windows, there’s no need to actually mount the drive on Steam Deck as you access Windows through the boot menu rather than through Steam. If you’re splitting it 50/50, however, you’ll need to partition the drive accordingly.
I had my SSD set up as half for Windows, half for Steam Deck storage. I did this first by installing Windows (outlined in the link above) onto the storage drive, then with the drive hooked up to a Windows PC, I used disk manager to shrink the volume to 50 percent and then formatted the other 50 percent to NTFS so I could use it on the Deck..
Step 1: Load Up KDE Partition Manager
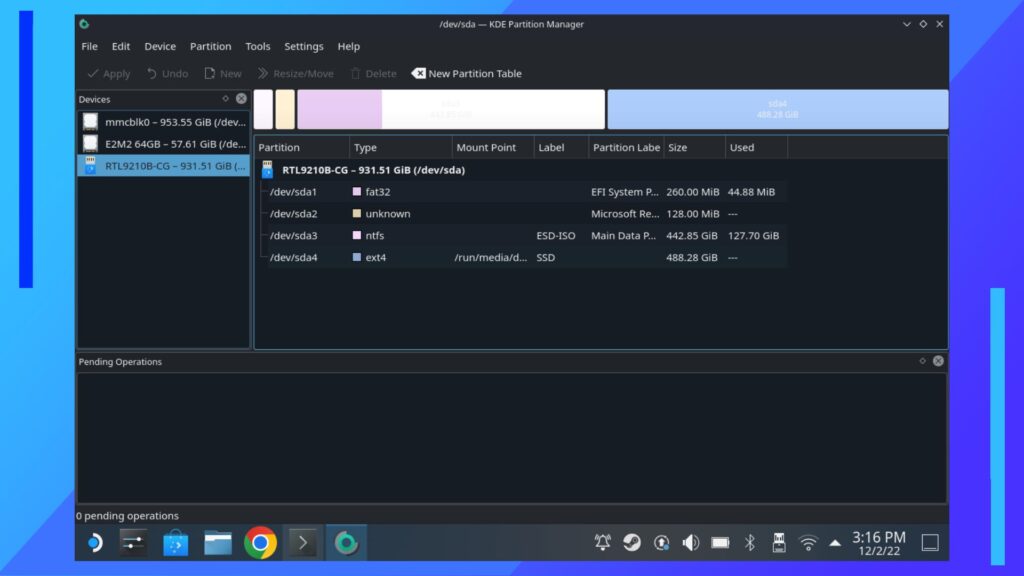
While in Desktop Mode, open the start menu and locate KDE Partition Manager. Boot this up, and because you set a password earlier, you’ll be asked to enter it. Do so now.
Step 2: Understanding KDE Partition Manager
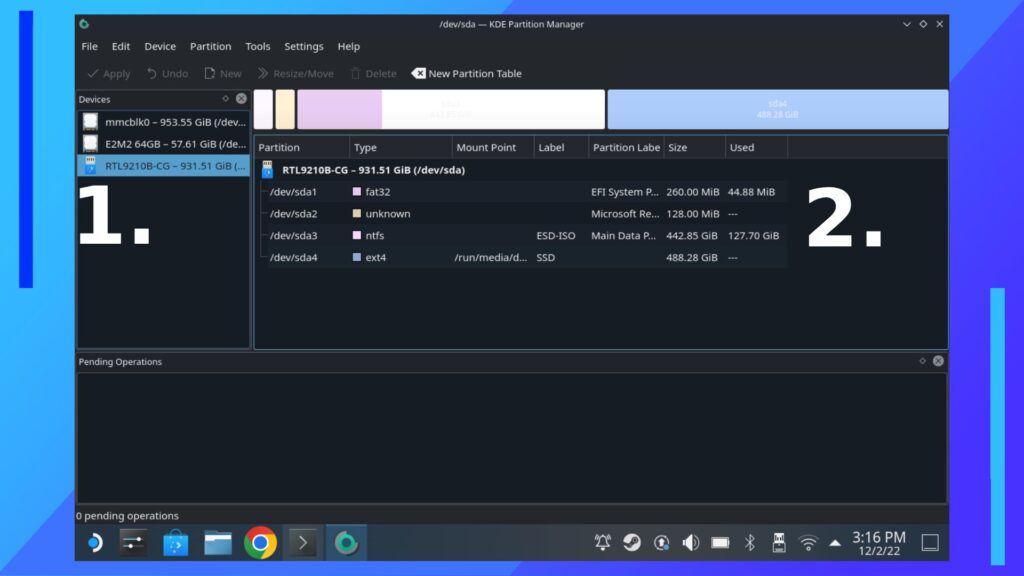
Once KDE Partition Manager loads you’ll be faced with a few options. In the left column are all the different storage devices hooked up. For me, it shows my internal 64GB storage, my SD card, and my external hard drive. This will be different depending on how many storage options you’ve got hooked up, so don’t worry if it looks a little different.
What you’re looking for is the drive that corresponds to the same storage amount as the hard drive you have plugged in. Once you’ve found that, click on it and move on.
- List of available storage options currently connected
- List of available partitions on the selected storage device
Step 3: Starting the Format Process
Depending on what you’ve done with the hard drive so far means the section of the screen on the right will look different.
It should say either “unallocated” or show a file type like NTFS exFAT, or Fat32. Again, it doesn’t need to be identical as we’ll be formatting it in a moment anyway.
If you see a file type, click on the drive to select it, then hit delete (located towards the upper part of the window). If you’re using the drive 50/50, you want to delete the NTFS partition we set up earlier.
The drive should now read as unallocated. That’s good. That’s what we want.
Step 4: Finish Formatting and Create a Label
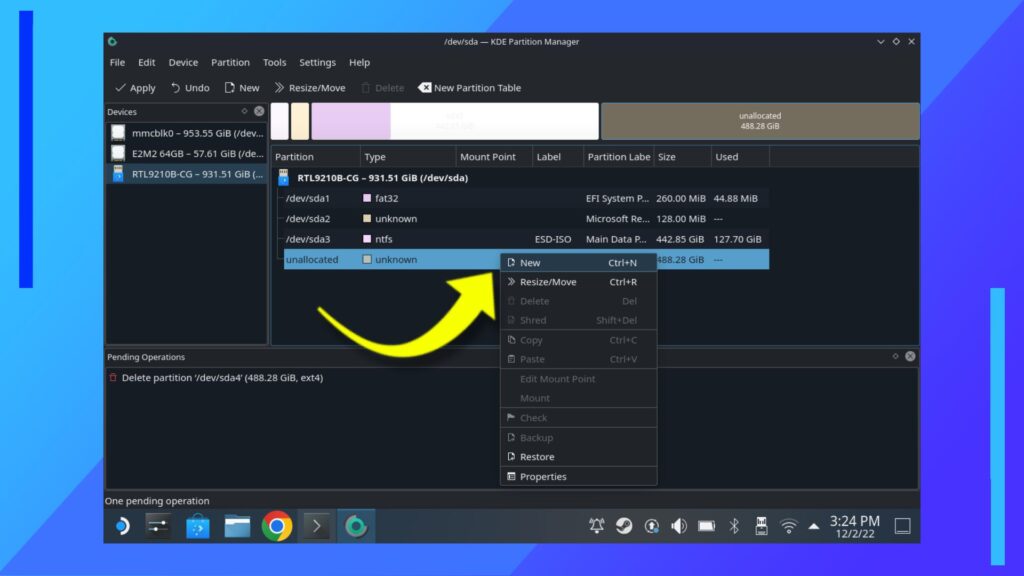
Left-click on the unallocated drive and select new. This will bring up a menu where we can use the drop-down box to change the File System Type to ex4. You can also set a label here as well to make the drive name easier to remember. I named mine “SSD” just so it’s easier to type in later.
I do definitely recommend making a label because, like most things, it’ll save you a headache later down the guide.
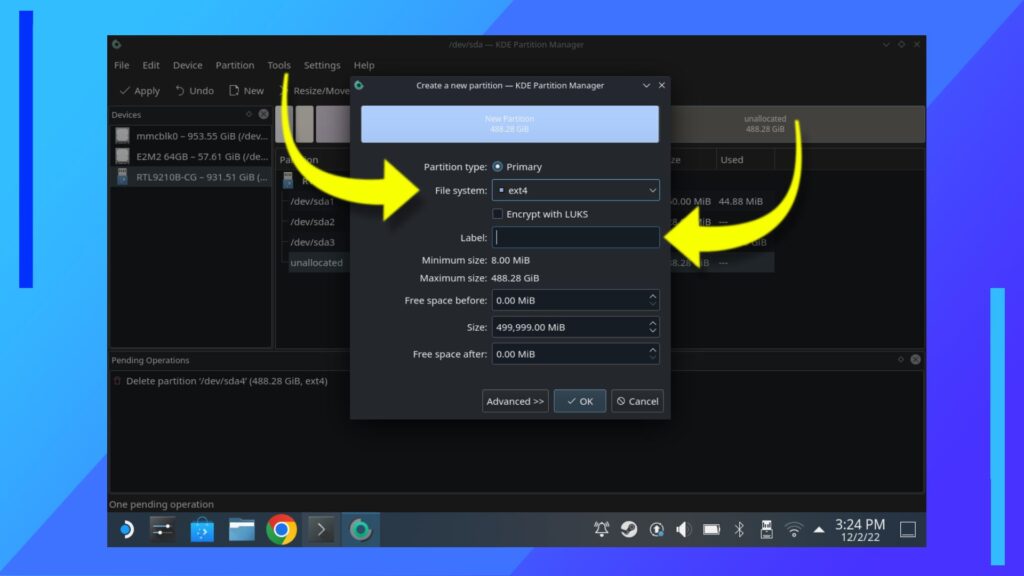
Once that’s all done, hit OK, then in the top-left corner hit Apply and KDE Partition Manager will format and set up the hard drive for use in Steam.
Mount the Hard Drive
![]()
Now the hard drive can communicate with SteamOS, we can go ahead and mount it.
To mount the hard drive, look to the system tray in the bottom right corner of the taskbar (the taskbar is the big dark bar that runs along the bottom of the screen). You should see a USB thumb drive icon. Click that and it’ll bring up a list of connected storage devices.
If you gave the external hard drive a label, that will be displayed here.
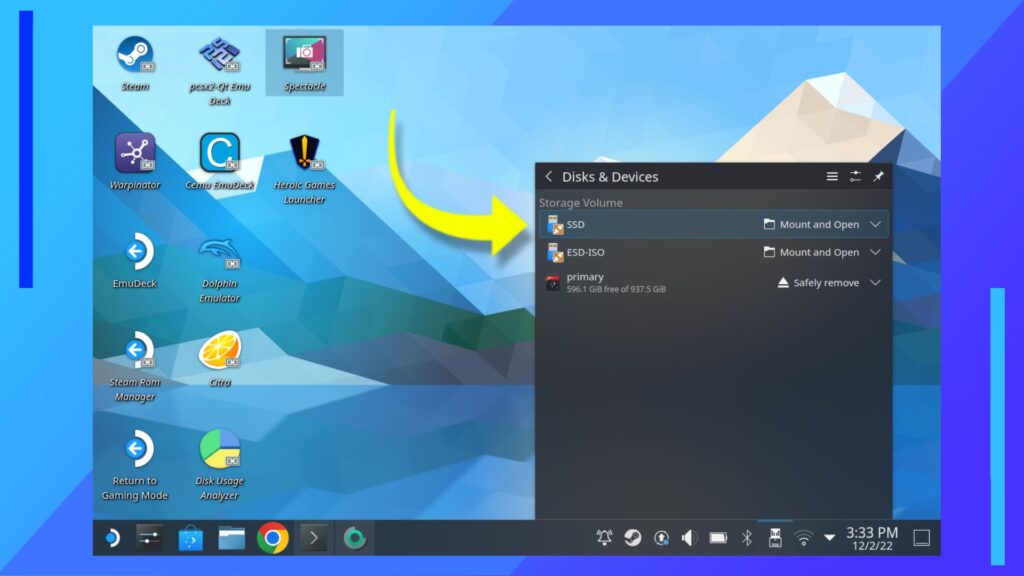
Find your drive then click on Mount and Open. This will open the drive in the Dolphin file explorer and mount it for use in SteamOS.
Change Permissions from Root to Deck
Next comes the complex part. Strap in, and read every line of code twice.
Code needs to be exactly as it is laid out. That means no “Sudo” only “sudo.” You also need to take note of where spaces sit. This will be fine for those of you copying and pasting, but when you need to add in your own IDs in step two, be sure to note the space after the code.
It goes: CodeSPACEYourID (this will make more sense shortly).
Step 1: Grab Your Device Name
Head back to Konsole and input the line of text below and hit enter.
- cd /run/media/deck/
Now enter the next line of code.
- ls
Note: This is an “L” and an “S” in lowercase. It’s not “is” or any variation of it.
Konsole should now show the name of your storage. Make a note of it as we’ll need it.
Step 2: Change Permissions
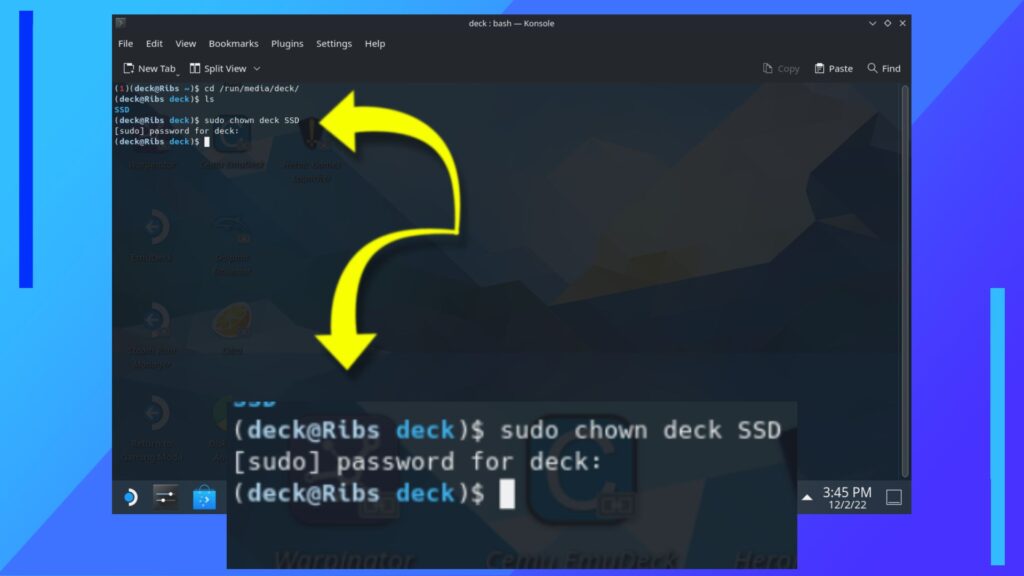
Enter the next line of code into Konsole and hit enter.
- sudo chown deck [the name from the “ls” code or your UUID goes here]
In the example above, for me, it’d be “sudo chown deck SSD” without quotation marks.
If you didn’t set a label, you’re going to need your Universally Unique Identifier (UUID) number. To find this, go back into KDE Partition Manager and left-click on the external storage. Hit Properties, then within the data that’s shown should be a section titled UUID. That long number next to it is your UUID, and yes, it can be left-clicked and copied.
Once you’ve entered this code, you’ll be asked to enter your password. Enter it and you’re done for this step.
What we just did was change who owns the external hard drive. Before, it belonged to root. Now it belongs to the Steam Deck. This means the Steam Deck is now allowed to write and read files to the hard drive.
To make sure this code has worked, open the hard drive in the Dolphin File Explorer. Left-click the drive and select Properties. Click on the Permissions tab and under Ownership it should say User: deck (as opposed to User: root).
If it doesn’t, rerun the code above again.
Automatically Mount the Drive When Steam Starts
We’re nearly done. If you made it this far, you’re a legend. Be sure to give yourself a pat on the back. Seriously.
We now need to set up a string of code so whenever you turn the Steam Deck on, the hard drive automatically mounts itself for use in Gaming Mode and Desktop Mode. Otherwise, when you power down, you’ll need to go into Desktop Mode each time you reload and click the thumb drive icon to mount it and no one wants that.
We’ll also be setting up a line of code we got from SteamDeckHQ so when we disconnect the hard drive for whatever reason, the Steam Deck doesn’t freak out and stop anything at all from booting.
I’ve used the code we’ll be using already, so if it sounds scary, it’s not. Believe me, I’d be screaming if anything bad had happened to my Steam Deck.
Step 1: Enter the Fstab Menu
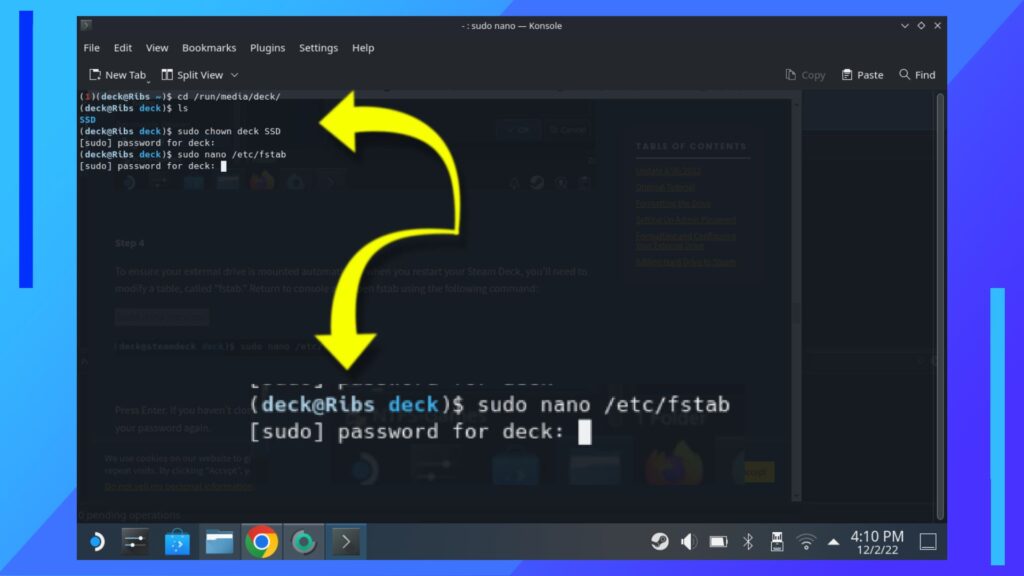
Back in Konsole again, add the following line of code:
- sudo nano /etc/fstab
Hit enter and when asked for your password, pop it in and hit enter again.
You’ll be transported to a new menu with a fairly large amount of code. Thankfully, you can ignore most of it.
Use the directional pad on the Steam Deck to move the white rectangle to the first empty line below all the code that’s now on-screen.
Step 2: Input the Code and Your Deck’s Details
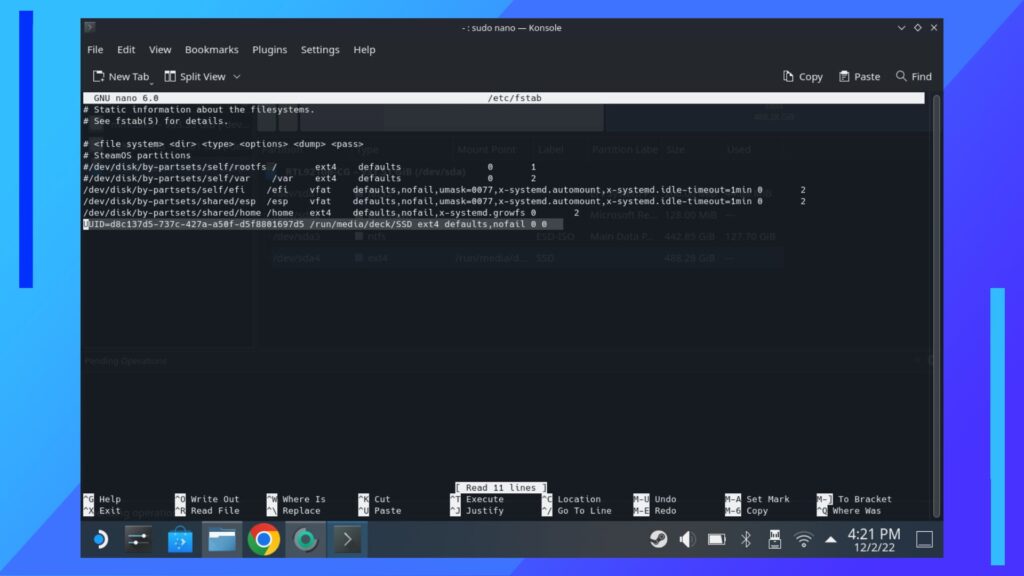
For this next, you’ll need to combine the Linux code with your details. The line of code we’ll be working with is below:
- UUID=[your full UUID] /run/media/deck/[your label or mount point] ext4 defaults,nofail 0 0
So, let’s build some code. Grab your UUID as we did earlier by left-clicking in KDE Partition Manager and selecting Properties. If you’re using the copy-and-paste method, it’s worth opening up the program KWrite to build the full code in there, then copy it across to Konsole when you’re done.
Once you’ve got your UUID, it should be placed directly next to the equals sign, with a space at the far end between the final slash (/) leading into run.
If you named your hard drive like how I named mine “SSD.” Type that name directly next to the end of “/deck/”.
If you didn’t name it, you’ll need your mount point. To find this, Go back into Dolphin and left-click the hard drive and hit Properties. In the first panel, look for the mount point. Whatever it after “/deck/” is what you need to add to the line of code.
Here’s an example image of what mine looks like.

Enter your code and when you’re sure you’ve entered it correctly, hook up a USB keyboard if you haven’t already and hit CTRL and S to save the code. You won’t get an on-screen pop-up saying you saved, so feel free to do the gamer thing and hit it a few times just to be safe.
When you’re done, hit CTRL and X to exit Konsole completely.
Once that’s complete, you’re free from all the complex parts. Well done!
Add the Hard Drive to Steam
Now all that’s left to do is add the hard drive as a removable storage device directly to Steam. This part is going to feel like a huge relief after the last part.
Step 1: Steam Settings
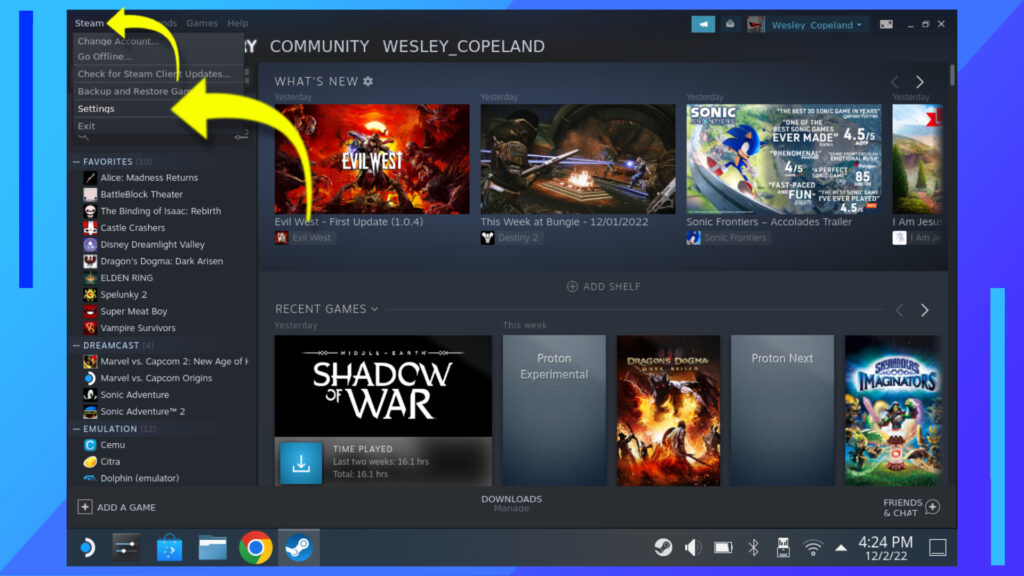
Open up Steam. In the top-left corner, click on Steam. Easy, right? Now click Settings.
Step 2: Enter the Steam Library Folders Area
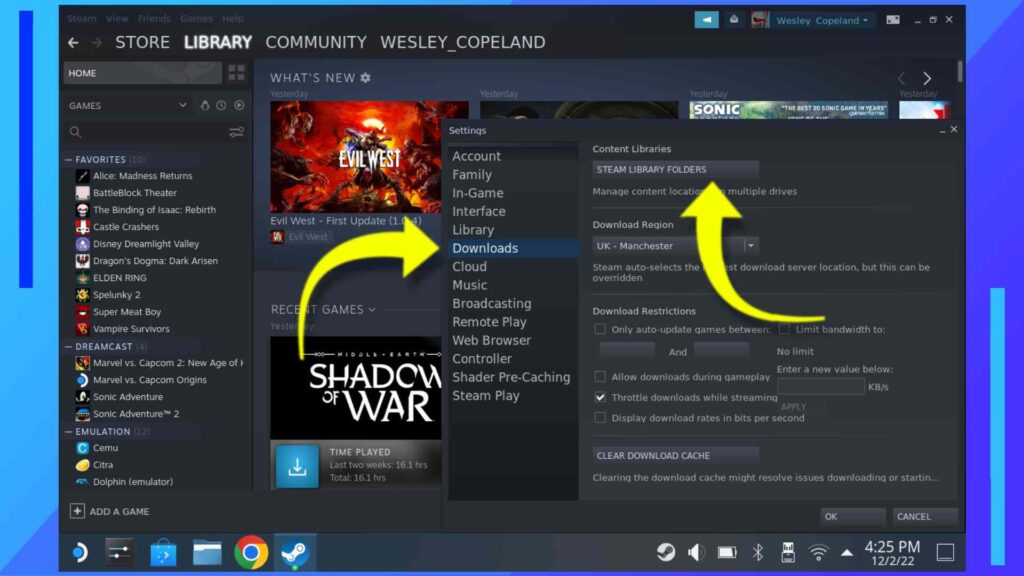
From the menu that appears, click on Downloads, then click on Steam Library Folders.
Step 3: Add the Hard Drive
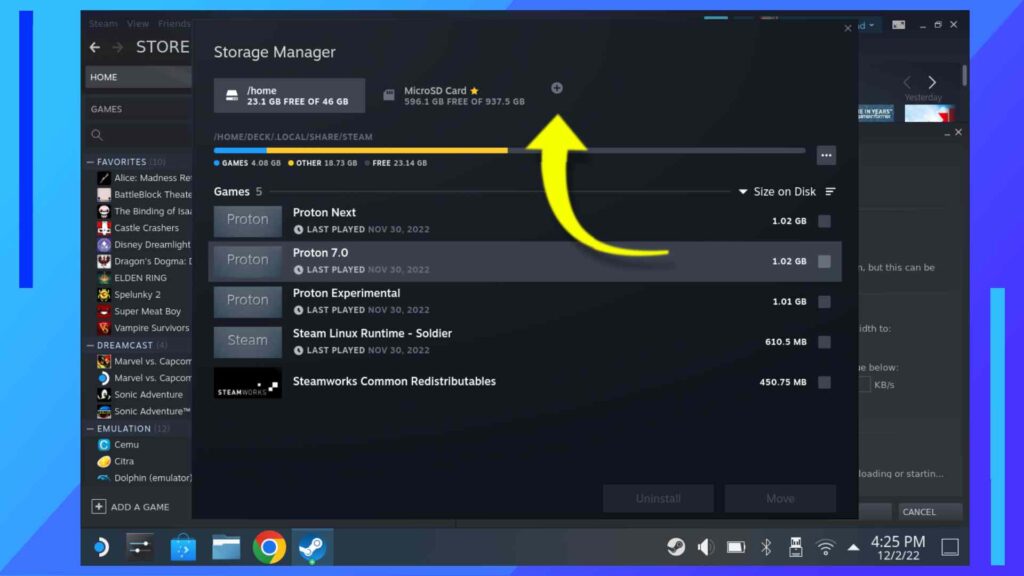
See that little plus (+) icon? Click that and the Steam Deck should ask if you want to add your new hard drive to Steam. Click Okay and you’re completely finished with this guide.
Test to Make Sure Everything Is Working
Yes, you’re done, but let’s just make sure everything is working as it should, shall we?
First, try powering down the Steam Deck then turn it back on. If the hard drive shows up in Gaming Mode. Everything’s going right so far.
Next, power back down and remove the hard drive. Power back up and if it boots normally, it’s all good.
That’s it. If you pass both of these recommendations you’re free and never have to mess with Linux code again. Or, well, until the next time you decide to tinker with the Deck.
Troubleshooting
If something isn’t working, chances are it’ll be a problem with how the code has been entered. As I say, I’ve done this myself and it all works. But what I found was the slightest mistake throws everything off. Linux is fun like that.
Chances are, it’ll be something simple like a letter is uppercase when it needs to be lowercase or there’s a space missing somewhere. Your best bet is to head back to the step that isn’t working and reread the Linux code a few times. Eventually, it’ll naturally click what’s wrong.
I say, speaking from very real experience of typing something in uppercase and wondering why it wasn’t working. Ahem.
Which External Hard Drives Work on Steam Deck?
Most hard drives should be compatible with the Steam Deck. Including M.2 SSDs, which is what I used.
The biggest factor you need to consider is how you’re going to hook everything up. A USB converter will do the job but that’s only one port you’ve got to play with. That’s why I recommend using a dock of some description so you can hook up multiple devices at once (I used the JSAUX M.2 dock).
The only thing to keep in mind, JSAUX recently spoke about how most of the power from the charger goes to the Steam Deck, so if you’re using an SSD, chances are you’ll need a slightly more powerful charger to get the most out of it.

