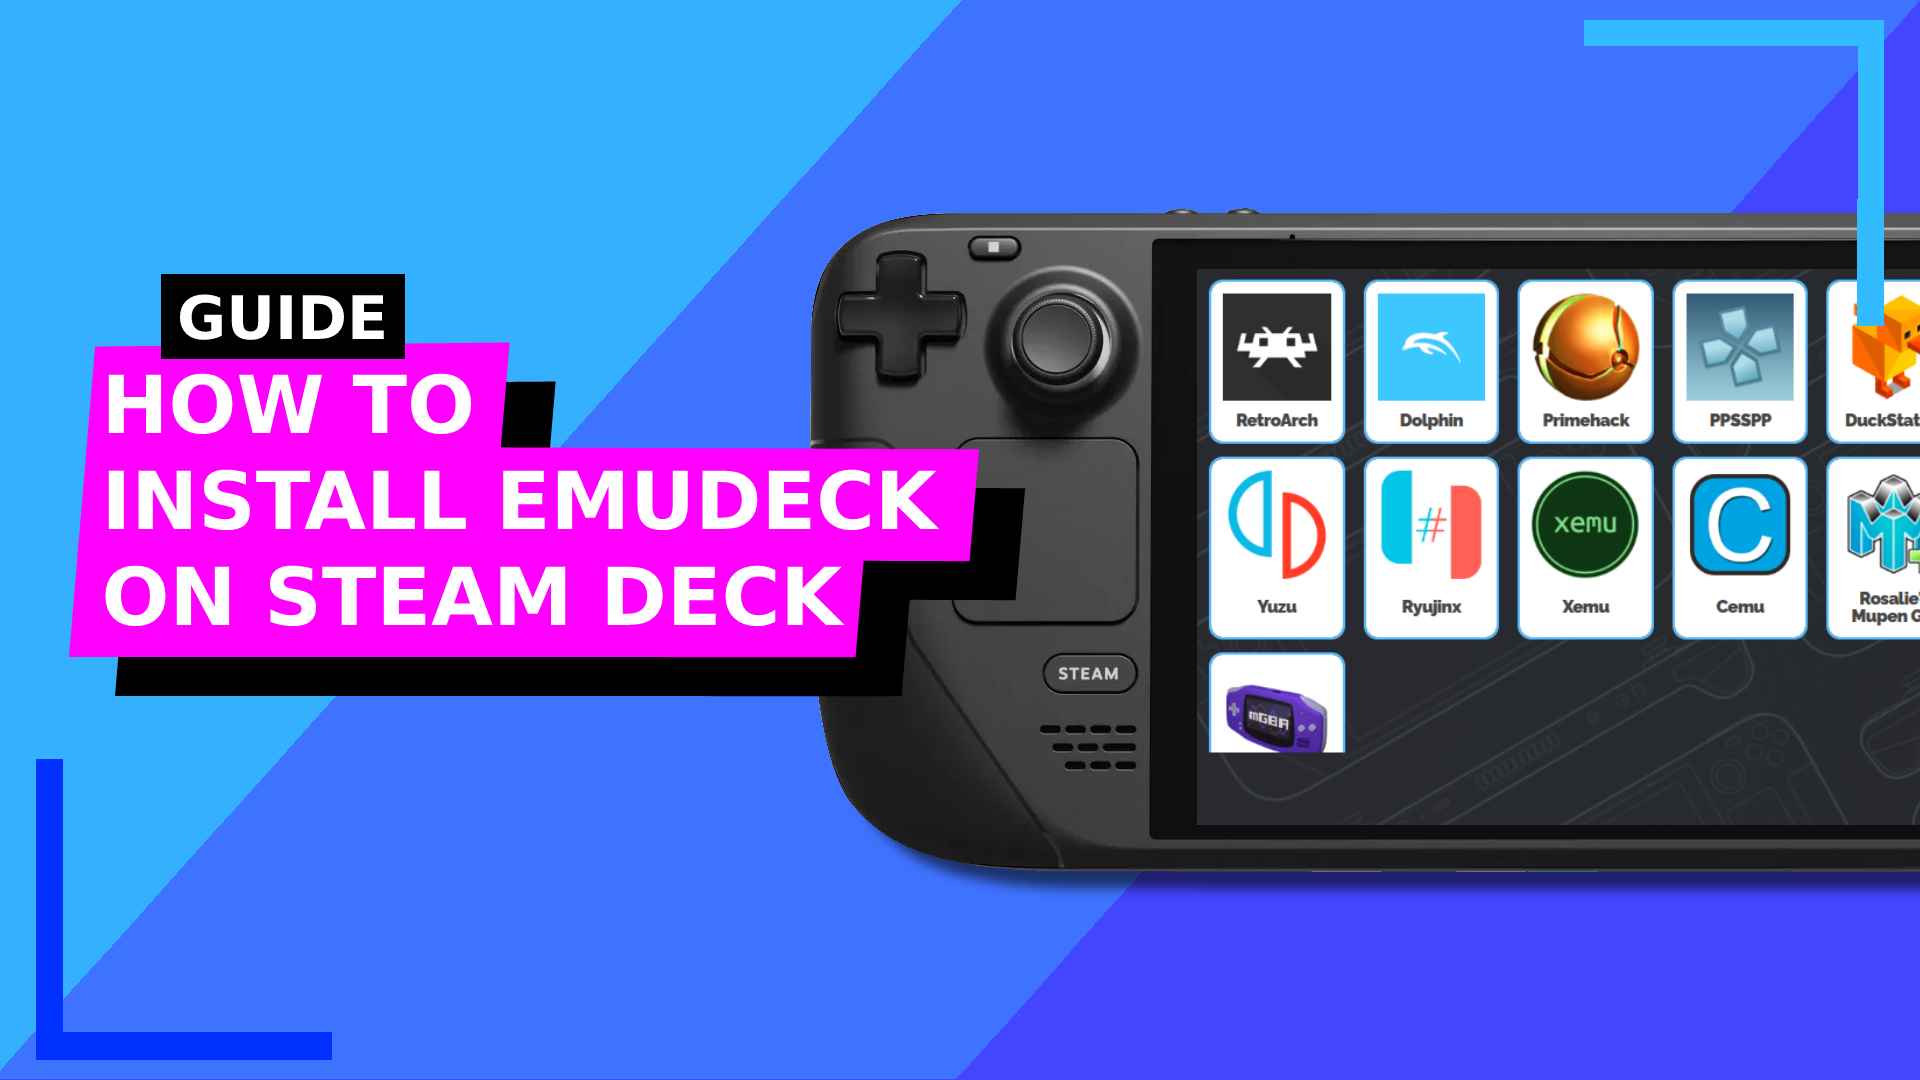
I thought with the release of a new version of EmuDeck, it’s time I went back to this guide and updated it will all the latest info.
Below you’ll find all the info you need to install EmuDeck on Steam Deck, complete with pictures to guide you through every step. And yes, it’s very beginner-friendly.
Step 1: Boot into Desktop Mode
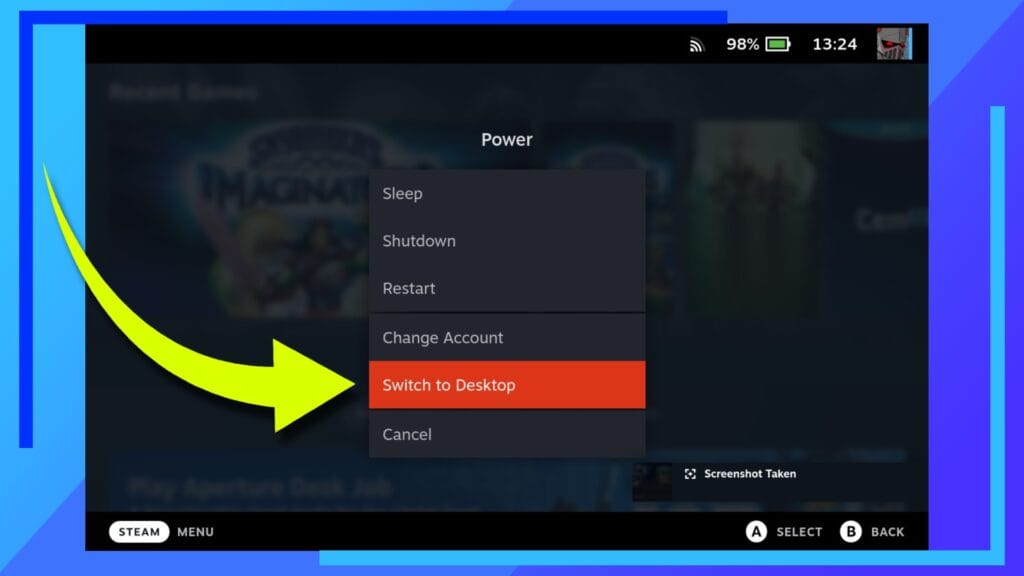
Let’s start this one off as most of my guides do: Boot into Desktop Mode.
To do this, load up the Steam Deck as usual, when it’s on the main home screen – known as Gaming Mode – hold down the Power Button until the menu above pops up. From here, click with the right trigger or with your finger on Switch to Desktop.
After a few seconds the Steam Deck will boot into the Desktop Mode.
Step 2: Download the EmuDeck Installer
Next we need to download the main EmuDeck installer. It’s a simple process but you’re going to need a web browser installed. If you don’t have one yet, grab Chrome or Firefox from the Discover Store (the blue shopping bag icon). I used Chrome for this guide and it’s much, much easier than downloading the file on a PC and transferring it over.
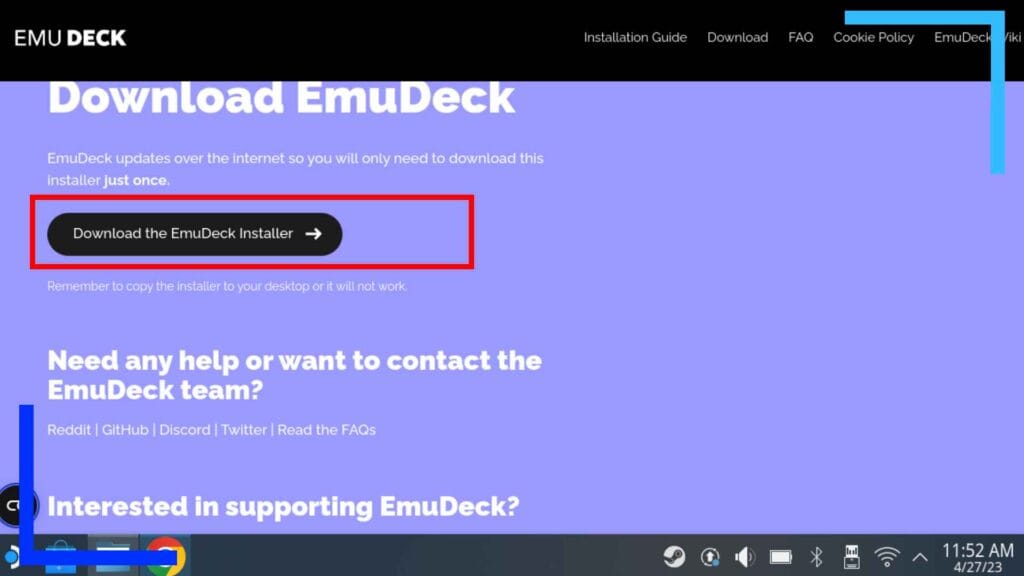
Once your Internet browser is installed, open it up and go to the EmuDeck Homepage. Scroll down the page by grabbing the bar on the right side of the screen with the right trigger. Around halfway down is a big Download button. You really can’t miss it. Click on that once with the right trigger and the EmuDeck installer will download to the Steam Deck.
Step 3: Run the EmuDeck Installer
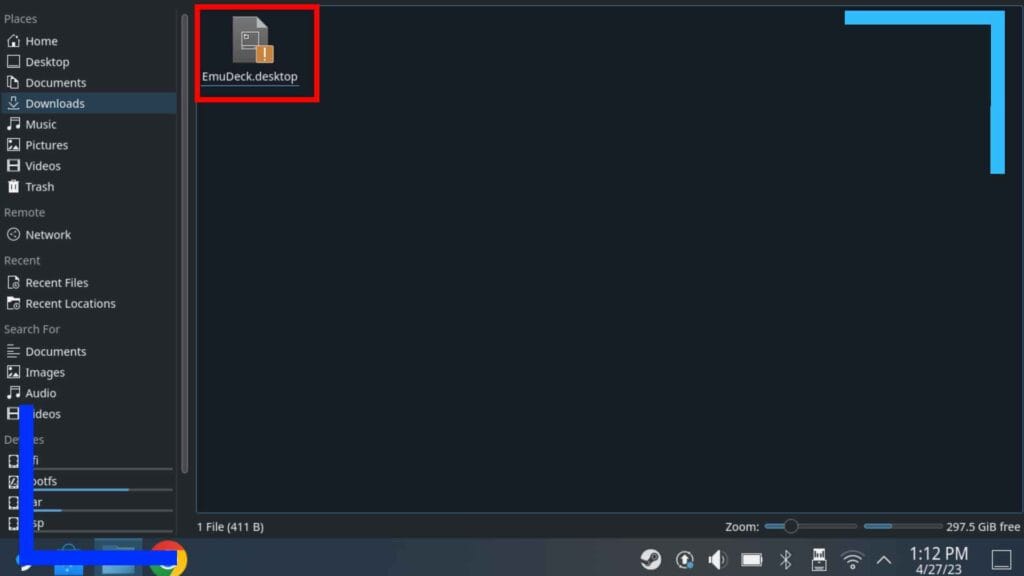
Next, open up the Dolphin File Explorer (the blue folder icon used to access folders).
Click with the right trigger on Downloads in the left sidebar and inside you should spot the EmuDeck installer file we just downloaded.
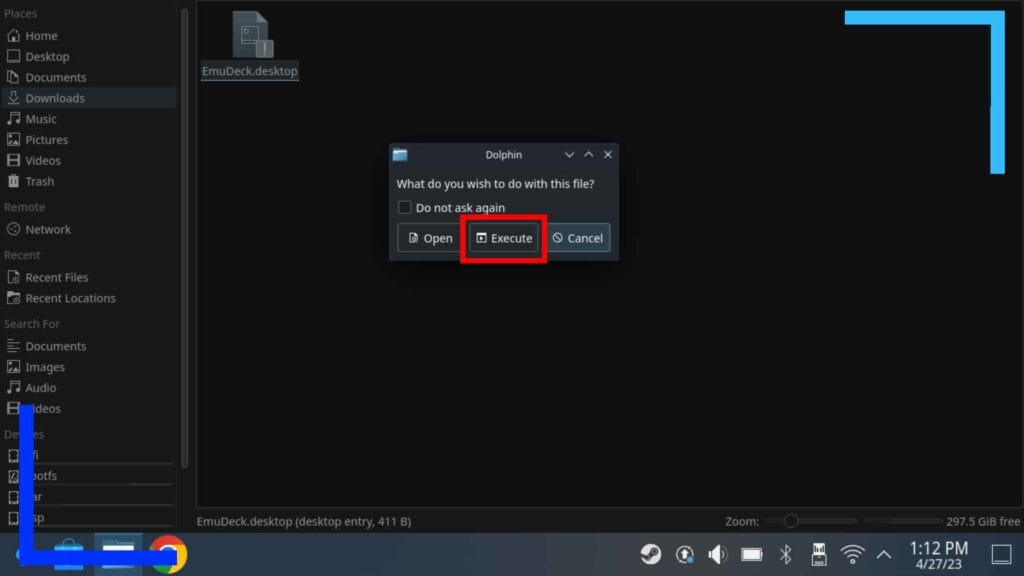
Click on the EmuDeck installer file with the right trigger twice to launch it. A new window will pop up. Click on Execute and the installer will boot up.
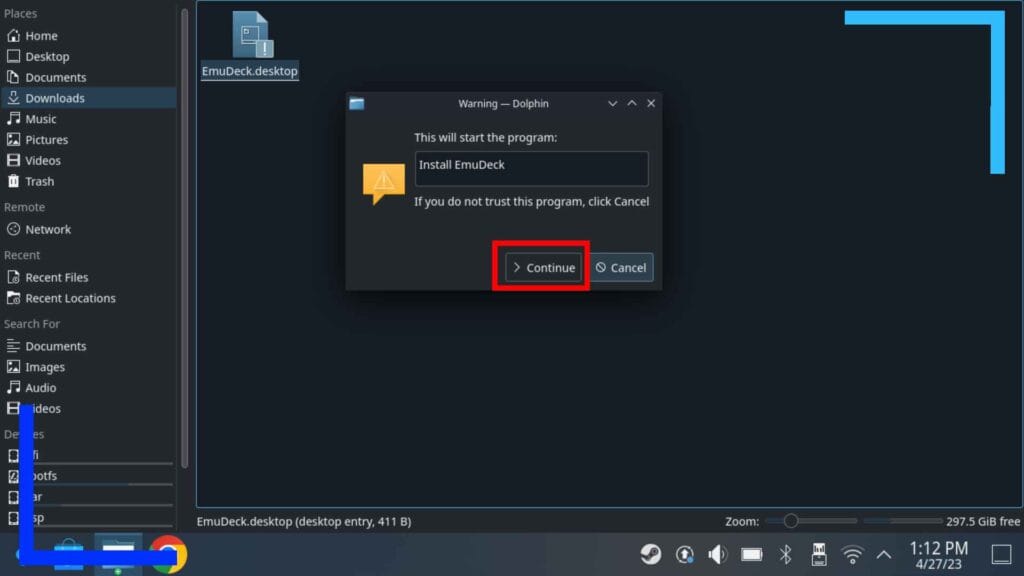
After the file launches, you’ll then be asked what you want to do with it. Click with the right trigger on Continue and the EmuDeck installation process will begin.
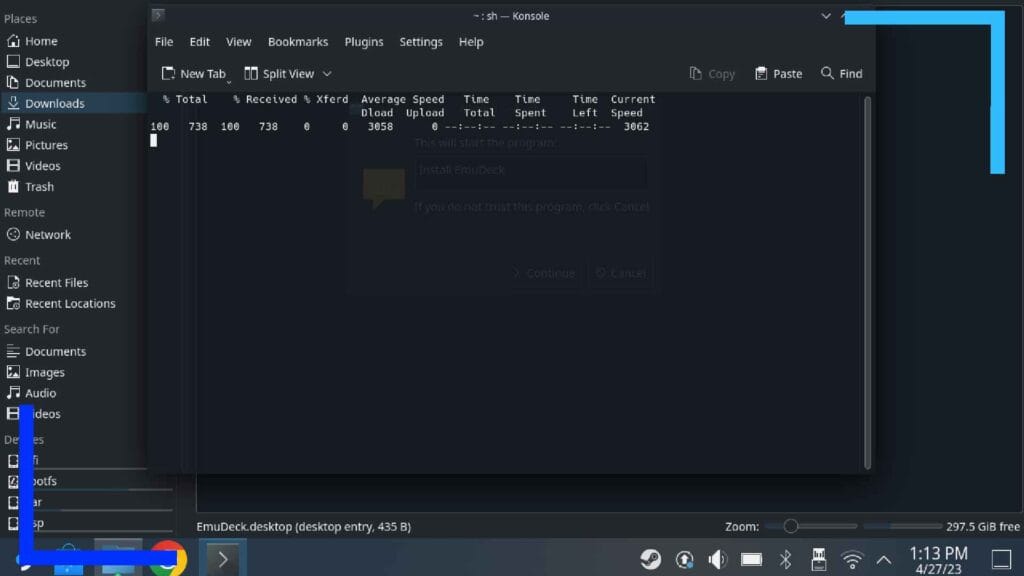
The next screen you’ll see will appear (pictured above). This is EmuDeck working with the Linux operating system. Don’t panic.
After a few seconds, you’ll be thrust into the main EmuDeck installer program.
Step 4: Install EmuDeck
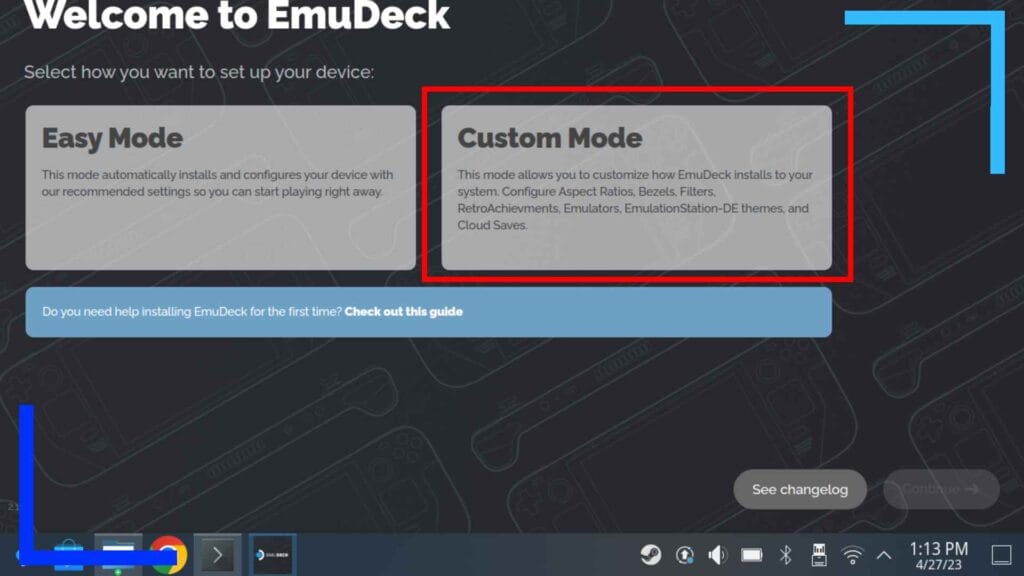
The first choice EmuDeck offers is whether you want to do an Easy or a Custom installation.
The easy mode version is great if you’re low on time and don’t really care about tailoring the experience, whereas custom mode lets you fine-tune everything to your liking.
This choice is yours to make, but I’d strongly recommend going with custom. The setup isn’t difficult at all and it’ll let you visualize how you want EmuDeck to behave.
If you go with the easy option, follow the on-screen instructions and move on to the next step. If you’ve decided you want control over what EmuDeck does, keep reading.
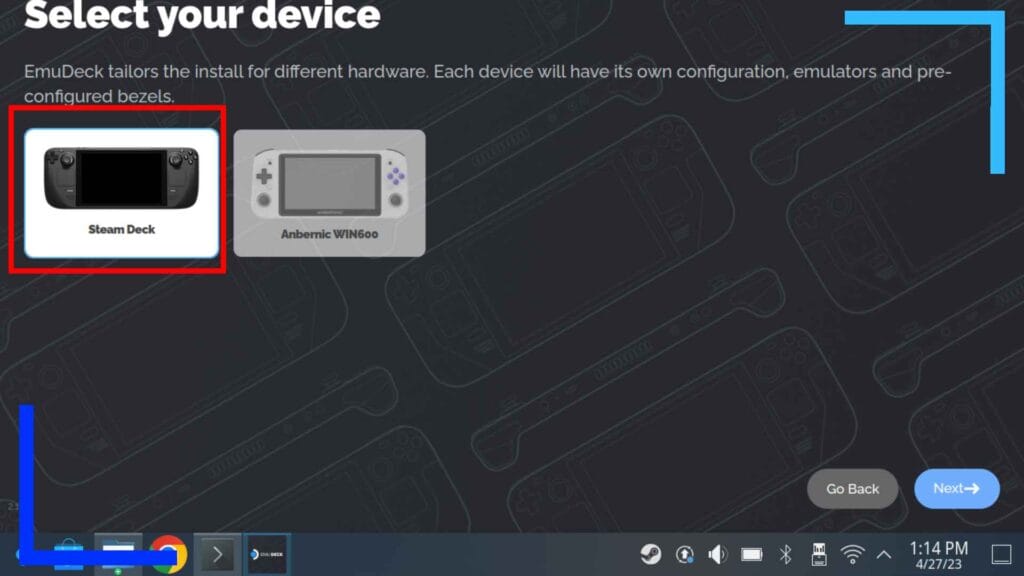
The next question will ask what platform you’re installing EmuDeck on (it can also be installed on the Anbernic Win600). EmuDeck will default to Steam Deck, so just make sure it has and click on the Next button in the bottom right corner of the screen.
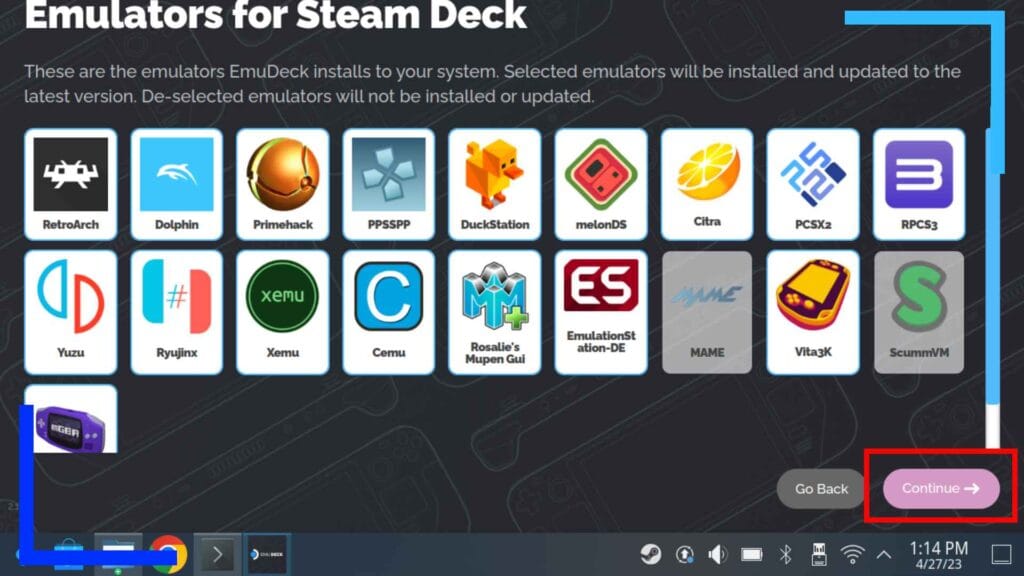
Now for the fun stuff. Your next choice will be to select the emulators you want EmuDeck to install on the Steam Deck.
You can toggle each of these on or off by using the right trigger to click on them. Feel free to take a minute to look at the different options and select the ones you want, and the ones you don’t.
Personally, I find it easier to install everything. That way if I fancy playing something, I’ve got it there and ready to go. Plus I have my EmuDeck installed to an SD card so I don’t need to worry about filling up my internal drive with emulators I won’t need.
When you’re ready to move on, click on the Continue button.
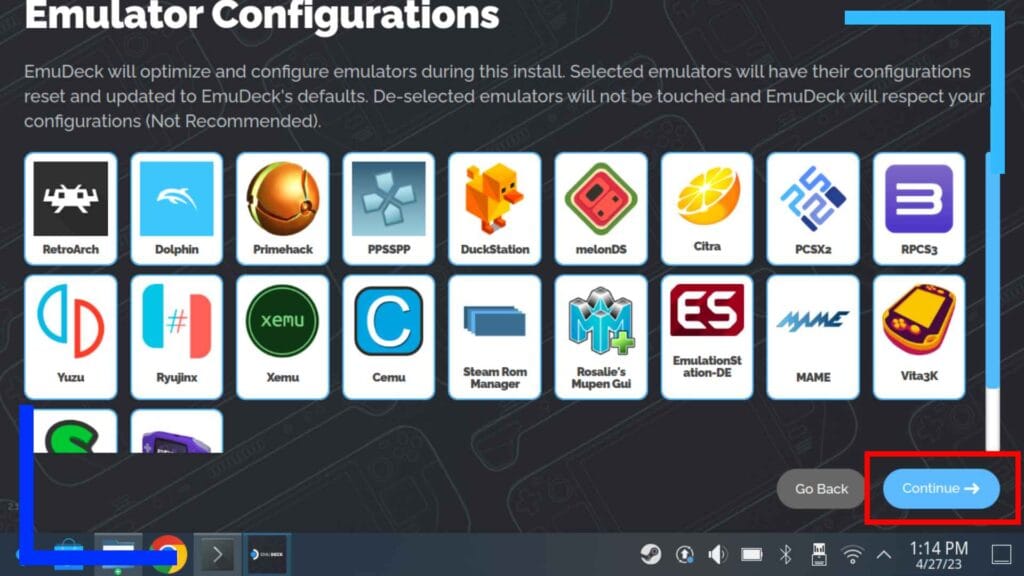
This next screen looks very similar to the previous one, so let’s dig in.
Whereas the previous screen asked you to decide on which emulators you want to install, this screen wants to know who will configure each emulator.
Tick everything. The reason being, EmuDeck can configure each of the emulators to work with the Steam Deck. If you were to do this manually, you’d need to go into each emulator and configure the graphical options and dictate each of the controller inputs.
Doing this manually isn’t fun, and EmuDeck really saved me a ton of time by doing all the boring stuff for me. If you’re like me and want this process to go smoothly and save time, ticking everything will make your life easier.
When you’re ready to move on again, click on Continue once more.
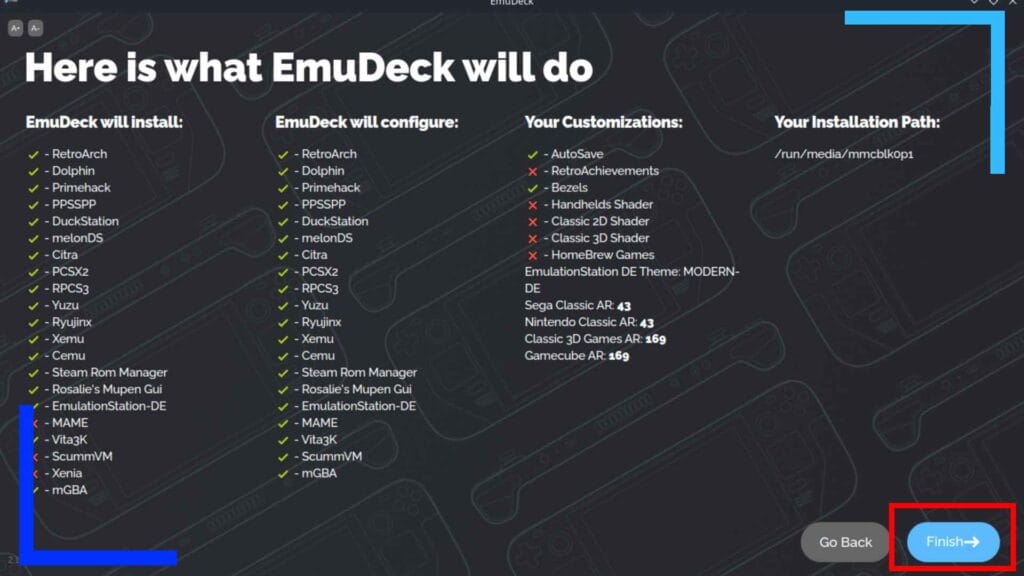
The next few installation pages will work like a questionnaire: Do you want bezels? How about the default aspect ratio? Click on the options you want and hit the blue button to move onward.
Eventually, you’ll come to the screen above. Give it a once over to make sure all of the settings are to your liking- use the Go Back button if you want to change anything – and when you’re done, click on Finish.
Upon hitting Finish, EmuDeck will install its files and folder structure to the Steam Deck. This takes around five minutes depending on where you’re installing EmuDeck to. Feel free to go on your phone in the meantime, just be sure to occasionally move the Steam Deck’s joysticks so it doesn’t go into sleep mode.
Step 5: Transferring ROMs
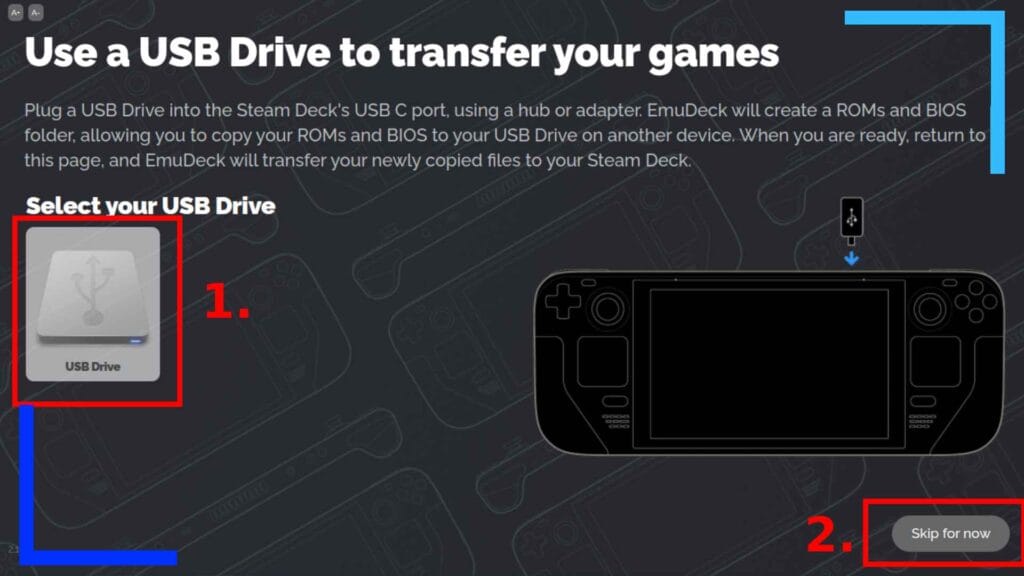
Once everything has finished installing, you’ll be asked about transferring ROMs.
You have two options here: Either transfer your ROMs/Games via a USB drive, or transfer them manually.
If you’ve got a USB drive, plug it in now and click on USB Drive (1) and that will start the EmuDeck transfer wizard.
If you’re moving stuff over manually, I’ve got a full guide to transferring ROMs you can follow. After trying out several different ways to transfer files to the Steam Deck, I found the easiest way is to install Warpinator on the Steam Deck and also on either a Windows PC or mobile device and use that to transfer the files wirelessly.
If you do go the manual route, click on Skip for Now (2) to move on to the next step.
Step 6: Understanding EmuDeck

Pictured above is the final page of the installation process and the main front page for EmuDeck when you load it up (an EmuDeck icon will have been added to your desktop and start menu).
At this point, I’d recommend taking a few moments to check out what EmuDeck is capable of and the different apps it has available. It’s this menu you’ll be using to reset emulator settings, add ROMs to Steam so they show up as games in Gaming Mode, browse homebrew, install apps, and much more.
At this point you’ve completed the EmuDeck installation and can access your emulators through the Start Menu (the blue and white Steam Deck icon in the corner of the screen). Congrats! Though I would recommend sticking with me so we can get your ROMs and games added to Steam for use in Gaming Mode.
Use Steam ROM Manager to Import Games
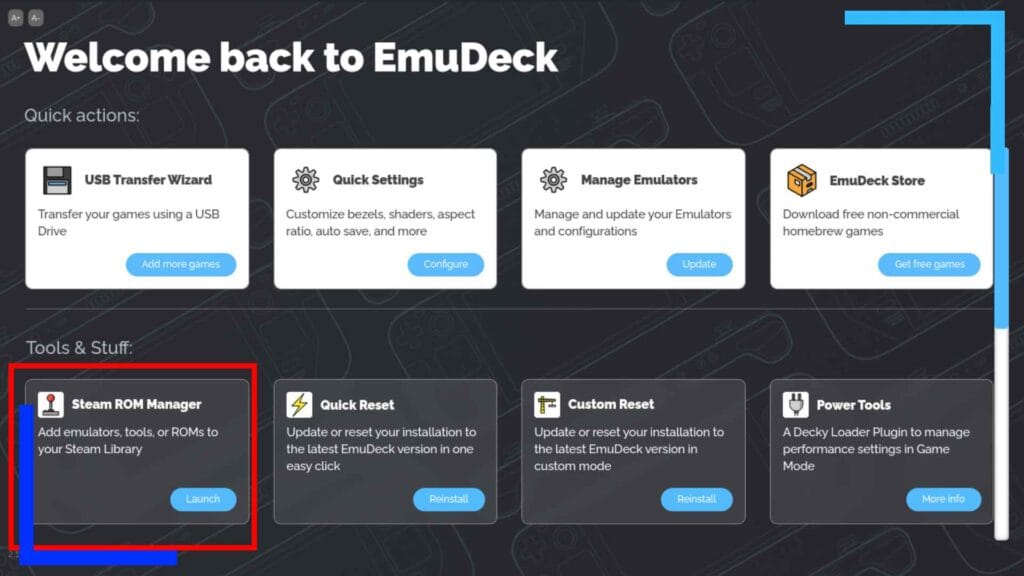
Want your ROMs or games to show up from the main home screen on Steam Deck like a regular Steam game would? You can do that, and I’m going to walk you through it.
Load up the EmuDeck app by clicking on it twice from the desktop.
Once it opens, you should see an app called Steam ROM Manager. Click on the little blue launch button in that section with the right trigger and the app will open.
You’ll be asked if it’s okay to close the Steam app. Tell EmuDeck that’s fine with a click and Steam will close. You’ll still be able to use the trackpad and trigger to click on things, but the on-screen keyboard will no longer be accessible.
That’s due to Steam ROM Manager needing to add the files to Steam itself, something it can’t do while Steam is running.
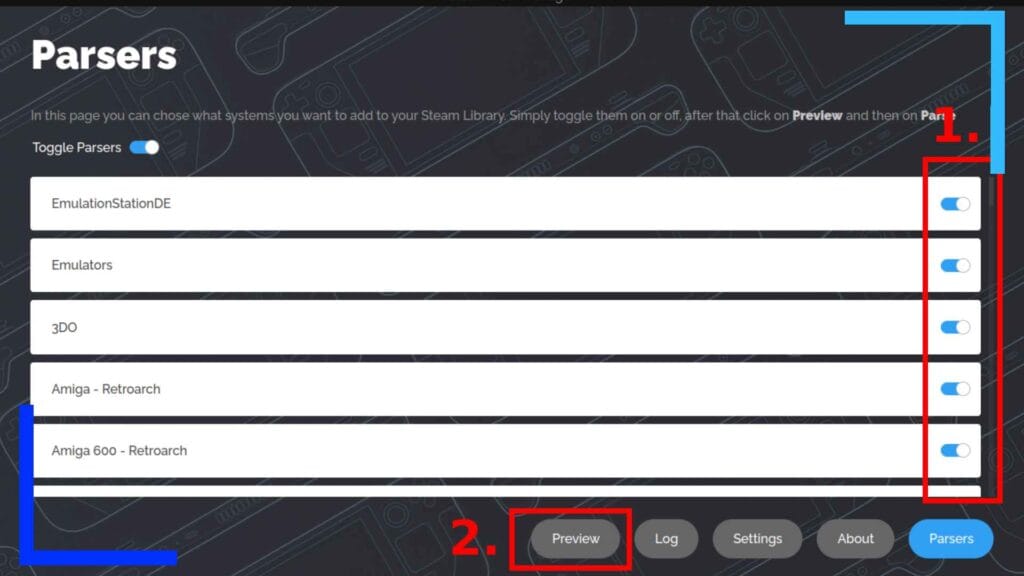
Steam ROM Manager can be quite overwhelming at first due to the number of options that are available. Thankfully, EmuDeck added a theme that simplifies a lot of this.
The first page is parsers. Think of this as Steam ROM Manager basically asking what systems you want to show back in Gaming Mode. You can toggle on or off the options in relation to which games you want to show.
Don’t want your N64 library to show up? Turn off all the N64 emulators. Want to show Wii U games? Toggle Cemu to on.
One thing to keep in mind, if you have multiple versions of the same emulator enabled, you may end up with multiple versions of the same game. As a hypothetical example, let’s say you’ve got Mario Kart 8 for Wii U ready to go. If you toggle on both the EmuDeck version of Cemu and the standalone version, you’ll have two versions of the game added to Steam – one that loads up with the EmuDeck version of Cemu, and another for the standalone Cemu.
So, it’s worth only parsing a single version of an emulator. That’s what I did and each of my games only show up once.
To toggle the systems on or off, use the right scroll bar (1) and click on each of the buttons. If it’s blue, that means it’s enabled. If it’s not, that means it won’t show up back in Gaming Mode.
When you’ve got that setup, click on Preview (2) and Steam ROM Manager will move on to the next screen.
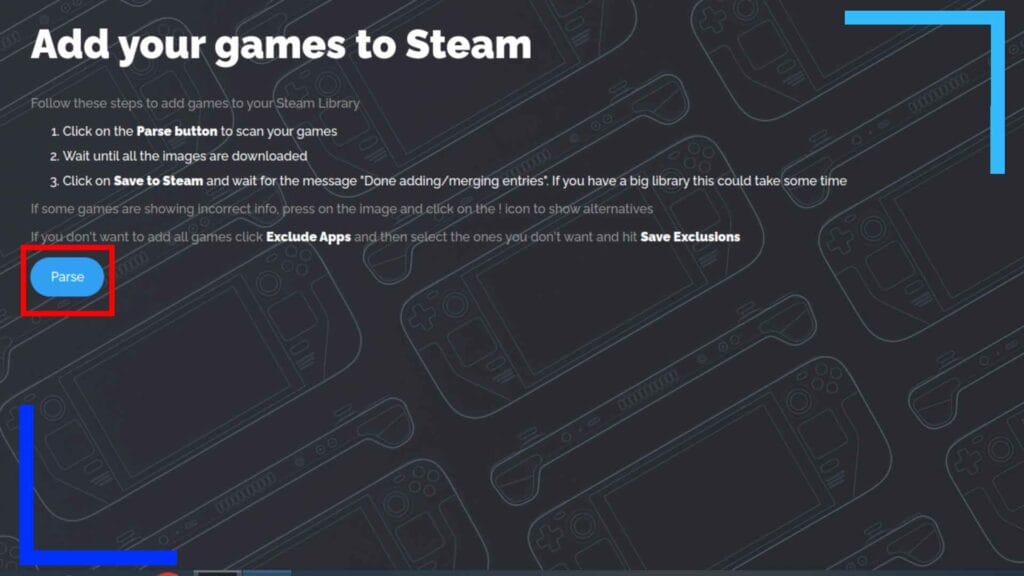
Use the right trigger to click on Parse and Steam ROM Manager will build a list of your games.
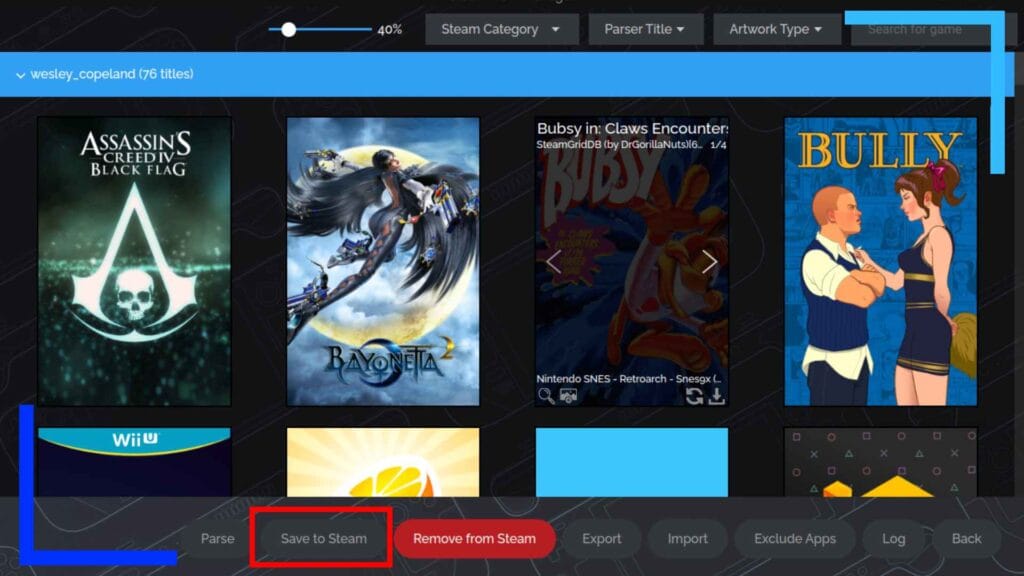
The next screen will show you all your ROMs and games and give you an idea of what they’ll look like back in Gaming Mode.
Here you can highlight a game with the right trackpad then click the left and right arrows to cycle through the available game artwork from SteamGridDB.
If a game doesn’t have artwork, that could be either there is no artwork to download, or the file name wasn’t recognized by Steam ROM Manager. If it’s the latter, find the game in the Dolphin File Explorer and rename it to something more obvious.
For example, I dumped my own copy of Pokemon Violet and it dumped with the name “Pok__Mon Bunch Of Number”s. I renamed it to” Pokemon Violet”, and suddenly Steam ROM Manager was able to recognize it and download the appropriate artwork.
When everything is to your liking, click on Save to Steam and all the games will be added to Steam for use in Gaming Mode.
What Emulators Come with EmuDeck?
EmuDeck gives access to all the systems the Steam Deck can emulate. That includes Genesis/Mega Drive, SegaCD, Sega32x, PC Engine, WonderSwan, SNES, Mame, FBNeo, NES, Master System, Dreamcast, Neo Geo, Gameboy, Gameboy Advance, Neo Geo Pocket, GameGear, NDS, 3DS, PSP, Nintendo 64, Wii, GameCube, PlayStation 1, PlayStation 2, PlayStation 3, Wii U, and Switch. That’s a lot, right?
It’s worth remembering, performance will only be as good as the emulator is capable of. Up to PS2 is almost flawless and you can even upscale the resolution. Above that, though, things get spotty. Some PS3 games will run great, others won’t run at all. Xbox 360 emulation, meanwhile, is pretty dire. Wii U is good for the popular games, and I even got mods running on Zelda: Breath of the Wild. Nintendo Switch is a similar story to PS3 – either games run great or they fall flat.
Still, the fact the Steam Deck is capable of all this is a testament to how powerful it is.
- Sega: Genesis/Mega Drive, SegaCD, Sega32x, Master System, Dreamcast, GameGear
- Nintendo: SNES, NES, Gameboy, Gameboy Advance, NDS, 3DS, Wii U, Switch, Nintendo 64, Wii, GameCube
- Sony: PlayStation 1, PlayStation 2, PlayStation 3, PSP
- Misc: PC Engine, WonderSwan, Mame, FBNeo, Neo Geo, Neo Geo Pocket
EmuDeck Hotkeys
Something else worth familiarizing yourself with is the HotKeys. When playing in RetroArch, this makes launching functions – like saving and reloading – all the easier and saves you needing to mess around with menus.
- L3 + R3 – brings up the RetroArch menu
- Select + Start (twice) – to leave RetroArch
- Select + A – pause the emulator
- Select + R2 – fast-forward
- Select + L1 – to load a save state
- Select + R1- to select a save state
All screenshots captured on Steam Deck by Wesley Copeland.

