There currently isn’t an official way to play Game Pass games on Steam Deck. Or at least, there isn’t a dedicated app for it.
Thankfully, there is a fool-proof way to get Game Pass games, including RetroResolve favorite Disney Dreamlight Valley, running on the Steam Deck by repurposing the Microsoft Edge browser.
Just keep in mind, the app itself is currently in beta form, so expect some occasional hiccups. That said, we’ve done it on our Steam Deck and our games are running super smooth.
Plus once it’s done, you’re free to play whichever Game Pass games you want. So long as you’ve got a subscription and Internet access to stream the games via xCloud, you’re good to go.
How to Play Disney Dreamlight Valley on Steam Deck via Xbox Game Pass (xCloud)
This is going to take a while to get up and running. That’s because we’re going to take the Microsoft Edge Beta browser and repurpose it to become a fully-fledged streaming app.
That may sound pretty complex, but don’t worry, we’ve done it ourselves and it’s quite straightforward. It’s trickier than installing EmuDeck and transferring ROMs to the Steam Deck, but not by much. Just follow our tried-and-tested guide and you’ll be up and running in no time.
- Step 1: Get the Microsoft Edge Beta Browser
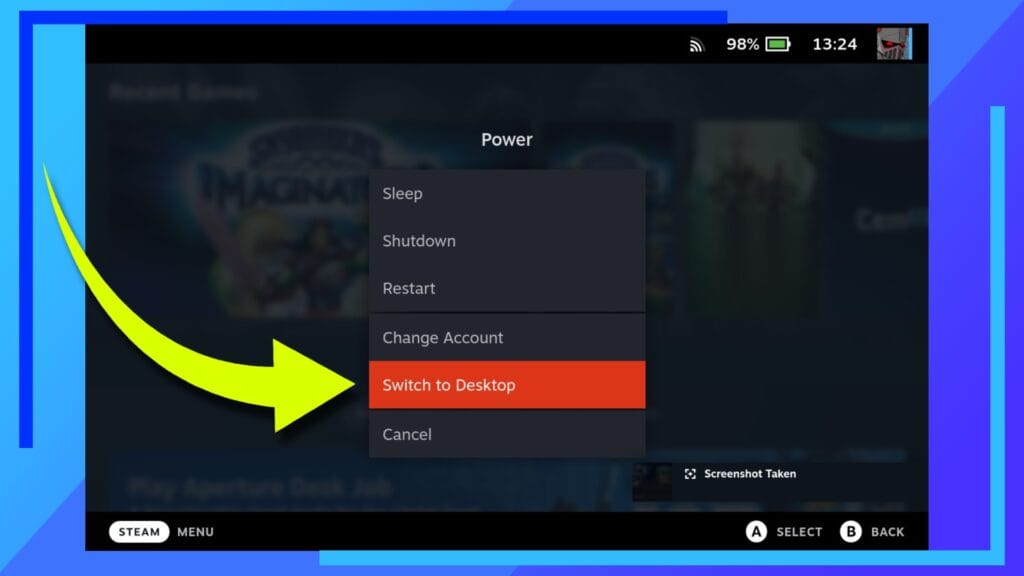
The first thing we want to do is switch to desktop mode. Achieve this by holding down the power button located at the top of the console and selecting “power” then “switch to desktop.” You can also access this by pressing the Steam button on the face of the console and then hopping to “power” and “switch to desktop” that way.
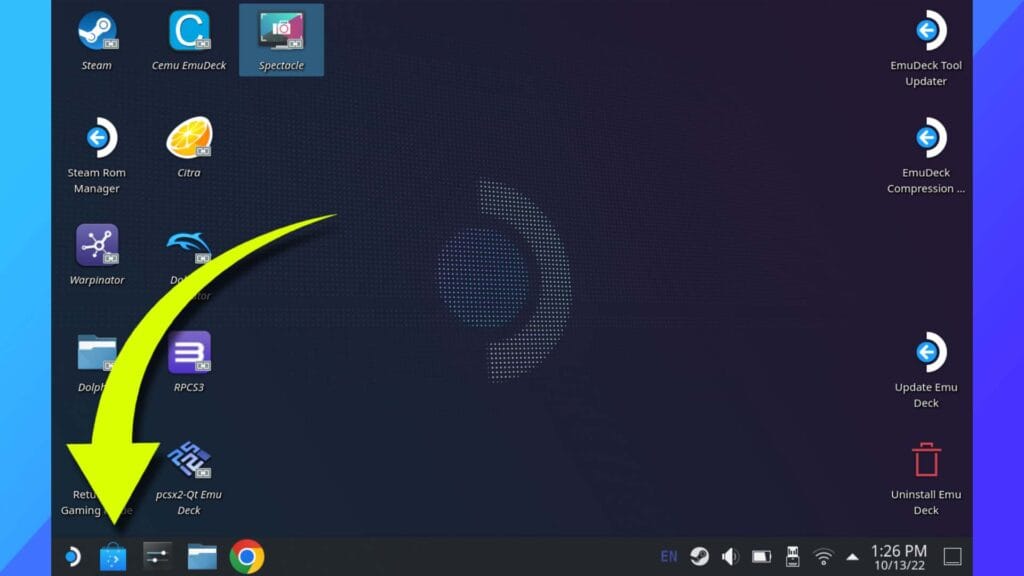
Once the desktop loads, click on the little shopping bag icon in near the bottom-left corner. That’s the “discover” app and it’ll help us get the Edge browser installed.
If you don’t see the blue shopping bag icon, click on the Steam icon in the far bottom-left corner, then press on “all applications,” then finally, “discover.”
In the uppermost corner is a text box with a little magnifying glass. Click on that and the keyboard should pop up (if it doesn’t, press the Steam button and X button together to make it appear). Type “Edge” into the search box and then press enter.
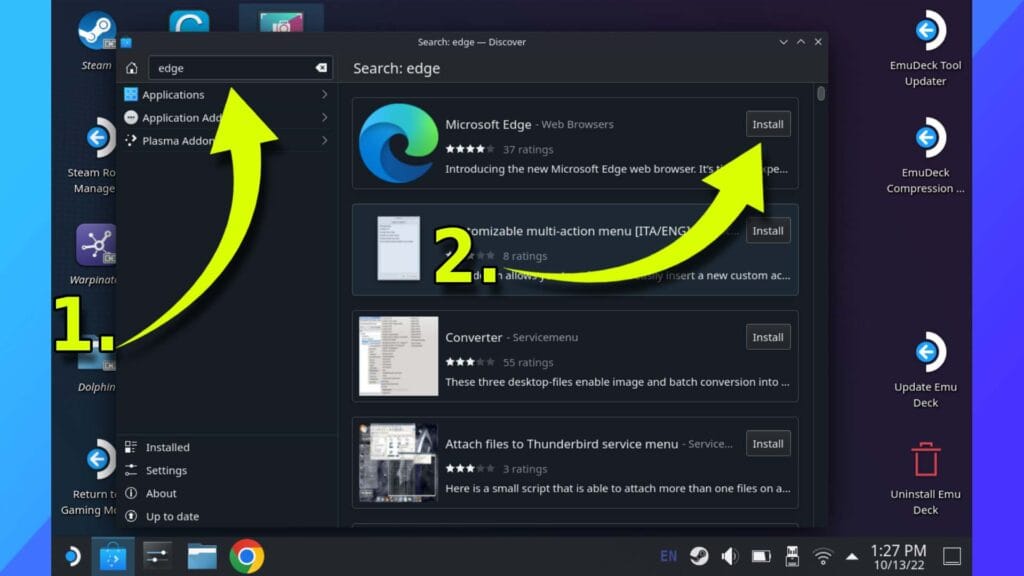
You should now be faced with a box on the right saying “Microsoft Edge Browser”. In the top-right corner of this box should be the word “install.” Tap that and the Steam Deck will install the beta version of the Edge browser.
- Step 2: Setting up the Edge Browser to work with the Steam Deck
In desktop mode, click on the blue and white Steam icon in the bottom left corner. Navigate to “Internet” and highlight “Microsoft Edge”. Right-click and select “add to Steam.”
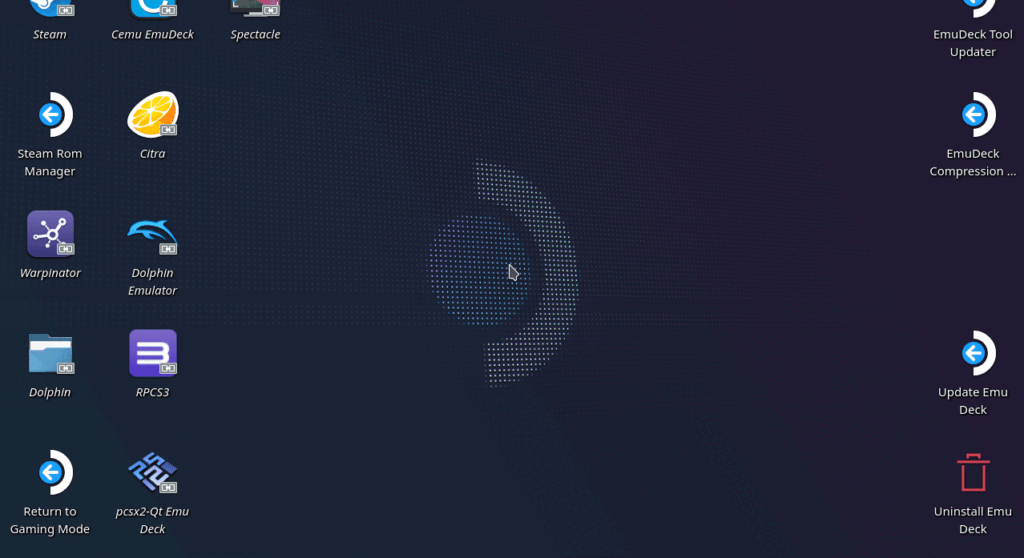
Doing this will add the Microsoft Edge app to Steam, meaning it’ll be visible when you eventually move back to gaming mode. Handy!
Next, the same way we found the Microsoft Edge app, head into the Steam menu, select “all applications” and scroll down to the “K” section. You’re looking for something called “Konsole.” When you find it, click it to open it up.
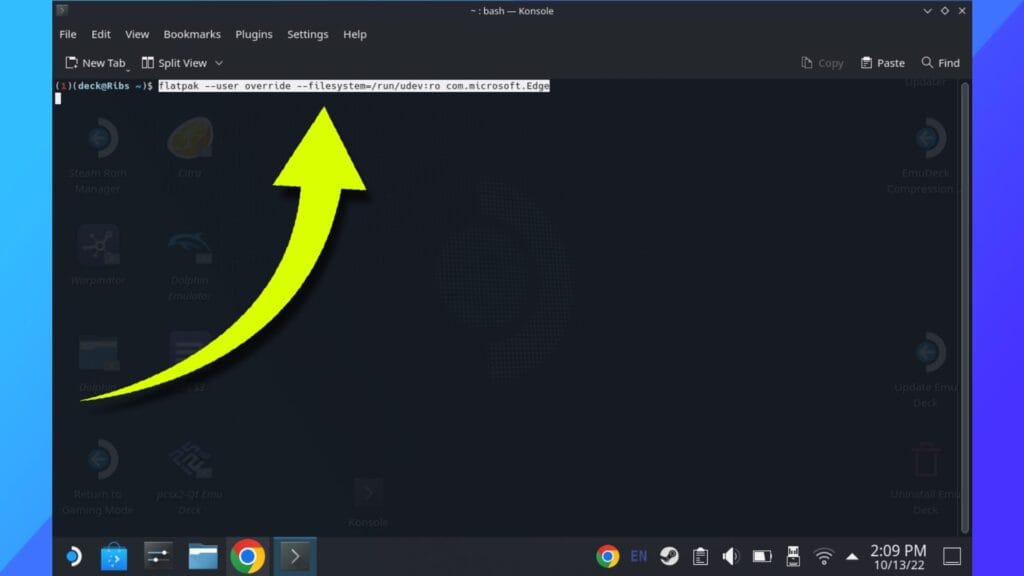
Now we’re going to want to add the following command line:
flatpak –user override –filesystem=/run/udev:ro com.microsoft.Edge
It may be easier for you to open up this page on the Steam Deck. That way you can copy and paste it into Konsole without needing to type it out. Typing or pasting works, though. Whatever you’re more comfortable with, do that.
When it’s fully typed in, hit enter. You won’t get a notification but be assured it’s done what it needs to, which is grant Edge access to your Steam Deck controls via udev.
- Step 3: Modifying Edge in Steam to Behave Like an App
The next thing we’ll be doing is setting up the Edge browser so the Deck considers it a gaming app and modifying it so it behaves more like a designated xCloud app rather than, you know, an Internet browser.
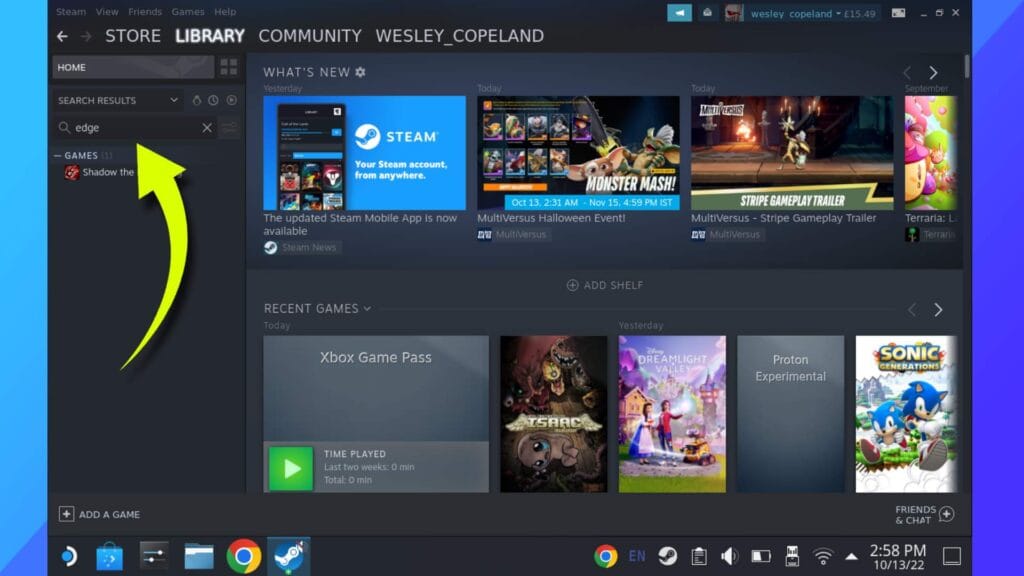
Open up the main Steam storefront – either through the Steam icon in the bottom-left or by double-clicking an icon on the desktop.
Next head over to the library section if you’re not already there and in the search box (the rectangle with the magnifying glass) type in “Edge.”
In the left section should be a greyed-out box with the name Microsoft Edge. Right-click it and select “properties.”
This window that opens may look a little scary but don’t worry. It’s all fairly pain-free. Just pay attention to this next bit, yeah?

First off, let’s change the name to something more apt. Click in the rectangle with “Xbox Game Pass” on and then bring up the keyboard by pressing the Steam button and the X button at once.
We ended up naming ours “Xbox Game Pass,” but you’re free to name it however you want. Maybe “xCloud Beta”?
Next comes another line of code to add. Copy the following string:
–window-size=1024,640 –force-device-scale-factor=1.25 –device-scale-factor=1.25 –kiosk “https://www.xbox.com/play”
See where it says “LAUNCH OPTIONS” in all caps? Click there and bring up the keyboard. Don’t hit paste just yet though.
Use the left and right arrows on the Steam Deck keyboard to navigate to the end of the line of code. The end section should read “@@u @@”. Once you’re at the end, drop in a single space then you can hit paste.
During our testing, not having the space caused the Game Pass app to be unable to reach the Internet. If you see the error message “hmm… can’t reach this page” that lack of a space is likely the issue.
- Step 4: Changing the Control Layout
Press the “X” in the top-right corner to close the window and head back to the desktop to select “return to game mode.”
After a few moments, the main game mode will load up. Once it has, go into your library and find the non-Steam apps section. Inside should be our version of Edge, complete with the new name you gave it. Click on it, then select play to load it up.
Edge should load without any issues now. The final problem we need to fix is to change the controller layout so we can actually move around and click on stuff.
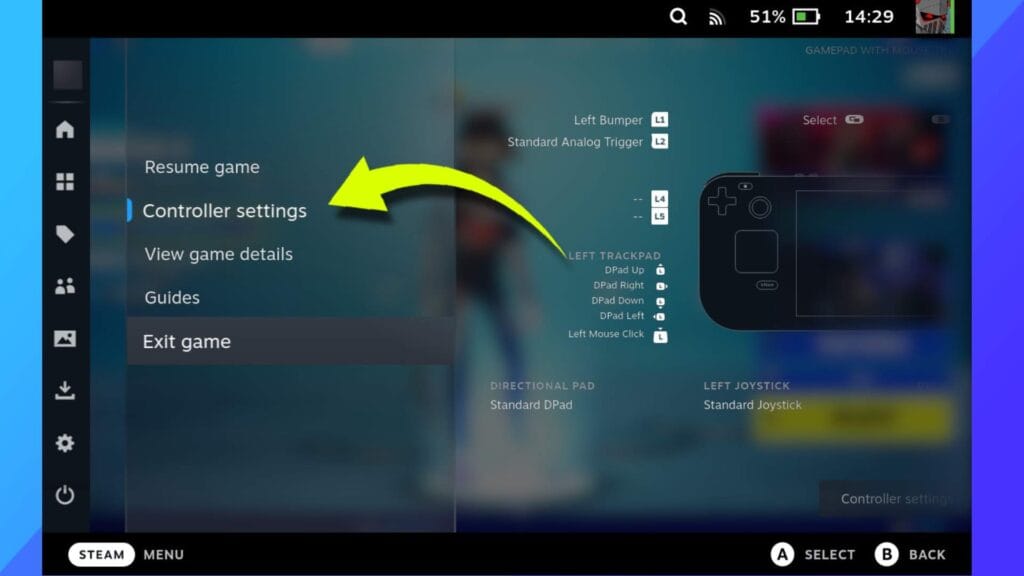
Pop the Steam button on the console and find the controller settings section. Click it and change the layout to “Mouse with trackpad.” You may also want to go into the edit layout function while you’re here and map mouse left click to a button (we went with the left trackpad click).
Back out of the menu once that’s done and you’re free to enjoy Xbox Game Pass on the Steam Deck. That wasn’t so hard, was it?
- Step 5: Use Game Pass to Find Disney Dreamlight Valley
Now we get to finish with something nice and easy.
Open up the Edge browser app in game mode, log in, then in the top-right search bar, enter – you guessed it – Disney Dreamlight Valley.
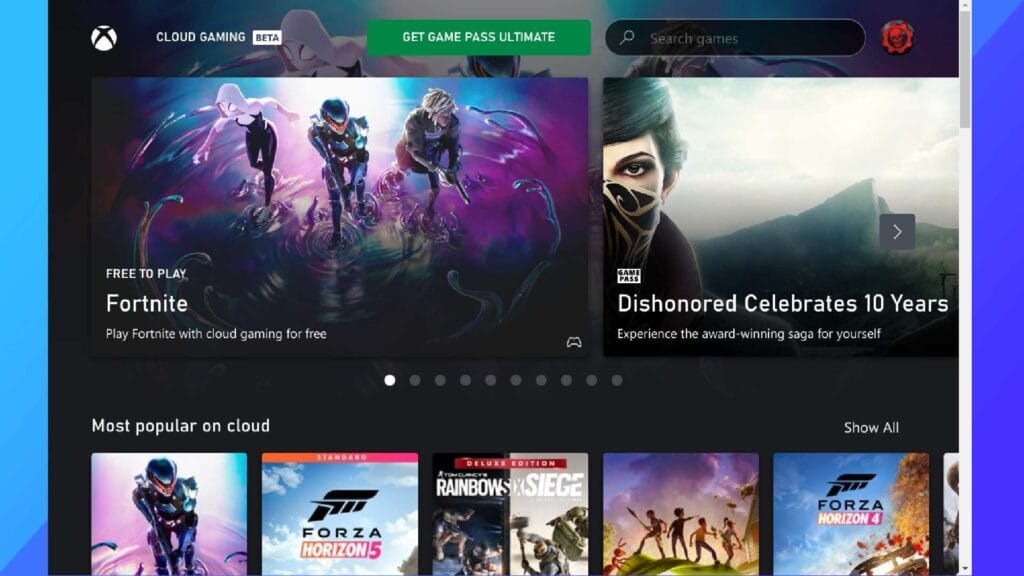
Within seconds you should be staring at your favorite life-sim. Click on it and follow the on-screen instructions to play.
That’s it! And now you’ve got Xbox Game Pass installed on the Steam Deck you’re free to stream any other games Game Pass has to offer.
Just keep in mind, you will need a Game Pass subscription to play premium games. That said, the free games don’t need a sub, so if you fancy playing Fortnite on your Steam Deck without any of the effort that installing the Epic Game Store involves, go for it.
How to Make the Xbox Game Pass App Look Like an App
As you may have noticed by now, the Edge app is really ugly. It’s literally just a blank box. Ugly, ugly, ugly.
There is, however, a way to make it look like a proper Steam app, and you can get it done in around 10 minutes. Sounds good? Read on.
- Step 1: Head back into Desktop Mode and Get the Official Artwork
By now you should be a pro at this. Load back into desktop mode. A quick refresher: Power button, click power, then head to desktop mode. Easy stuff.
Next, open up the main Steam storefront and search for the Edge app. Just remember if you renamed it, search for that name instead of “Edge.”
Next, load up an Internet browser (we installed and used Chrome). Go to the official Microsoft website and look for “Download the supplied artwork from here.” Click on it and it’ll download a Zip file Microsoft put together so we can have a kinda-official Game Pass app. Pretty neat, right?
When that’s completed, load up the Dolphin file explorer, go into download, and extract the contents of the Zip inside of the downloads folder.
- Step 2: Modify the Steam app to Look Nicer
Back in the Steam app, in Library, right-click the Edge app and select “manage.” This should open up a few options, but what we’re after is “set custom artwork.”

When you click on “set custom artwork,” find your way through the files to the download folder and click on the cloud gaming folder to open it up. By default, it won’t show any files, so look to where it says “file types” and click there to change the selection to “all files.” That’ll show you all the files and let you select the banner image we want.
- Step 3: Change the Icon and Box Image
This is a similar process to changing the custom artwork as before.
First we need to move the position of the Edge app. There isn’t a straightforward way to do this, so just load up any other game, then when it loads, close it. This will move the Edge app one block to the right and make the next part possible.

Now the app is vertical and smaller, right-click it as you did before and select “set custom artwork” again. It’s the exact same process, only this time because it’s moved to the right by one, Steam will set the vertical box image instead of the horizontal equivalent.
All that’s left to do now is right-click and this time select “properties.” Remember where we changed the name of the app? Head to there and instead right-click on the blank icon. Go back into your official artwork folder and select the “icon” image.
Now just close everything and boot back into game mode. Upon loading you should notice your Edge app has now had an Xbox Game Pass makeover. Congrats. You’re finally finished.
All images and gifs created individually on Steam Deck by RetroResolve.

