The Steam Deck is a brilliant device with a killer operating system that can do some amazing things. It is, however, a pain to get non-Steam games working. Some will work with minimal effort, others require dumping nights to get them up and running.
That’s why loads of users are opting to install Windows on Steam Deck. It’s simple, many are already familiar with Windows, and most games should work without needing to mess around with Proton or Wine settings.
Windows does have its own, albeit different, problems. And while we’re certain most users will choose to switch back to SteamOS, having the option to run Windows is cool as heck. Plus with more and more third-party docks with built-in SSDs coming out, knowing how to get Windows up and running on the Steam Deck is well worth checking out.
It’s not as easy as getting EmuDeck running on the Steam Deck, and it takes around two hours to get it all sorted, but the end result is worth it for those who like to push their devices as far as they can.
What You Need
- The Windows 10 or Windows 11 Media Creation Tool
- A microSD card, USB hard drive, or USB thumb drive
- A cable for connecting an external drive to the Steam Deck (optional)
- The Steam Deck drivers from Valve
Before we start it’s worth noting installing Windows on the Steam Deck will completely erase everything on the Steam Deck and the memory card/hard drive.
What that means is any data – including games, save files, or any configurations you may have set up – will be lost if they’re not backed up first.
This is less of an issue for Steam games as reconfiguring a game isn’t that time-consuming and game saves should auto-upload to Steam’s servers. If you’ve got a bunch of Epic or GOG games running via Heroic Launcher, though, the auto-upload save feature is still in beta so it’s best to assume your saves aren’t packed up and need to be (Google Drive is a quick way to get this done).
Step 1: Grab the Windows Installation Media Tool
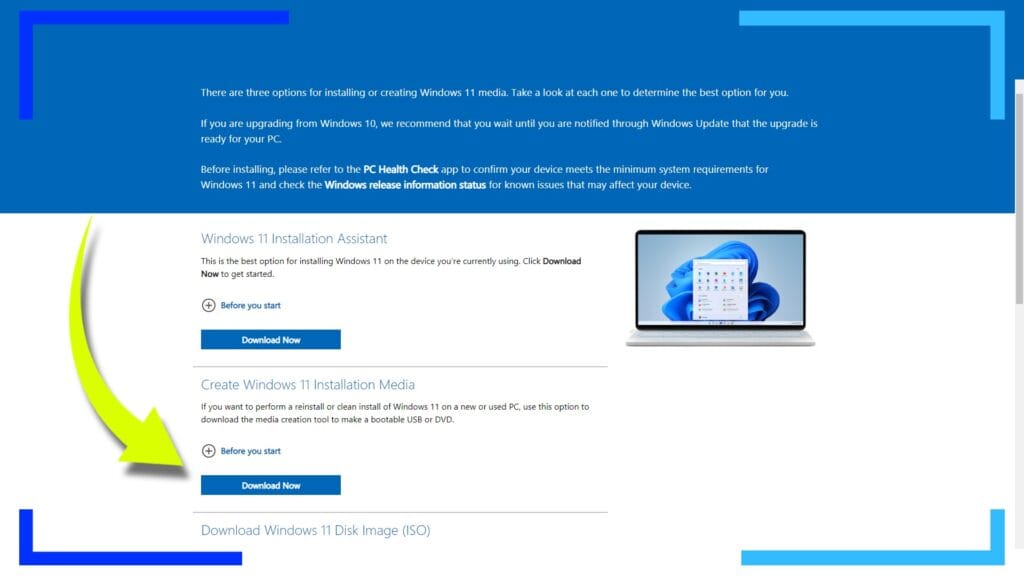
First, make a decision about which version of Windows you want. We’ve got a breakdown at the bottom of the page listing the pros and cons of each. We’ve installed both versions and the process is the same, so feel free to repeat this guide from the start if you want to see which version is right for you.
When you’ve decided which version you’d prefer head over to the official Windows 10 or Windows 11 webpage and hit “Download now” in the “Create Windows Installation Media” section of the corresponding page.
Upon the completion of the download, open the file either by clicking on the downloaded item (in Chrome) or head to Windows Explorer and locate the file in the “Downloads” folder and click it there instead.
Next, insert your chosen storage device – this will be either a microSD card, a USB hard drive, or a USB thumb drive.
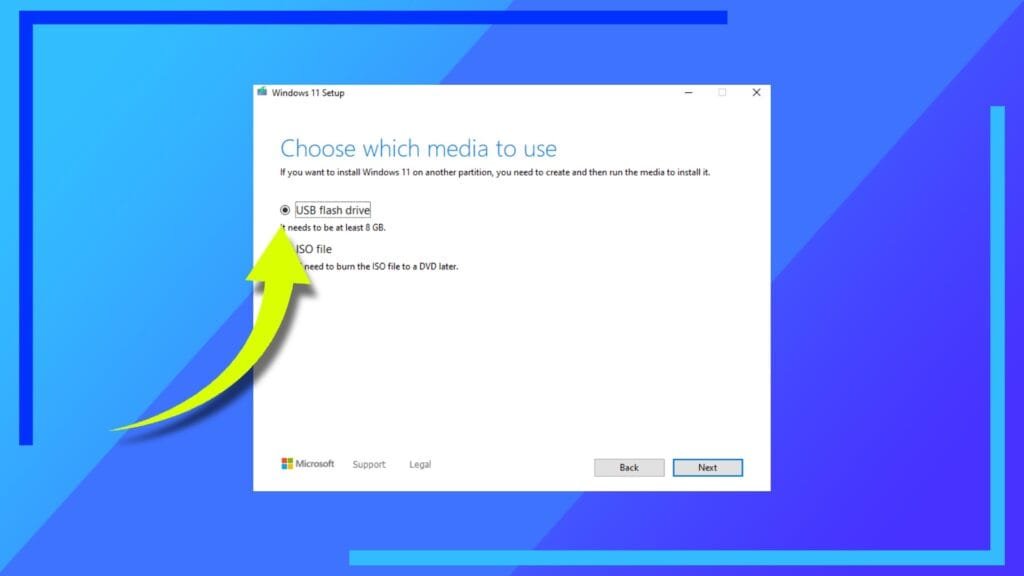
Go back to the Windows Installation Media tool and follow the on-screen instructions until you reach the “Choose media” section (pictured above).
Here we want to select “USB flash drive” and click next. From here navigate to the correct drive and, again, follow the on-screen instructions to complete the first part of the installation process.
What just happened is we’ve created a self-booting version of the Windows 10 or Windows 11 installer. When we move on to plugging it into the Steam Deck, we’ll be able to use that software to install Windows. Neat, right?
This took us about 10 minutes to complete on our PC, so if it takes a while, don’t fret. It’s all good.
- A note about the storage device when you’re done
One thing to keep in mind, when we did it with an SD card, the Windows Installation Media tool made what’s known as a partition on our storage. This meant when we were done, our device had much less storage than it did before (1TB down to 32GB in our case).
If this happens, and that is an ‘if‘, when you’re finished installing Windows on the Steam Deck, or you reach the later point in this guide where you need to grab the Steam Deck drivers, pop the storage device back into the Windows PC and use the little magnifying glass icon in the corner of the screen to search for “DIsk management.”
Load this program and it’ll show your storage. Right-click the storage device and select delete partition. When that’s finished, right-click it once more and select the option to make a simple partition. This time, your partition will be the maximum amount of storage instead of the incorrect smaller size listed.
Note: If neither version of Windows works on your Steam Deck (it’s temperamental like that for some), try using Rufus instead of the creation tool and instead install Windows 10 To Go. That, in most cases, fixes the compatibility issues.
Step 2: Boot the Deck Bios and Start Installation
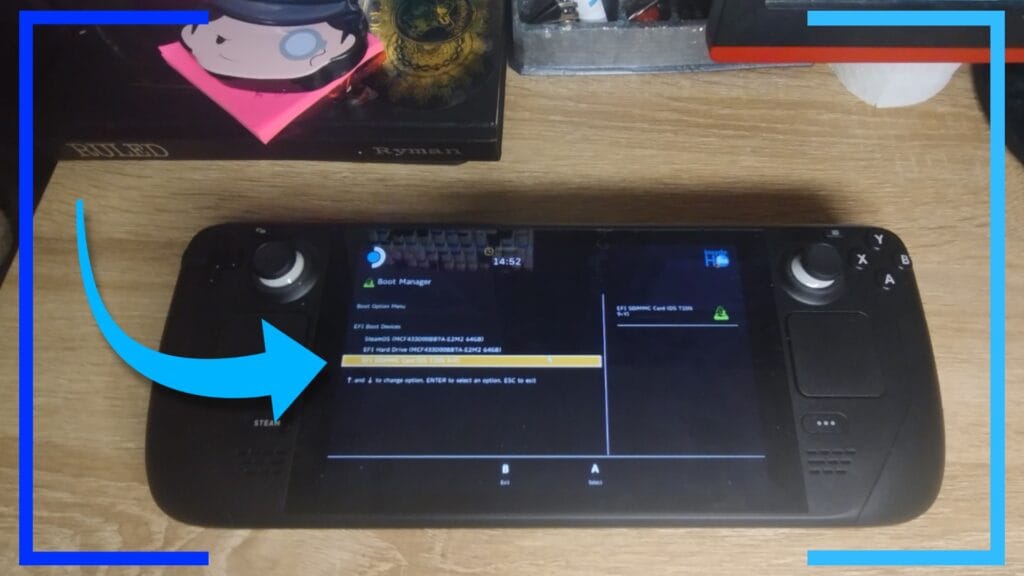
Safely eject your storage device and connect it to the Steam Deck. If you’re using a microSD card, plug it in via the bottom of the Deck. If you’ve got a USB cable to connect an external device, hook that up now.
With the Steam Deck powered off, hold down the volume down button (the left volume button). Next, tap the power button to turn it on while keeping the left volume button held down.
After a few seconds, the Steam Deck will boot into its BIOS. From here you should have several options. Ignore them all except for the one that shows your storage device. Click on that device and the installation process will begin.
This is almost the point of no return, so again, if you haven’t backed up any data, now’s the time to do it.
Step 3: Install Windows
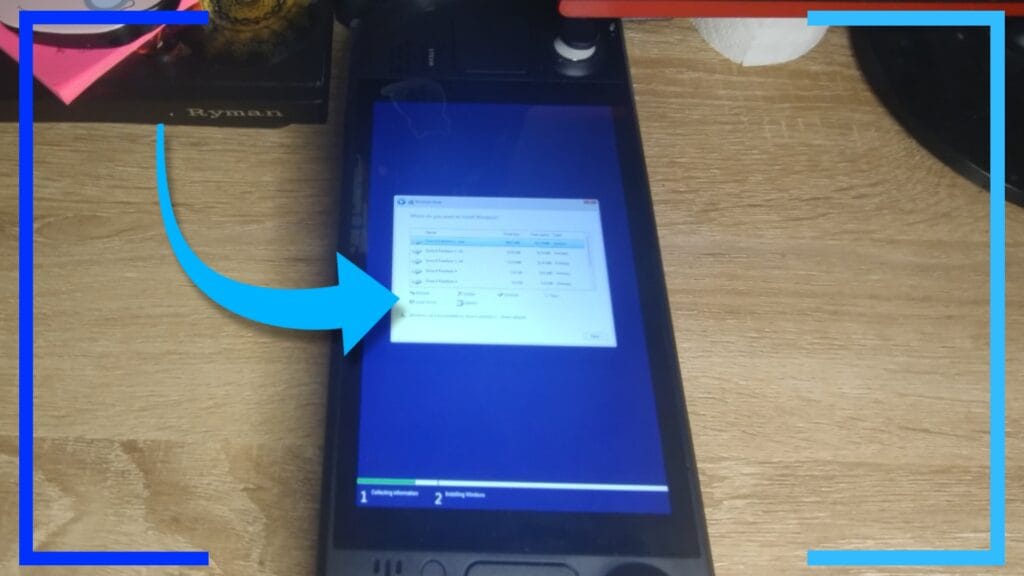
Installing Windows on the Steam Deck is all fairly straightforward. If you’ve ever bought a PC and had to set it up, it’s the same process. Just follow the on-screen instructions and you’ll be done in no time.
Just so you don’t get a scare, you’ll be doing this whole process in portrait mode. That means you’ll be using the Steam Deck the wrong way round – very much like a tablet. We can’t fix that until the new operating system is installed but worry not, we will be fixing it later.
- Where to install the operating system to
One area that is worth covering is the section where Windows asks where to install the operating system to. Here you’ll have a host of different drives and it’s easy to get a little lost.
Don’t panic. It’s fairly simple once you know what to click.
All we need to do here – the actual point of no return – is select each of the sections and click “Delete” on all of them. That’s it.
The Steam Deck is partitioned into several different sections, so what we’re deleting here is the operating system, Linux files, and recovery options. In its place, Windows will modify the internal storage so it’s all ready for Windows instead of Linux.
Don’t forget, although we’ve deleted the Steam Deck recovery options, you can still get SteamOS back at a later date (outlined at the bottom of this article).
After that’s done, click “Next” and follow the on-screen instructions.
Eventually, you’ll get to a point where Windows leaves you alone and installs everything that’s needed. If this takes some time, don’t worry. It’s meant to.
Step 4: Change From Portrait to Landscape
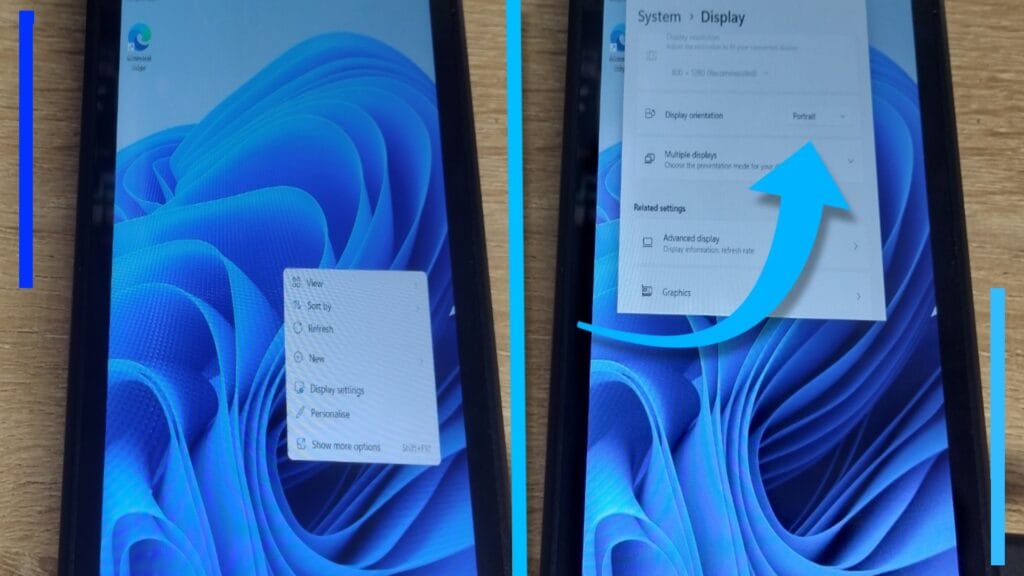
When the installation of Windows on the Steam Deck is complete, the first thing you’ll notice is the screen is still the wrong way round. Here’s where we fix that. At last!
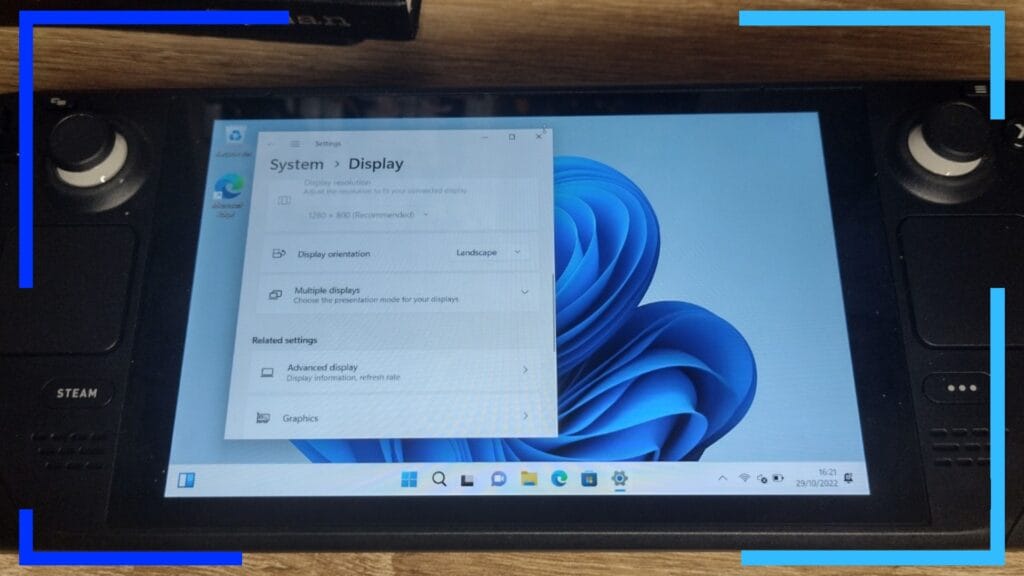
Once the desktop loads, hold down a finger on the desktop background. After half a second a bunch of options will pop up (we’ve manually done a right-click). See where it says “Display settings”? Click on that, then use your finger to scroll down to where it says “Portrait” and change it to “Landscape.”
At long last, your Steam Deck is now back to looking like a Steam Deck. Or Windows Deck?
Step 5: Grab and Install Steam Deck Drivers
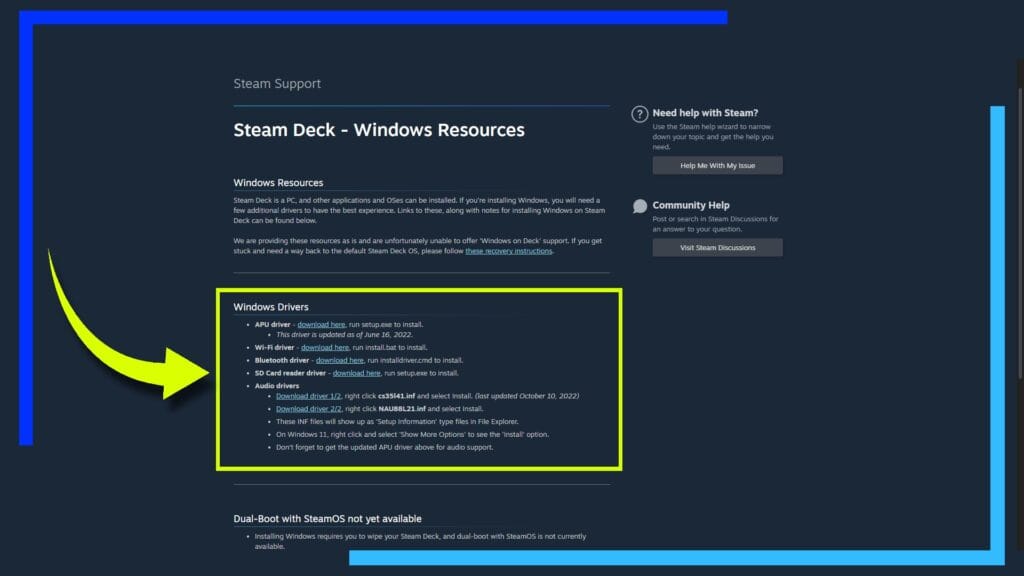
You’re nearly done. All we need to do now is grab the drivers we need to let Windows interact with the different sections of the Steam Deck.
If you installed Windows 11, and your wi-fi is working, you could just hop online and download the files directly to the Deck.
For Windows 10 users, chances are your wi-fi isn’t up and running right now so you need the drivers to make it all work. If that’s you, read on.
Grab your storage device and plug it back into a Windows PC. Open up your Internet browser and go to the Valve Steam Deck Resources website and download the following six files:
- APU driver
- Wi-Fi driver
- Bluetooth driver
- SD Card reader driver
- Audio driver 1: cs35l41.inf
- Audio drive 2: NAU88L21.inf
Once they’re downloaded, transfer them over to your storage device and return it back to the Steam Deck.
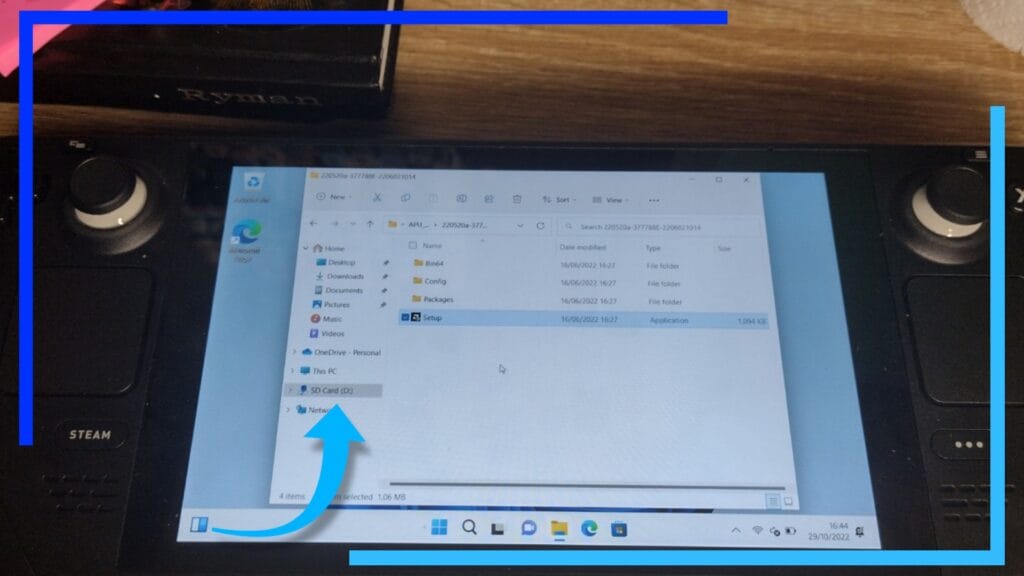
Boot up the Deck and head into Windows Explorer to locate the files and install each of them as explained below:
- APU driver: Click “setup.exe” to install
- Wi-Fi drive: Click “install.bat” to install
- Bluetooth driver: Click “installdriver.cmd” to install
- SD Card reader driver: Click “setup.exe” to install
- Cs35l41.inf: Right-click and select “install”
- NAU88L21.inf: Right-click and select “install”
Once they’re all installed, power down the Steam Deck or restart it from the Windows icon in the bottom-left corner (or center on Windows 11).
With that you’re completely done and free to start installing Steam, the Epic Games Store, or even the Xbox 360 emulator Xenia.
Although you’re free to go, there are some fairly-important tweaks we’d recommend to make sure the system runs as well as it can.
Extra: Windows Tweaks to Make Life Easier
- Stop Edge from Running in the Background (Important)
Windows is a massive bloat fest. That means that there are not only a host of useless apps you can delete in the add/remove programs section, but there are also some things that are sure to drain the battery faster.
The Edge browser isn’t so much of an issue when you’re using a PC as it’s plugged into a power source. When it’s a mobile device like the Steam Deck, that drain isn’t wanted.
To stop Edge from running in the background, open up Edge and click on the three dots “…” From here select “System and Performance” from the left side of the screen, then navigate to “continue running background extensions and apps when Microsoft Edge is closed.” Yes, it’s that long.
To the right of this setting should be a toggle. Hit it so it’s off and Edge won’t drain your battery anymore.
- Change Scaling
By default, the Windows Steam Deck will set the screen to 125%. This does make everything easier to read but will throw up problems when playing games.
To fix this, right-click on the desktop and choose “Display settings”. It’s like how we changed the screen from portrait to landscape. Under “Scale and Layout,” click the drop-down box and change “125%” to “100%”.
- Enable the On-Screen Keyboard
You may have noticed the on-screen keyboard doesn’t pop up as it does in SteamOS. Annoying, we know, so let’s fix that.
Click on the Windows icon and navigate to “Settings.” Under the “Time and Language” tab on Windows 11 or “Ease of use” then “Keyboard” on Windows 10.
Once inside, there should be the option “Show the touch keyboard when there’s no keyboard attached.” Click that and the virtual keyboard can now be used with the help of a little button near the clock in the bottom-right corner.
- Disable Hibernation
Windows has a handy option to enable hibernation to conserve power. This doesn’t work as it does on Steam Deck and may very well lead to errors (known colloquially as the “blue screen of death”).
To shut this feature off, open up the start menu from the Windows icon and navigate to “Run Command Prompt”. Don’t left-click it, though. Right-click it and select “Run as administrator.”
A new window will open. In it type the following code below or open this page on the Steam Deck and copy and paste it into the window without the quotation marks.
“PowerCfg -hibernate off”
Hit enter and that will disable hibernation.
Extra Software Worth Considering
Now you’re legit free to go off and play with your brand new Windows Deck. There is a piece of software we really recommend grabbing first though.
- Power Control Panel
Although you can change video game settings in-game, there are still a few options missing from the Deck that makes it great. One of those features is being able to change the power consumption or the refresh rate on the fly.
That’s where Power Control Panel comes in. While this doesn’t work exactly like its equivalent does on the Steam Deck, it still gives users the option to limit the power intake and change the refresh rate and is the next best thing.
How to Reinstall SteamOS on Steam Deck
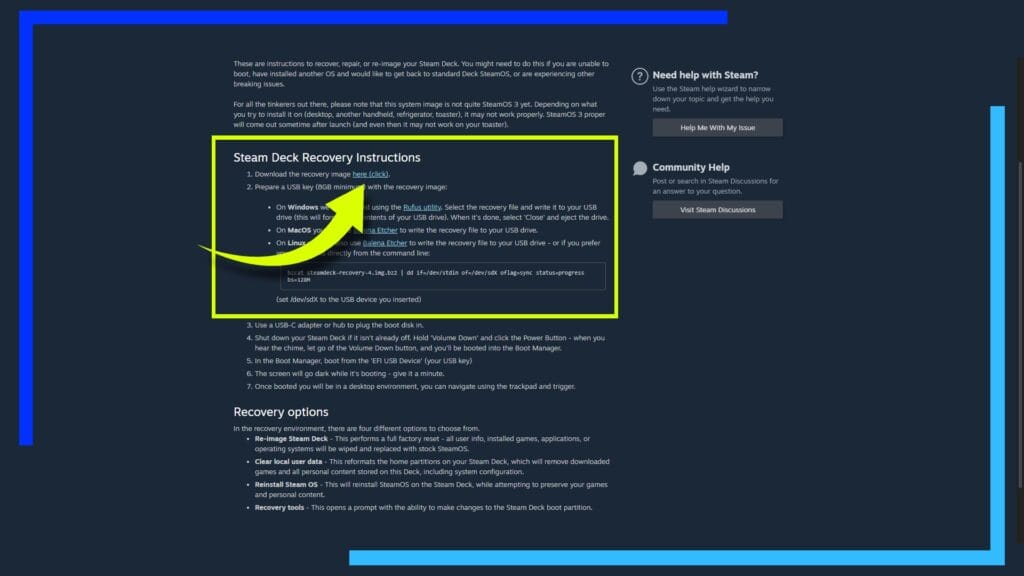
If you decide Windows isn’t for you, switching back to SteamOS from Windows is nice and simple.
First head over to the Steam Deck recovery website and download the “recovery image.”
Next download Rufus. That program will let you write the Steam Deck recovery image to an SD card or external drive for use with the Steam Deck.
When Rufus has finished creating a bootable file, plug the drive or SD card into the Steam Deck (this sounding familiar?).
With SteamDeck power off, hold down the “Volume down” button and while keeping it pressed, tap the power button. This will bring up the BIOS. As we did when we installed Windows on Steam Deck, select the option pointing to the memory card and that’ll begin the Steam Deck recovery process and reinstall SteamOS back onto the Deck.
Easy, right?
How Windows Handles on Steam Deck
Both SteamOS and Windows have their own set of issues. Installing Windows on the Deck is essentially trading one set of problems for another. The Steam Deck can be a pain when trying to install games from outside Steam, and Windows can be a pain when trying to use features that make SteamOS so great.
Windows is also much louder. The fan will whir at the smallest task and it’s very annoying. Though the above-mentioned Power Control Panel does help with that.
If you’re after a smooth experience, stick with SteamOS. Windows has a habit of randomly crashing when something doesn’t like the Steam Deck hardware. There are also random quirks we couldn’t understand.
Case in point, we installed the AMD software on Windows 11. It worked. Hurray! Then when we reinstalled Windows 11 later to test something else out for this guide, installing the AMD software kept crashing the Deck. As we say, weird quirks.
When Windows works, it’s great, and being able to install non-Steam games without having to faff around with Proton settings is so much more user-friendly. But as with how SteamOS is a pain when you move outside of SteamOS and into Linux territory, Windows is a pain when it’s trying to make sense of hardware it wasn’t designed for or when it fights the Steam app for control.
The good news is, if Windows 10 or Windows 11 isn’t for you, you can easily reinstall SteamOS back to the Deck. So long as you follow the guide and don’t veer off and start clicking random things, you can switch back to SteamOS in about 20 minutes.
Don’t Install Windows to an SD Card
No, don’t install Windows 10 or 11 to an SD card. Ever. Windows 11 runs horribly from an SD card, and while Windows 10 runs fine from an SD card, the amount of processes per minute each operating system performs isn’t good for memory cards. They simply weren’t designed to be put under that constant level of stress. Install games to the SD card, sure, but not the operating system.
If you don’t want to install Windows to the internal Steam Deck SSD/eMMc drive, grab an external hard drive and hook it up via USB. Just don’t use an SD card. Even more so if it’s an expensive one.
Should You Dual Boot Between SteamOS and Windows?
It’s possible to dual boot the Steam Deck between SteamOS and Windows, but we won’t be covering how to do that here for one simple reason: It’s not officially supported yet.
Dual booting allows the user to change which operating system the Deck loads into each time. This is great as you can play your Steam games in SteamOS and games designed for Windows via Windows 10 or Windows 11.
The problem right now is it’s not officially supported by Value and won’t be until we get SteamOS version 3.0.
Now, lots of users have successfully implemented dual boot and it appears to work well. The problem we have is when Valve eventually adds support, how will that impact people who already have it set up? Will the update break everything? Chances are it won’t, but that’s not a chance we’re comfortable taking right now.
Plus with how easy it is to install Windows on Deck and then reinstall SteamOS when you want to switch back, it’s not worth the risk.
Steam Deck: Windows 10 vs Windows 11
Both versions of Windows will run on the Steam Deck but both have their own kinks.
Overall, our testing showed better gaming performance on Windows 11. Not only that, Windows 11 also can use certain features of the Steam Deck without installing any drivers, like being able to access the Internet during setup. That last point isn’t a major factor as we have the drivers to install it manually, but it is a stylish example of what Windows 11 is capable of.
Windows 11 is also the current operating system, and while Windows 10 is still supported, we don’t know how long Windows 10 support will last. It’s future-proofing on a small scale.
Windows 11 may be the better choice for gaming, but if you don’t want your fan to constantly spin even when performing the most basic tasks, we found Windows 10 to be much quieter by comparison.
It’s hard to say which version is better for the Steam Deck because there are so many differing factors. Gaming performance is great on Windows 10, but Windows 11 was slightly better. We also found that Windows 10 had fewer issues than WIndows 11.
Also, the pop-up keyboard in Windows 11 is dire. It’s truly abysmal. Even when it’s scaled correctly it’s a massive step back from the version we had in Windows 10.
What it all comes down to is this: If you want the easy life, go with Windows 10. If you want to push the Steam Deck to its fullest to get the best visuals and speeds, go with Windows 11.

