What Is Alias Isolation?
When I reviewed Alien Isolation on Steam Deck, my main gripe was the lack of a good anti-aliasing method. Other than that, the game runs brilliantly for the most part.
Thankfully, that gripe can be circumvented with the excellent Alias Isolation mod. This mod will smooth out all those jagged edges in an instant. It’s genuinely amazing how well it works.
There is, however, the issue of getting Alias Isolation to work on the Steam Deck. It’s a Windows app that works by injecting code into Alien Isolation. Normally this would be an issue on Steam Deck as you run the games through Steam first, not another program.
Thankfully, after much trial and error, I’ve found a foolproof way to play Alien Isolation with the Alias Isolation mod installed and I’ve got pictures to guide you through every step.
Prerequisites
- You will need to have installed and loaded Alien Isolation at least once (IMPORTANT)
- An Internet explorer like Chrome or Firefox is also needed
Step 1: Boot into Desktop Mode
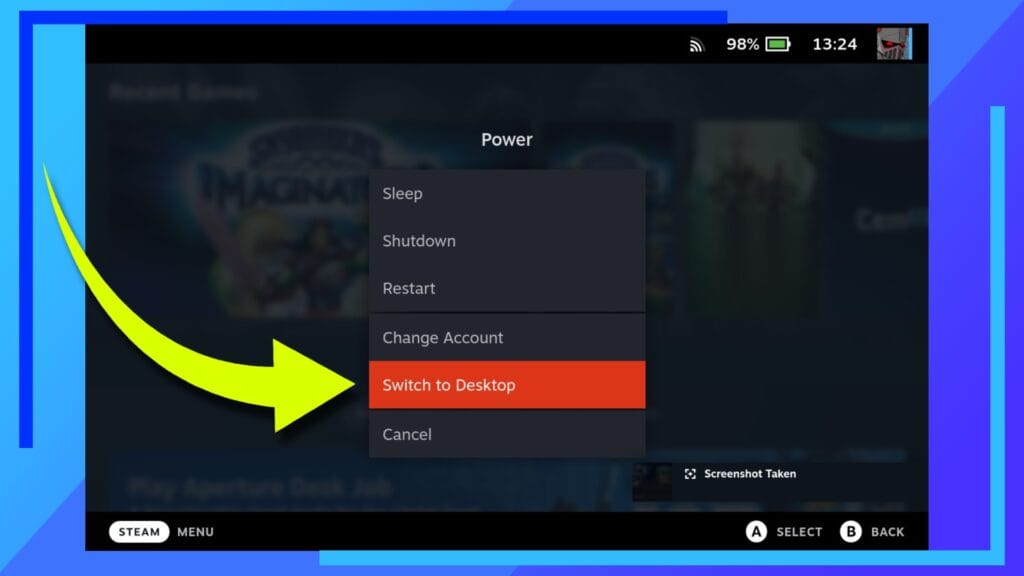
Let’s kick things off as most of my guides do and boot into Desktop Mode.
To do this, hold down the Power Button and click on Switch to Desktop from the menu.
Step 2: Download the Alias Isolation Mod
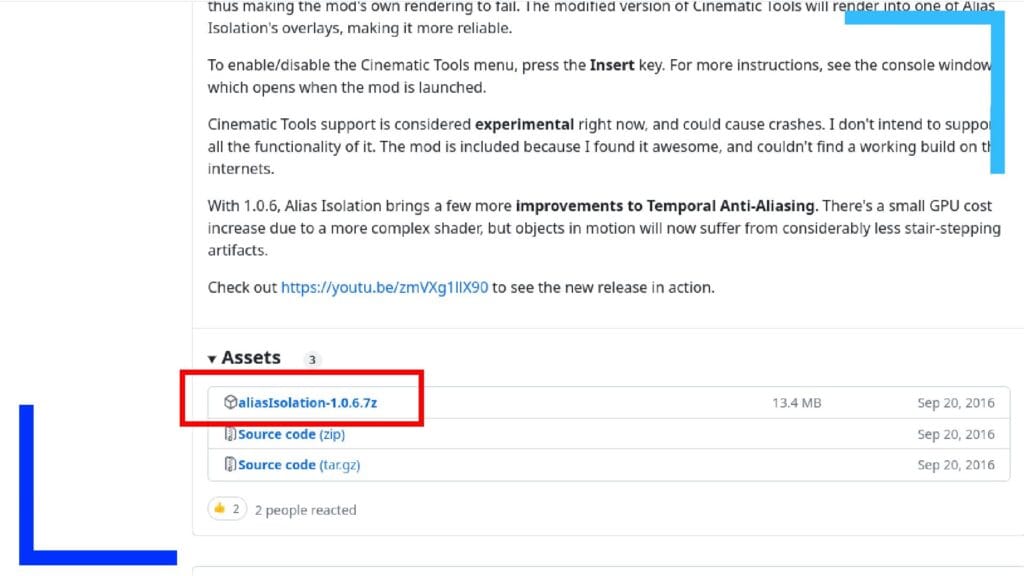
After Desktop Mode has loaded, open your Internet app. For most, this will either be Chrome or Firefox. If you don’t have any of those installed, head into the Discover Store (the blue shopping bag icon) and download them now.
When you’re ready, go to the Alias Isolation GitHub page on your Steam Deck and download the latest release.
Step 3: Extract Alias Isolation
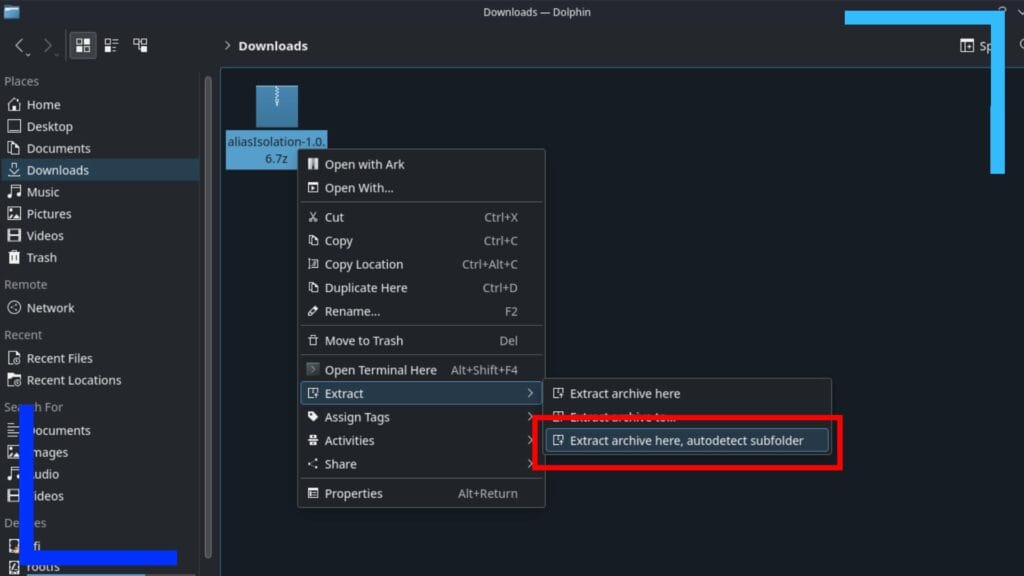
Open up the Dolphin File Explorer (the blue folder icon) and go into the Downloads section.
Inside you should see the file we just downloaded. Using the left trigger, click on the folder then navigate to Extract, then Extract archive here, autodetect subfolder. Use the right trigger to click on that last part and the files will extract to their own folder.
Keep this method of clicking with the left trigger to open the submenu in mind as we’ll be using it a few times throughout this guide.
Step 4: Copy the Alias Isolation Files
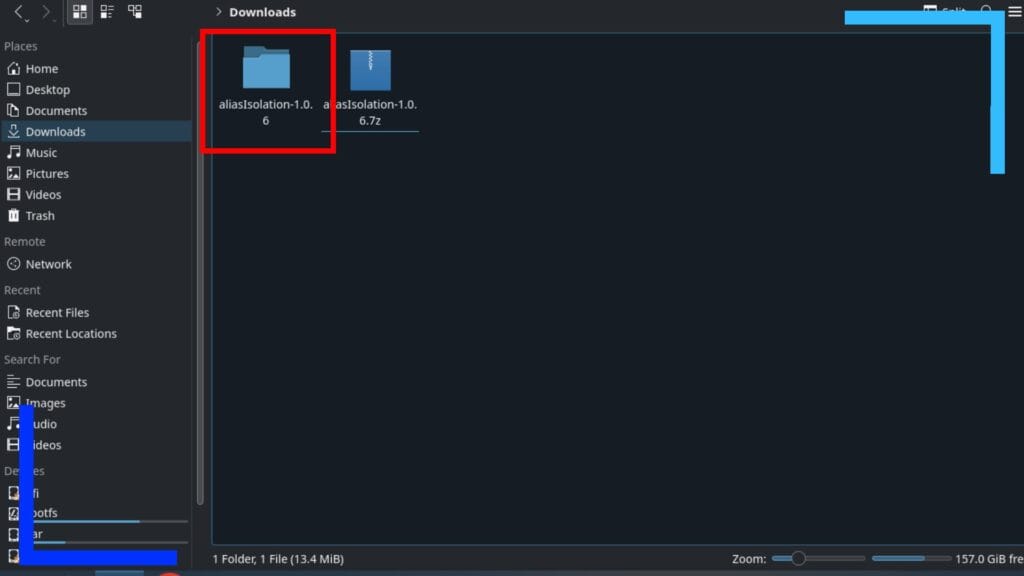
With the new folder in your Downloads, use the right trigger to click on it twice to open it.
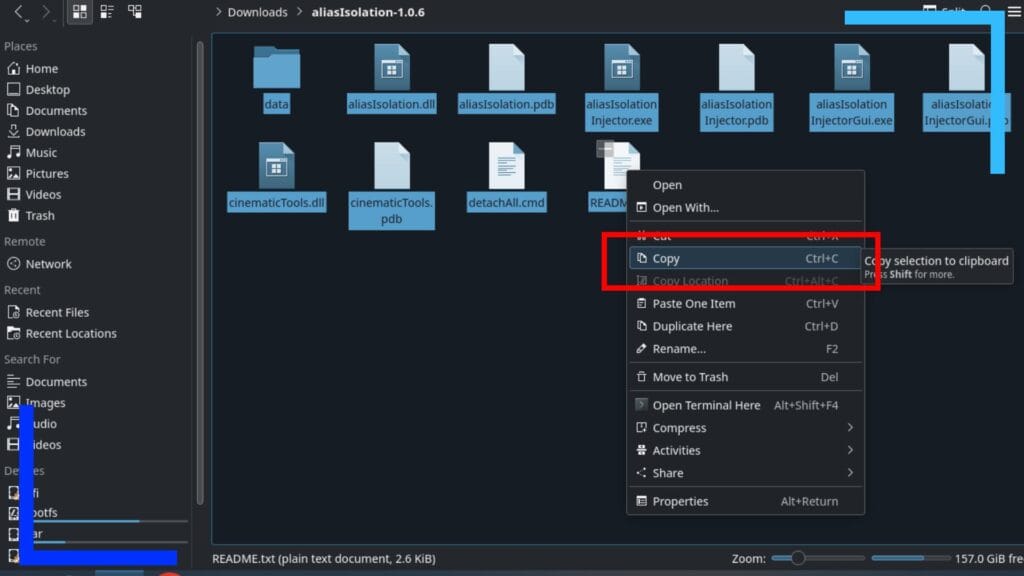
Inside you’ll see a bunch of files and a folder. We’re now going to copy all of them.
To do this, move the mouse cursor to an empty space and hold down the right trigger. With the trigger held down, use the right trackpad to move the cursor over all the files. This will highlight them all.
Now use the left trigger to click on any of the files and select Copy from the menu that pops up.
You won’t get a notification saying you’ve copied them, but rest assured you have.
Step 5: Move the Alien Isolation Game Files
For this next part we’re going to trick Steam into thinking Alias Isolation is Alien Isolation. Don’t worry, it’ll make sense soon.
To start this section, head into your Steam Library and find the Alien Isolation game folder. Depending on where you have the game installed will denote which path you want to navigate through.
If you installed Alien Isolation on the internal storage, the path is:
/home/deck/.steam/steam/steamapps/common/Alien Isolation
Note: To access the “.steam” folder, you’ll need to have “View Hidden Files” enabled. If you haven’t, click the three lines button to the upper right of the screen and there will be a box in the menu you can tick to show hidden files.
Or if you installed the game on an SD card, it’s normally:
/run/media/mmcblk0p1/SteamLibrary/steamapps/common/Alien Isolation
Once you’ve found the folder, go inside it by clicking twice with the right trigger and click on an empty space with the left trigger.
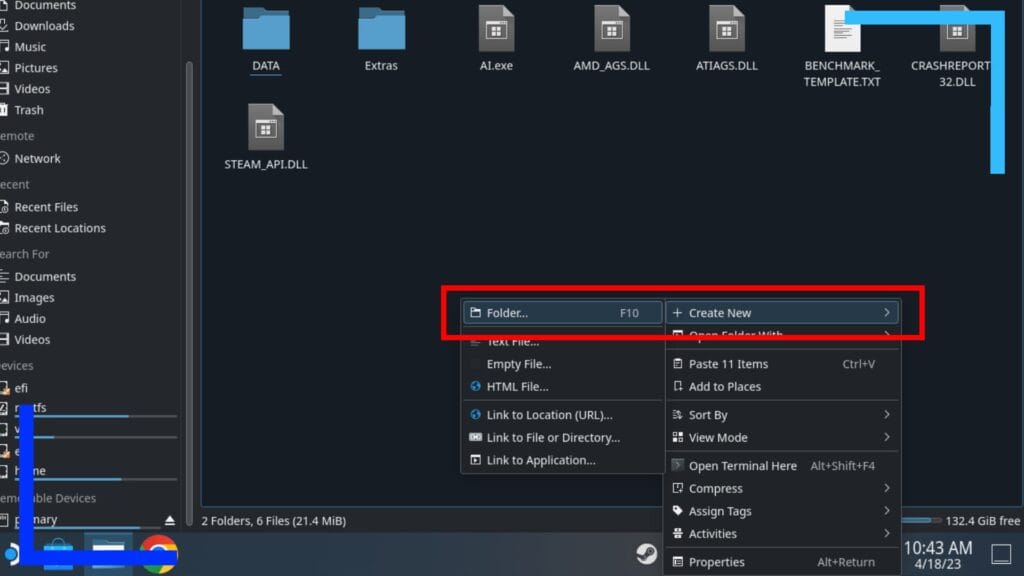
A menu will appear, and we want to select Create New then Folder. Name this folder inside of the Alien Isolation folder something simple, like “Alien”.
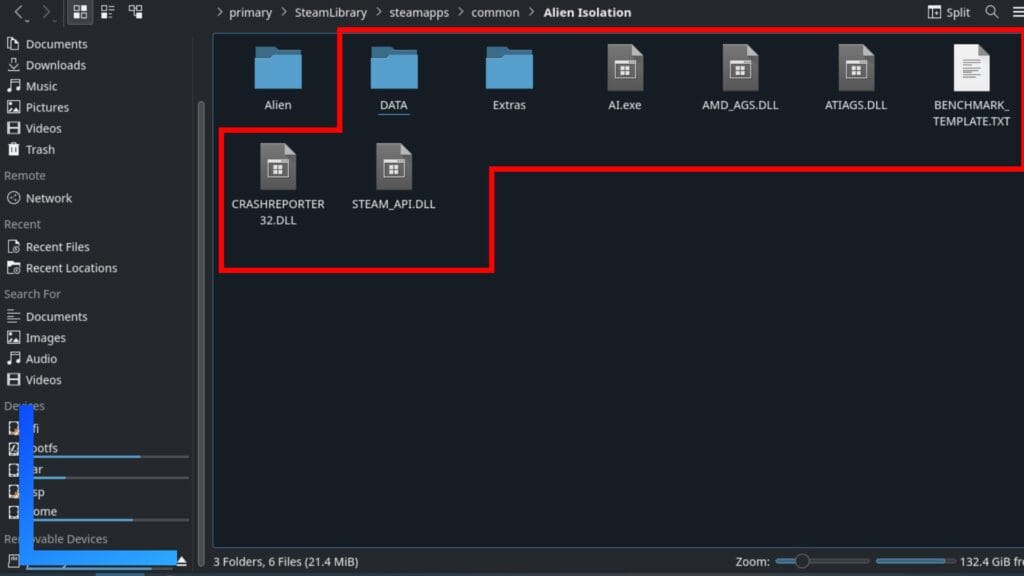
Now we’re going to move every single file inside the Alien Isolation folder into the new folder we just created.
You can do this by aiming the mouse cursor over a file, then holding down the right trigger and dragging said file over the top of the new folder we made. When you release the trigger, an option saying Move Here will appear. Click on that once and it’ll transfer the file into the new folder.
Do this for every file so you’re only left with the Alien folder visible.
Step 6: Rename the Launch File
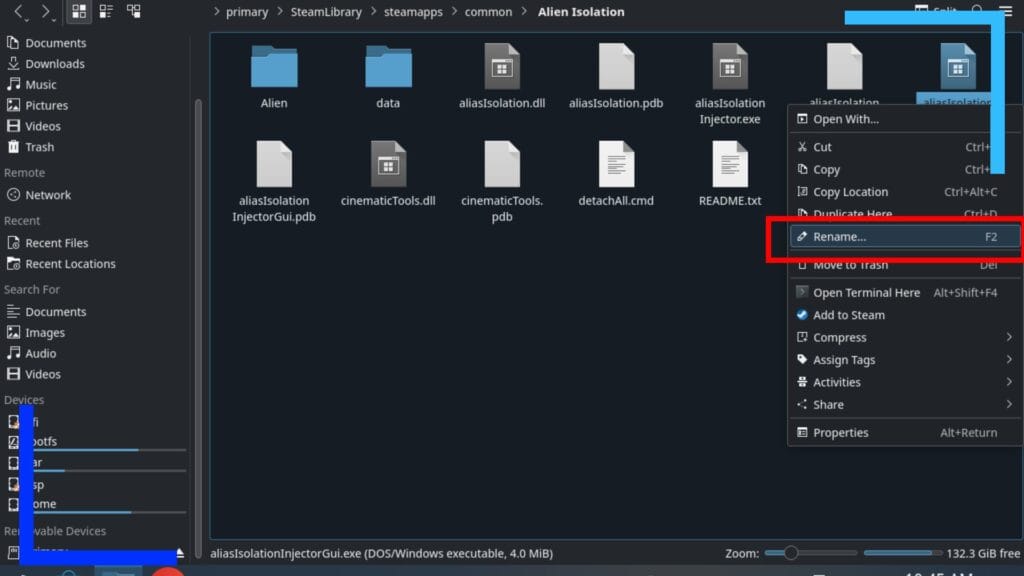
Remember when we copied the Alias Isolation files earlier? We’re now going to paste them into the Alien Isolation folder (not the Alien folder we created).
With the left trigger, click on an empty space and hit Paste. This will copy the files from earlier into the Alien Isolation folder.
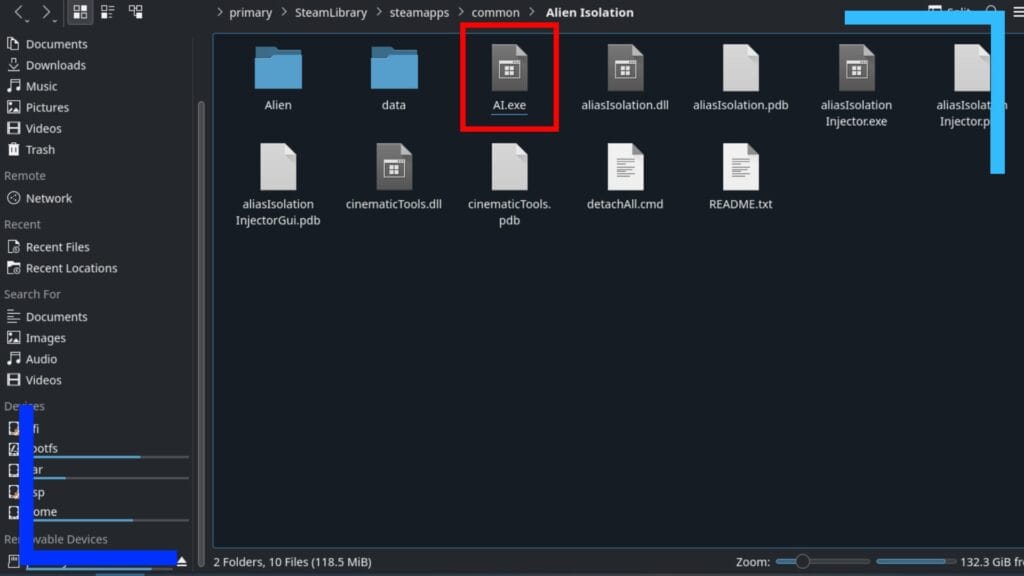
See the file named “aliasIsolationInjectorGUI.exe”? Good. Click that with the left trigger and rename it to “AI.exe” without the quotation marks.
The reason for this is the original Alien Isolation launch file is also named AI.exe. So by moving the original files to somewhere else, and naming the Alias Isolation launch file to the same as the Alien Isolation launch file, Steam will now load the Alias Isolation program before it launches the game. Pretty smart, right?
Step 7: Configure Alias Isolation
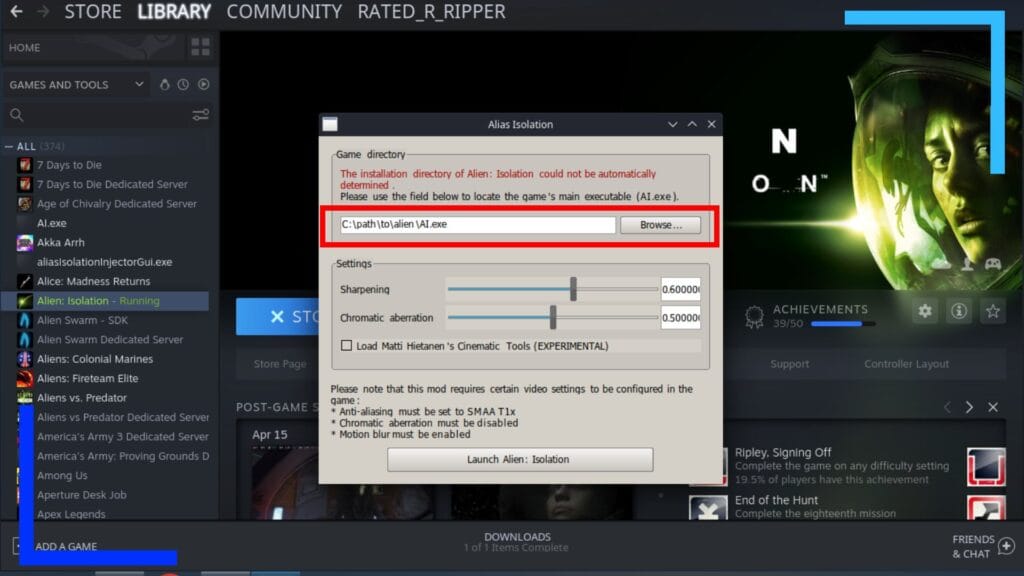
Head into the main Steam App and go into the Library section. Find Alien Isolation and hit the big green Play button to load it.
After a few seconds, Alias Isolation will load in its place. This is good.
Feel free to adjust the sharpening and chromatic aberration to your liking. I set them both to zero due to the Steam Deck being able to handle sharpening and I’ve read reports of Chromatic Abberation needing to be off for this mod to work.
Once that’s done, use the right trigger to click on Browse and point it to the Alien Isolation path we went through earlier in Step 5.
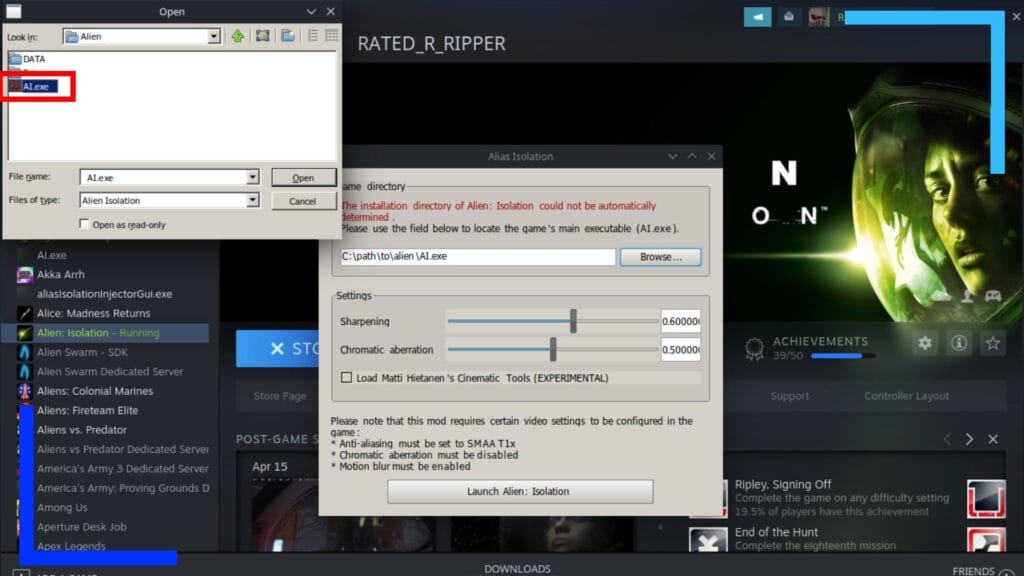
Once you’re inside the Alien Isolation folder, go into the Alien folder we created so you can see the original Alien Isolation files we moved. There should be a file named “AI.exe” (not to be confused with the version we renamed earlier). Click on that file twice with the right trigger and you’re all set.
All that’s left to do now is click on Launch Alien: Isolation and the game should load as normal.
Bonus Fact: Because you went to the trouble of doing this, you can even use the Alias Isolation mod in Gaming mode. You’ll need to hold the Steam button and then use the right trackpad to click on the launch button, but it totally works without ever needing to go back to Desktop Mode. How cool is that?
All images captured on Steam Deck. Testing performed on Steam Deck. Please credit if you used information from this guide.

