If you’ve got a Steam Deck and you’ve got Skyrim, you know exactly what the next step is: It’s modding time, baby.
But because the Steam Deck is Linux-based and most mod managers are designed for Windows, you can’t just install them as a non-Steam game and they’ll work properly. Stupid Linux.
Thankfully, installing Skyrim mods on Steam Deck isn’t all that difficult. In this guide, I’ll walk you through how to install SteamTinkerLaunch so you can load up a version of Vortex that works almost perfectly with the Steam Deck version of Skyrim.
Step 1: Boot into Desktop Mode
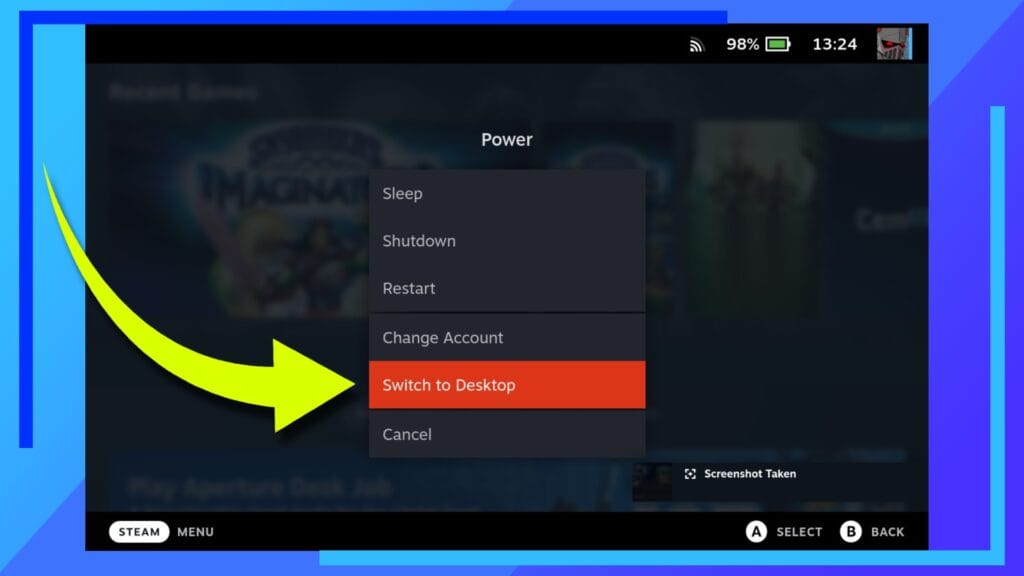
Let’s start with a simple task: Boot into Desktop Mode.
To do this, hold down the Power Button, and from the menu it spawns click on Switch to Desktop.
Step 2: Open the Discover Store
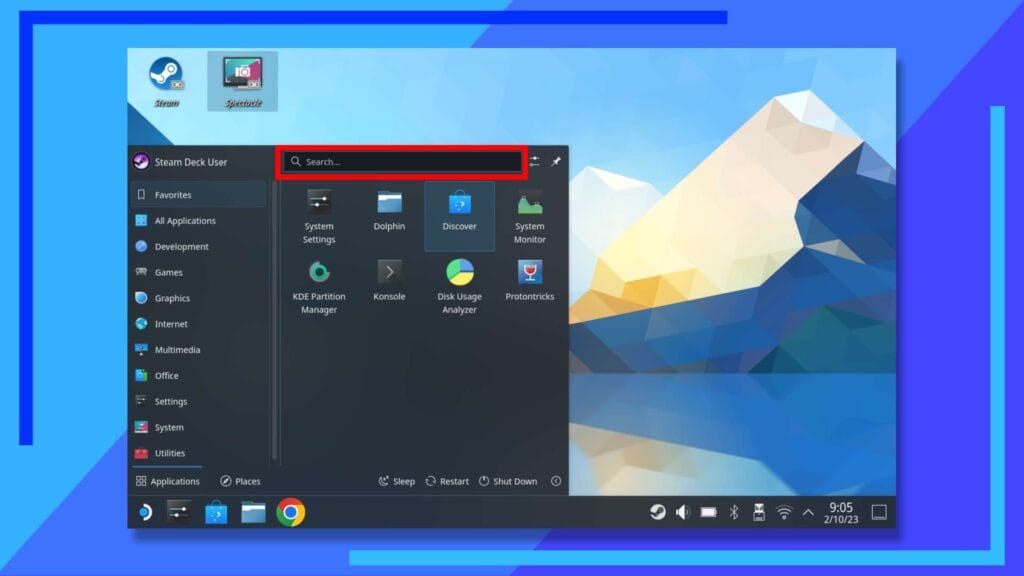
Once the Linux desktop loads, the next thing we want to do is open up the Discover store.
You can either click on the Blue Shopping Bag icon or open the Start Menu (the Steam Deck logo in the bottom-left corner of the screen) and in the search box type “Discover”.
When the Discover Store shows up, click on it with the right trigger to open it.
Step 3: Install ProtonUp-QT
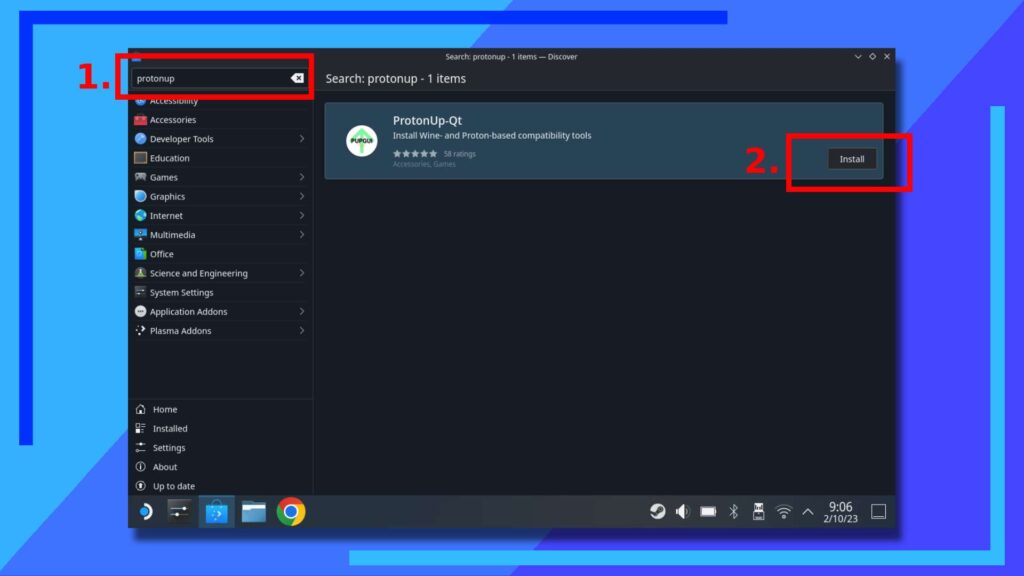
For this next part we’re going to install ProtonUp-QT. This will let us then install SteamTinkerLaunch, which itself will grant us access to Vortex. It’s much easier than it sounds. Promise.
With the Discover Store open, click on the top search bar and bring up the on-screen keyboard by pressing the Steam button and the X button. Next, type “ProtonUp-QT” without quotation marks and press the right trigger when you’re done to start the search.
ProtonUp-QT should now be on the right side of the screen. See that Install button? Click on that and the program will install to your Steam Deck.
Once ProtonUp-QT finishes installing you’re safe to close the Discover Store.
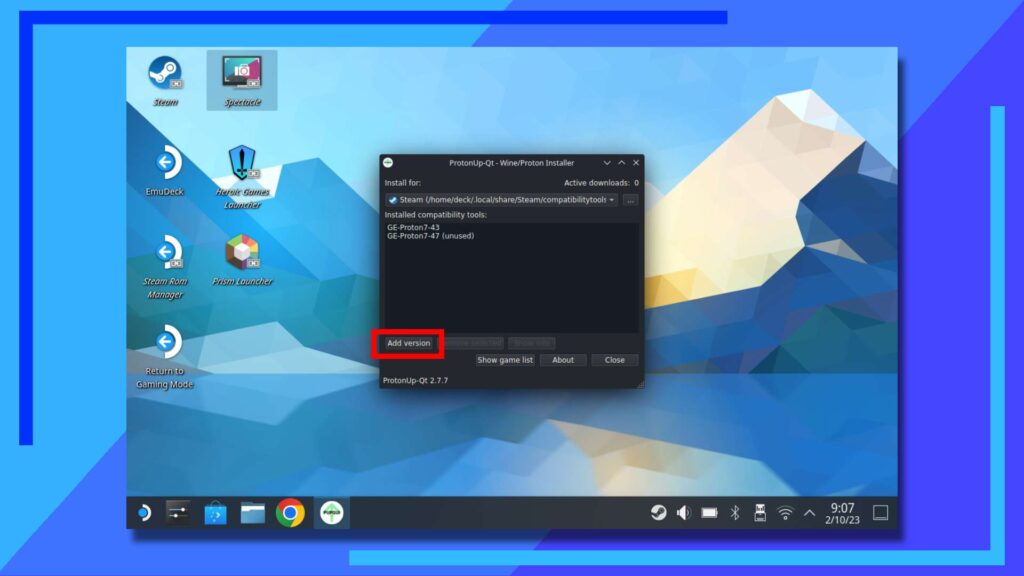
Head back into the Start Menu, and under all applications should be ProtonUp-QT. Click on it once to open it up.
There are a few options here but you can ignore most of them. What we need to focus on is Add Version. Click on this once.
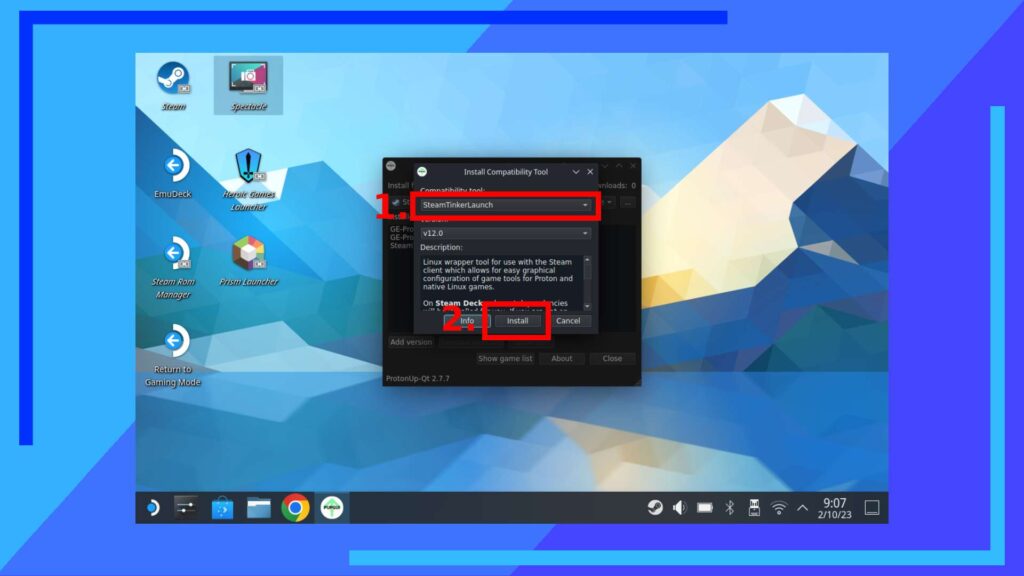
You’ll now be presented with a new window with some drop-down options.
Click on the upper box (1) to open it up and select SteamTinkerLaunch. Next, along the bottom of the window are three options. Click on Install (2) and SteamTinkerLaunch will be downloaded and added as an alternative proton option.
Step 4: Configure SteamTinkerLaunch
If you’ve ever had to change the proton version of a game, you’ll know exactly what you’re doing here.
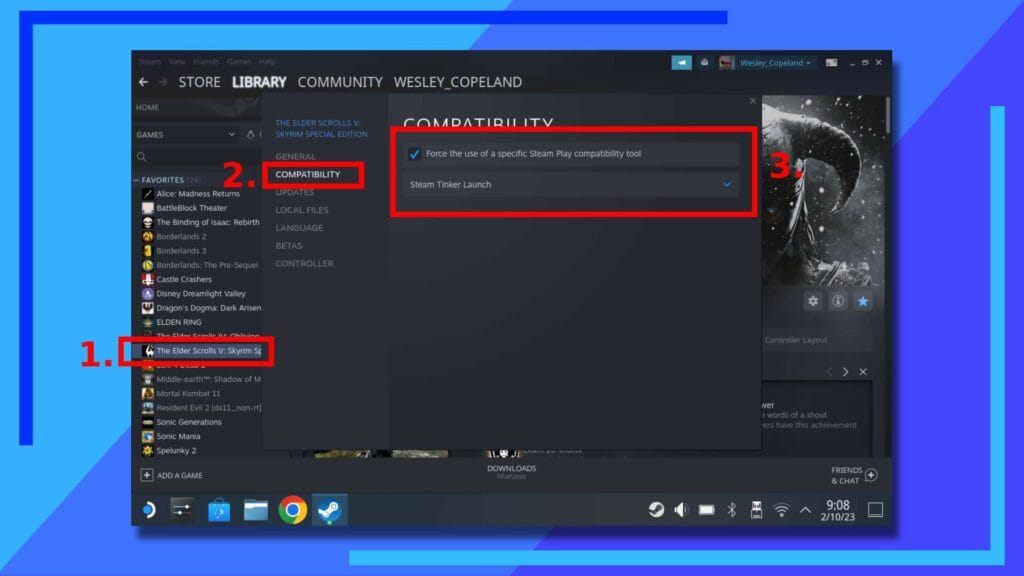
Open up Steam and click on the Library tab. Click on Skyrim, then in the left-hand column (1), use the left trigger to click on Skyrim again to bring up the sub-menu. Next click on Properties, then when the new window opens, click on Compatibility (2).
You should now be seeing a tickbox. Click on it once to tick the box (3), then from the drop-down menu select SteamTinkerLaunch.
Step 5: Load the SteamTinkerLaunch Menu
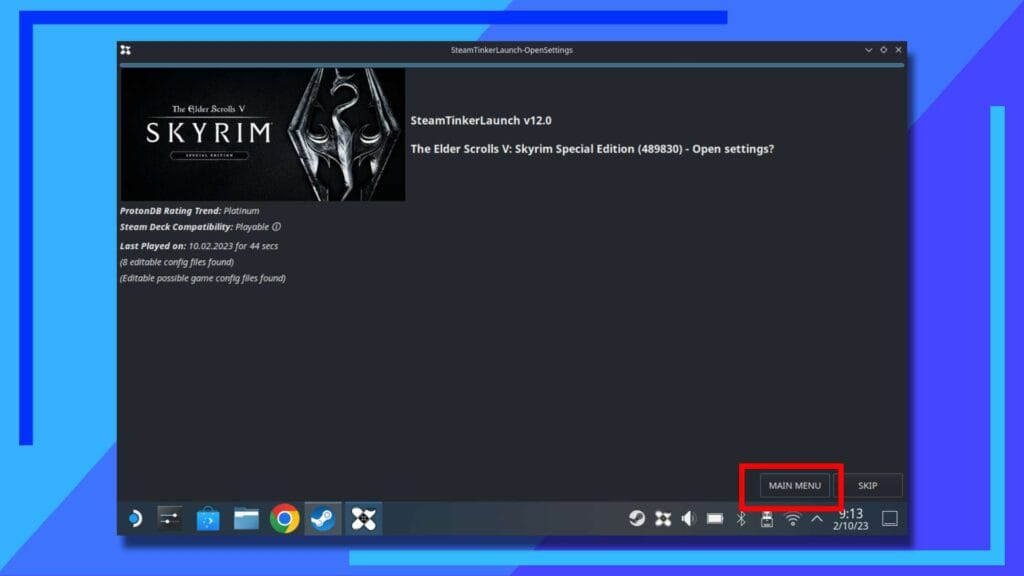
The next time you launch Skyrim normally, you’ll spot a handful of notifications to tell you what SteamTinkerLaunch is doing, then a new window will appear before Skyrim loads.
This SteamTinkerLaunch window only pops up for five seconds, so be sure to click on the button marked Main Menu to enter the SteamTinkerLaunch settings before it disappears.
Once the SteamTinkerLaunch settings menu loads, you’ll spot a mountain of options. This menu is where you can access Mod Manager 2 and a host of different launch tweaks.
For now, let’s click on Vortex to proceed.
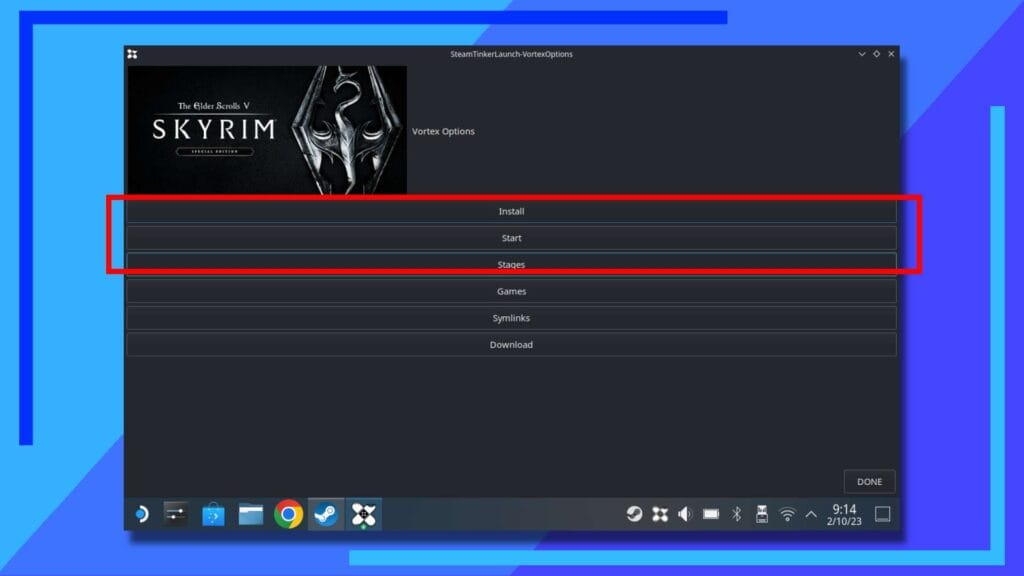
A new set of options will now appear. To install Vortex, click on the Install button.
One thing to note: This may take a while to install, and annoyingly the progress bar may not update as it goes. My advice? Just give it a couple of minutes to do its thing. SteamTinkerLaunch will inform you when everything has finished installing.
With Vortex installed, all that’s left to do is click on the Vortex button to load it up.
Step 6: How to Use Vortex Mod Manager on Steam Deck
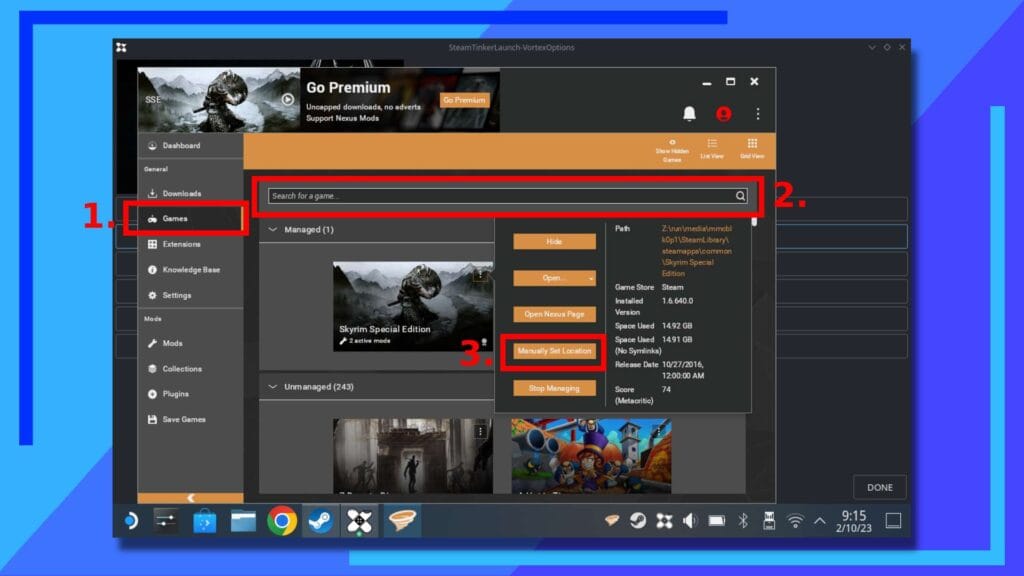
Vortex Mod Manager isn’t a massive complex program, but if you’re after a quick start rundown, let’s go through what you need to know.
Kick things off by clicking on Games (1). In the Search Box (2), type in “Skyrim” and add the version of Skyrim you’re running to Vortex (I did this guide with my copy of Skyrim Special Edition).
Chances are, because this is a Windows app running in Linux, you’ll need to specify the path to the main Skyrim launch file. This is super simple to do once you know how.
Under the managed games tab, find Skyrim and click the vertical ellipse button (…). This will bring up another menu (3) where you can click on Manually Set Location and show Vortex where the main launch .exe file is for Skyrim.
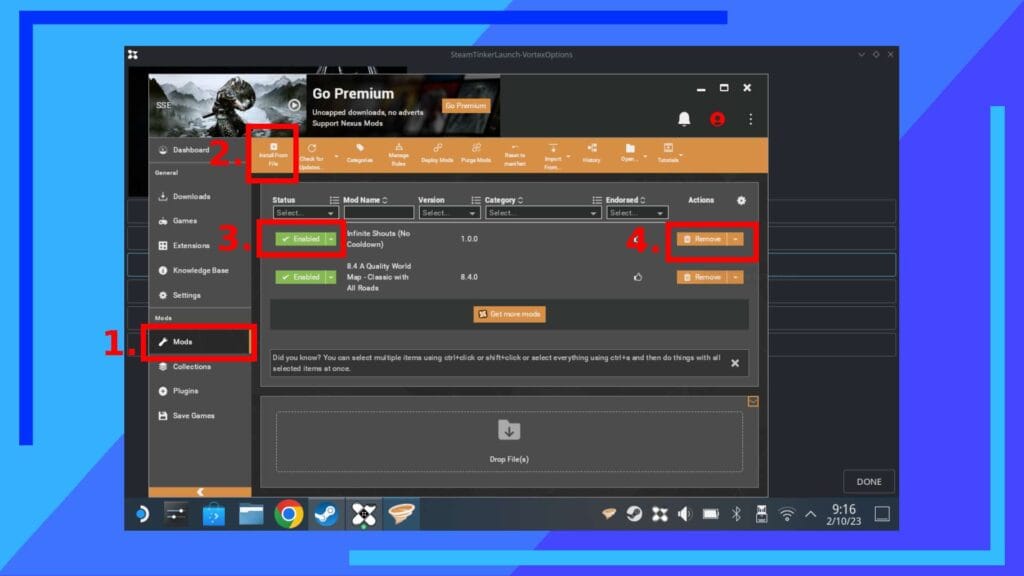
Now you’ve got an understating of how to add games to Vortex, let’s discuss how to use Vortex to mod Skyrim on Steam Deck.
Start by clicking Mods (1). You’re now looking at your main mods page. You’ll be here a lot, so it’s worth familiarizing yourself with what’s what.
In the upper-left of the window is Install From File (2). This button is what you’ll be using when you want to add a mod to Skyrim. Although Vortex does have the option to communicate with web browsers to auto-load mods directly from a browser with one click, this function doesn’t work on Linux. Boo.
So what we need to do is download the mod file manually, then use the install from file button to locate it and add it to Skyrim on Steam Deck.
Mods are normally downloaded to your Downloads folder, so when you click the button to set the location of the .exe file, navigate through the following path to find your mod:
/ > Home > Deck > Downloads
After clicking on your mod file to open it, it’ll then be loaded into Vortex and installed. Easy, right?
The only other buttons worth knowing about are Enable/Disable (3) and Delete (4). Use those to turn mods on and off, or to completely delete a mod.
It’s also recommended you don’t use the delete options from within Skyrim’s Bethesda.net mods menu. The reason being, it doesn’t actually delete the mod from your Steam Deck. It just hides it from Skyrim.
So if you want to get rid of a mod, use Vortex to delete the file. Just keep in mind this doesn’t delete the mod from your hard drive or SD card. It just removes it from Vortex. The mod in your downloads folder will still remain until you manually delete it.
With that, you’re now free to go off and install Skyrim mods on Steam Deck. That wasn’t too bad, was it?
How to Enable New Mods in In-game
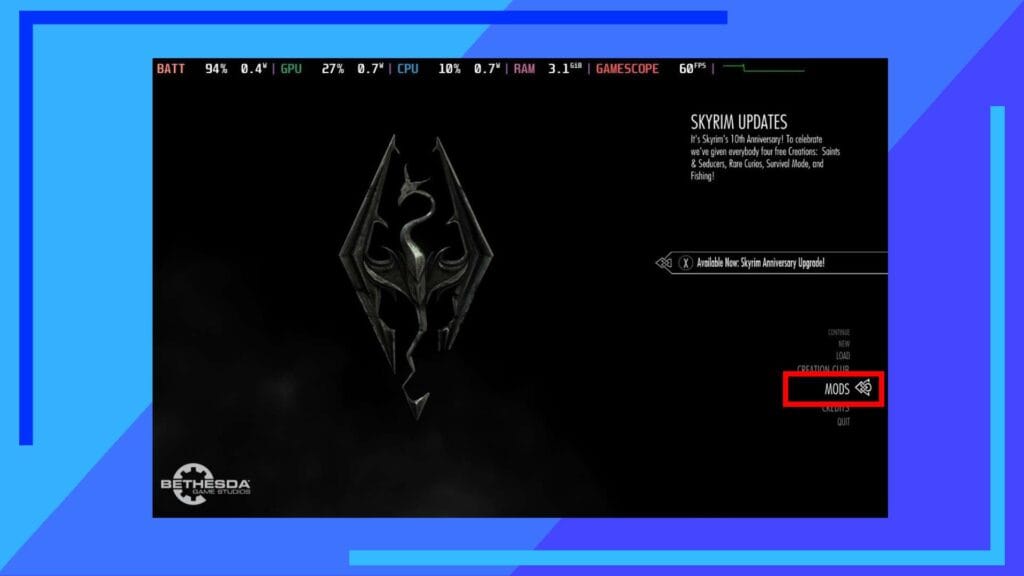
On Windows, Skyrim mods from Vortex are normally auto-enabled. On Steam Deck, or at least when I did it, they were not. It’s an easy fix, though.
If you find your mod isn’t doing anything in-game, head back to the main menu and click on Mods. You may need a Bethesda.net account for this, by the way.
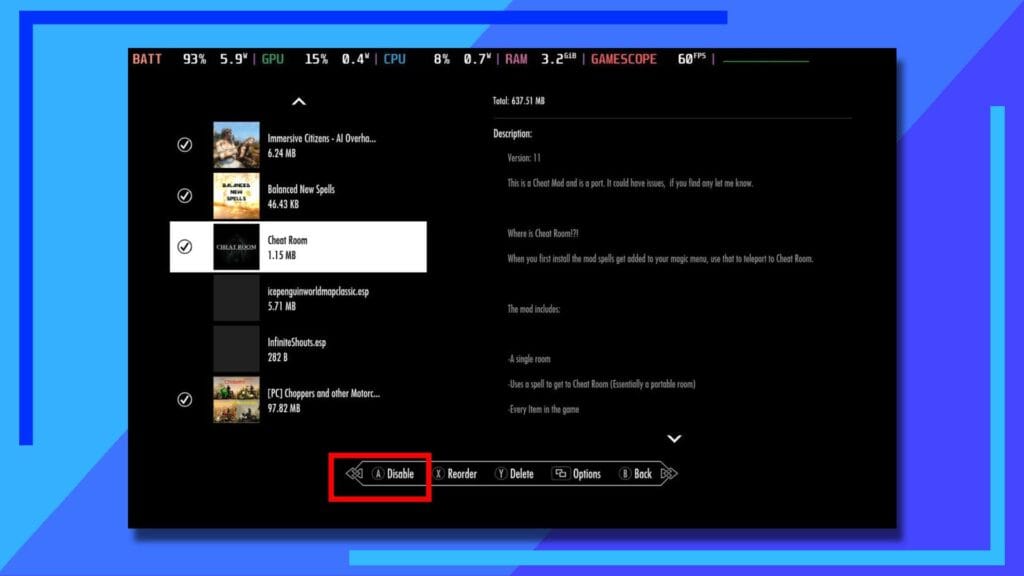
Once it loads, click on load order (the Y button on the Steam Deck) and scroll down to the troublesome mod. If it’s not got a tick next to it, that means it’s turned off and not active.
Now just hit the A button on the Steam Deck controller while the mod is selected and that will enable it (or disable it if it’s already on).
Further Reading: SKSE and Bethesda.Net Mods
Bethesda.net mods, the ones you access through the main menu of Skyrim, work brilliantly on the Steam Deck. Well, the search function is garbage but that’s a general issue everywhere. In terms of how well Bethesda.net mods integrate on the Steam Deck, everything works with minimal effort.
SKSE, however, that’s where things get a little more complex.
For those who don’t know, SKSE is a Skyrim script extender that certain mods utilize in order to work. I’ve done a whole guide on how to install SKSE on Steam Deck and I’d recommend using it if you’re looking to get it set up.
I’d love to say it’s a case of dragging and dropping files, but when I installed SKSE with SteamTinkerLaunch, SKSE had audio issues and a bunch of crashes, that’s why I’d suggest following the guide, especially if you want to install mods that enable achievements.
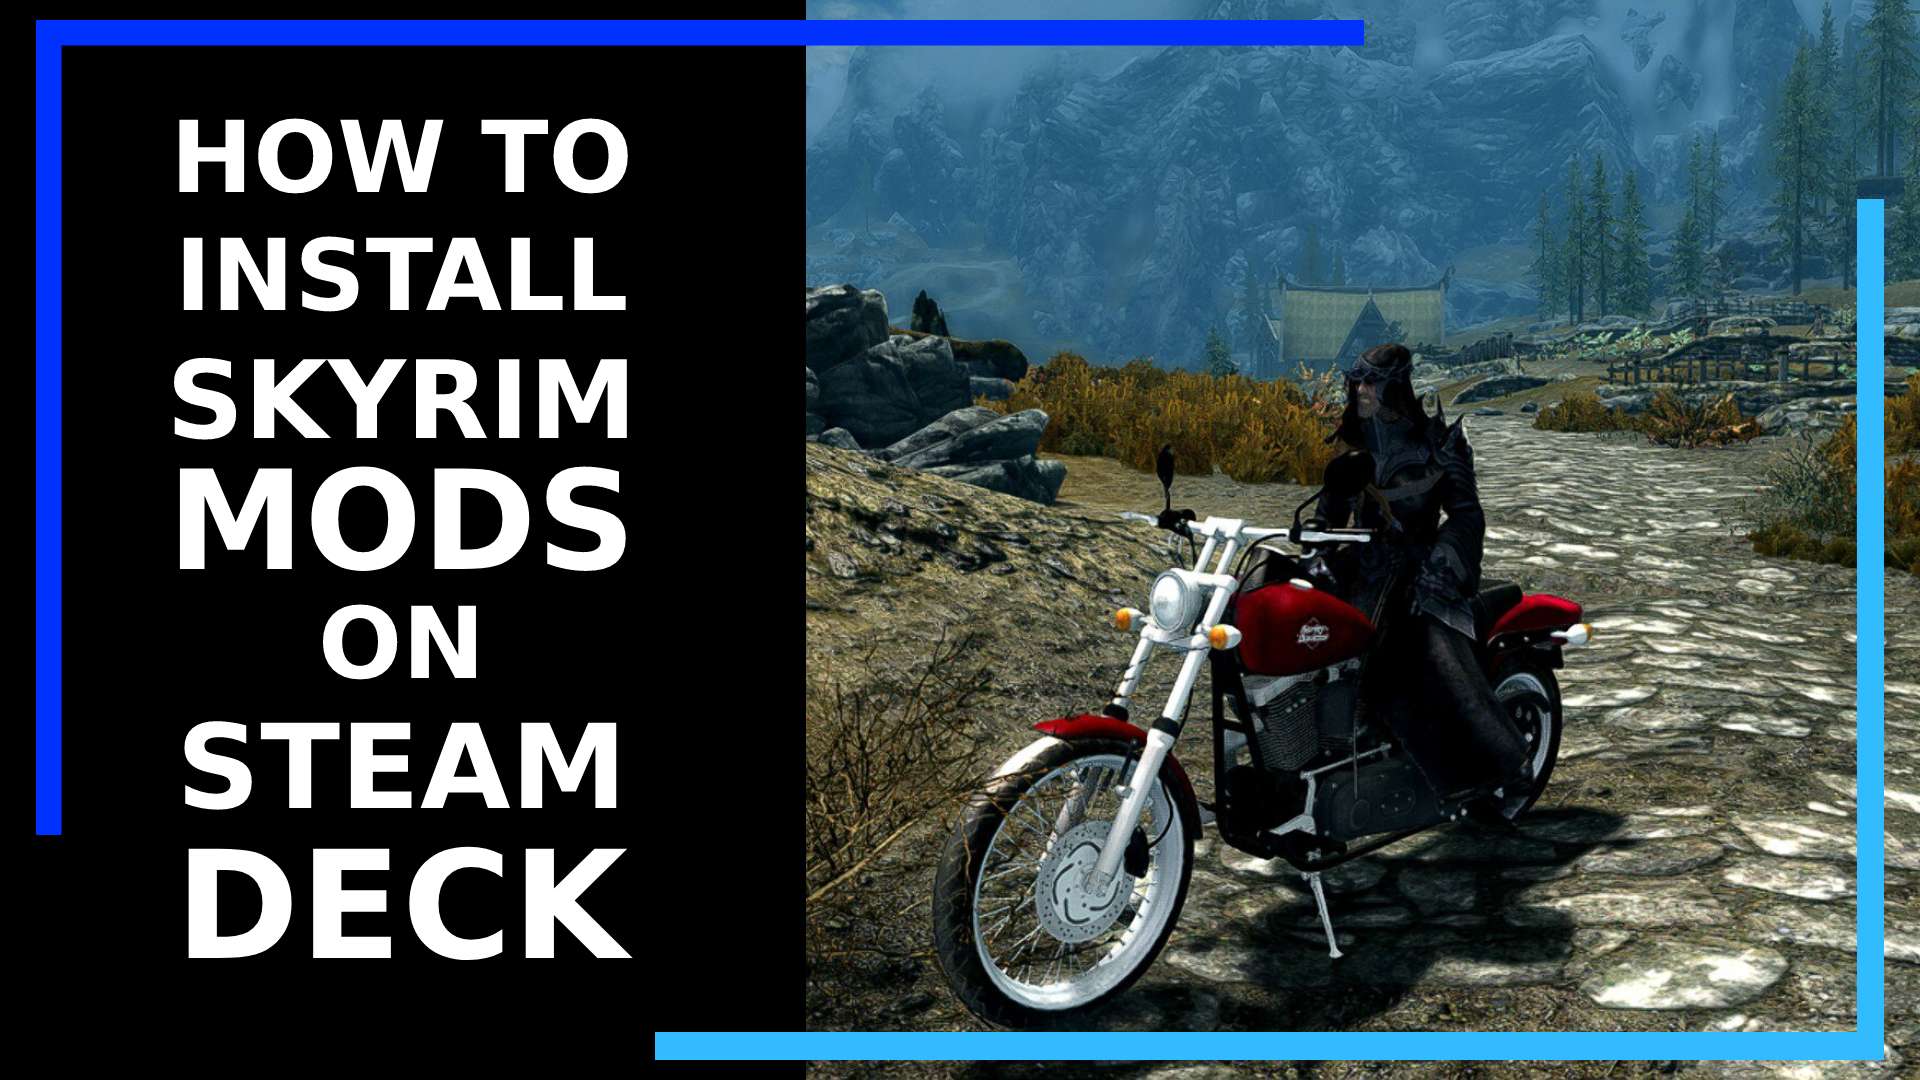
What’s the Mod In the Image At the Top?
Obviously, I’m having a blast modding Skyrim on the Steam Deck, and you can’t beat ridiculous mods. Who wouldn’t want to ride a Harley in Skyrim? It’s so stupid that you can’t help but laugh.
The mod from the image at the top of the page is the (ESL) Choppers SE mod, which I got from the Nexus Mods website. And yes, it works, and it’s as silly as you’re probably imagining.
What About Fallout 4?
How was I able to work out this method to get Skyrim mods running on Steam Deck? It’s the exact same method I used to install Fallout 4 mods on Steam Deck. Fallout 4 modding is, believe it or not, actually even easier as well.
Plus Fallout 4 has a cool lightsaber mod, so if you’ve got that Bethesda game as well as Skyrim, be sure to mod it also now you know how to.

