Do you have a broken Steam Deck screen or you’re looking to upgrade to something more flashy? Read on to learn how to install or replace a Steam Deck screen safely. Just keep in mind while this isn’t super-difficult, it is time consuming. It took me around two hours from start to finish to complete, so be sure to have enough time free before you start.
Before We Start.
Let’s start with some housekeeping tips. I recommend grabbing everything listed below to make your life easier. I’m using the JSAUX screen replacement for this guide and it comes with everything bar one of the screwdrivers. If you don’t have everything on the list below, you can get by with the essentials so long as you’re careful.
I’d also strongly recommend swapping the screws for new ones when you’re putting them back in. One of the common problems with the Steam Deck is the factories tighten the screws too much, and that results in stripped screws. It’s happened to me twice, so if you do strip any, switch them out for a new screw.
Should you happen to strip any of the heads like I did, don’t keep trying to move it with a screwdriver as you’ll make the problem worse. Instead, grab some needle-nosed pliers and carefully but tightly try to turn the screw clockwise. Once you’ve got it moved slightly, that should be enough to go in with the screwdriver again to release it.
Finally, if you have trouble remembering which way to turn the screws, remember: Righty tighty, lefty Lucy. You’re welcome!
Essential:
- Phillips Number 1 magnetic screwdriver (PH1) for back screws.
- Phillips Number 0 magnetic screwdriver (PH0) for internal screws.
- Hairdryer.
- Adhesive strips.
- Adhesive cutting sheet.
- A new screen.
Recommended:
- Latex gloves or finger protectors.
- Tweezers.
- Pry tools.
- Replacement screws.
Disclaimer: This guide is for educational purposes only. If you attempt anything within you are responsible for any damage caused to your Steam Deck.
Step 1: Remove the Backing Screws.
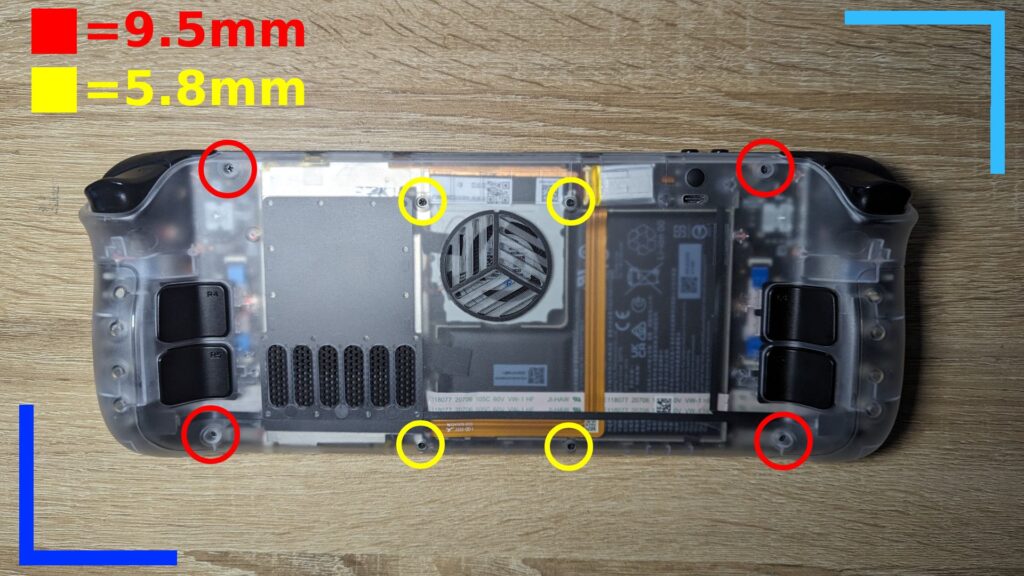
Don’t do anything yet. If you have an SD card in the Steam Deck, remove it now or it’s going to get snapped in half. Seriously, this will happen if you don’t. Also, make sure your Steam Deck is powered down and not in rest mode or connected to a charger. Leave it for 30 minutes to make sure any residual electricity has dissipated and then you’ll be good to move on.
Now take a look at the image above. You’ve got eight screws to remove – four 9.5mm screws vertically level with the triggers, and four 5.8mm screws near the center of the backplate.
Once all eight screws are removed and placed to the side, move on.
Step 2: Remove the Backplate.
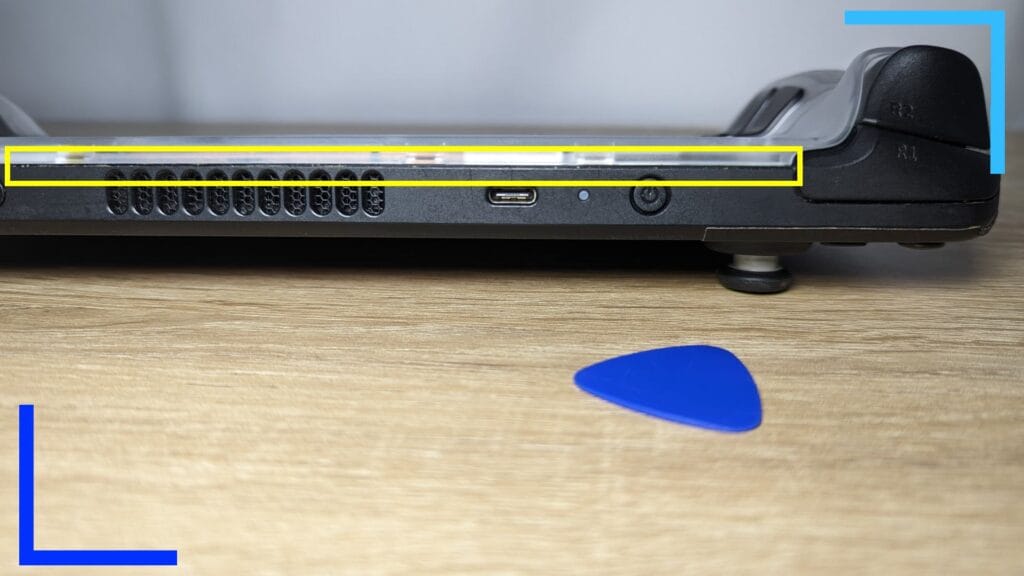
Some people suggest putting the pick into the area where the plastic backplate meets the frontplate along the top of the console is the best place to start. I don’t agree. When I was doing this, I found using the oblong pry tool and jamming into the bottom where the backplate and frontplate meet, by the memory card slot, is the best place to start opening and removing the backplate.
Once you’ve made an opening, slowly move the pry tool around the side of the console and up to the triggers. The case shouldn’t need much force. It’ll pop open as you move the tool around.
Once you’ve made a gap running the circumference of the Steam Deck, carefully lift the backplate off and lay the Steam Deck face down.
Tip: Be sure to not place the Steam Deck down on anything as it could damage the screen.
Step 3: Remove the Shielding.
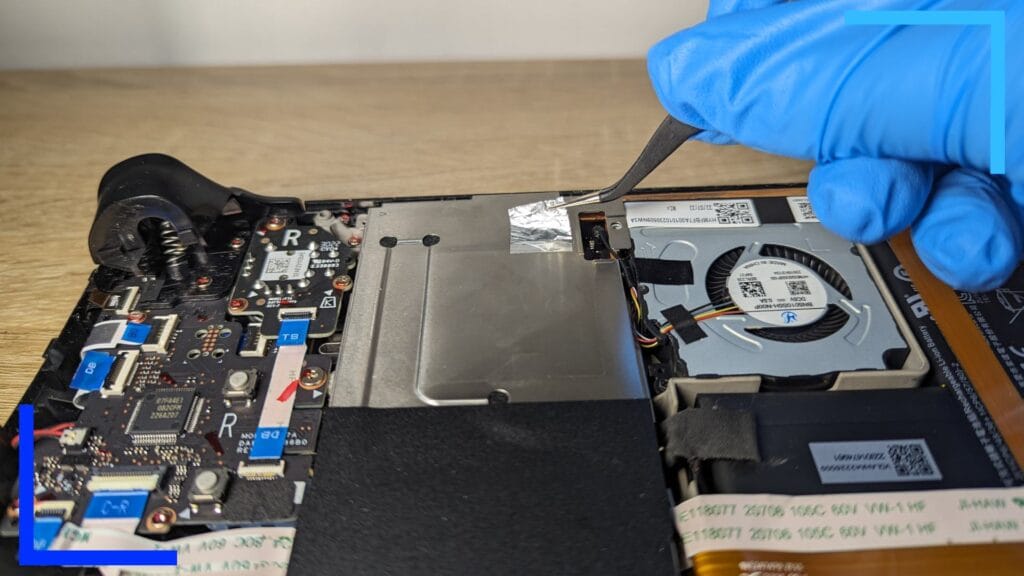
You should now be staring at the internals of the Steam Deck. Before moving on, grab your tweezers and carefully lift up the foil sticker on the metal enclosure shielding.
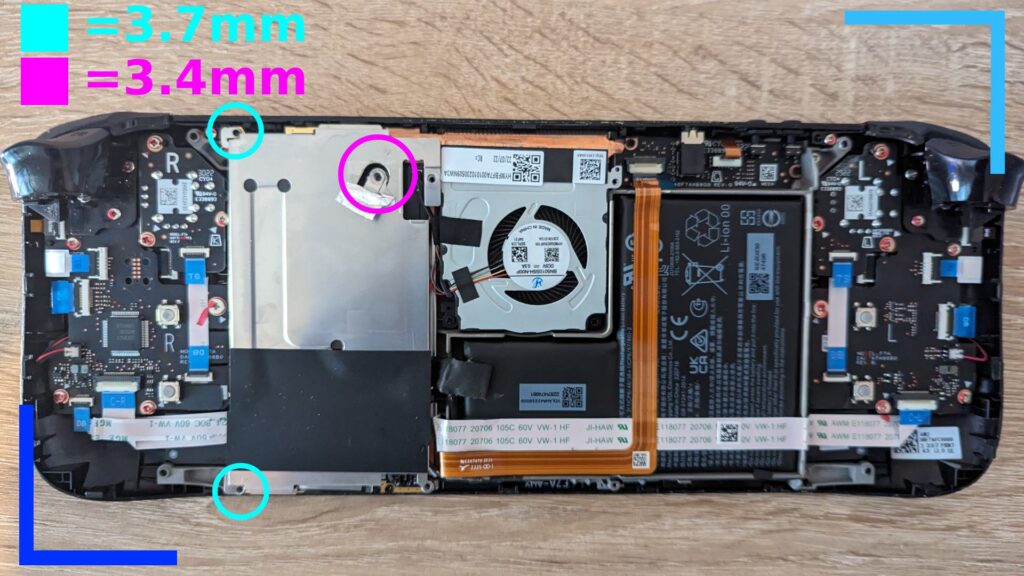
Lifting the foil sticker will reveal a 3.4mm screw we’ll need to take out. Do that now and place it to one side.
Now unscrew the two 3.7mm screws. You’ll find one in the bottom left corner of the shielding and one on the top left.
Once both screws are out, gently remove the shielding by hand while being careful not to tangle it in the black cable found in the upper right groove.
Step 4: Disconnect the Battery and Other Cables.
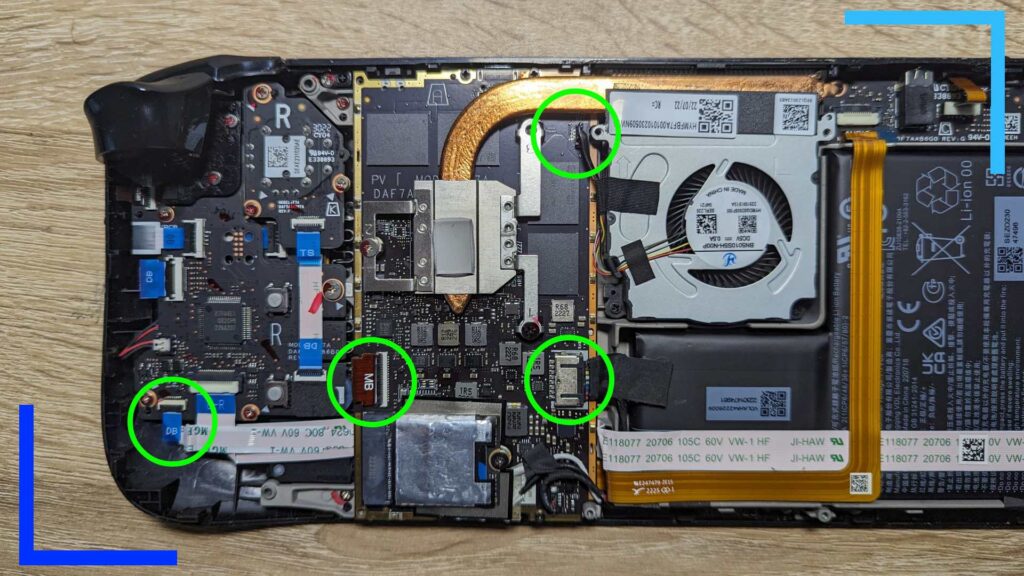
Next comes disconnecting several elements connected to the motherboard, including the battery.
Let’s start with the battery before anything else. You should see a large piece of fabric on the right side near the battery itself. Grab the fabric and carefully pull the battery connector to the right to remove it.
Once that’s out, disconnect the three remaining elements pictured above. The furthest left white cable will need to be peeled slightly from the other white cable it’s stuck to beneath. It’s not anything major, don’t worry. It will peel off like a sticker.
One thing to note with the smaller connections: You’ll need to flip a little switch up, which normally looks like a black line, to release the cable or lock it in place.
Once all four cables are disconnected, move on to the next step.
Step 5: Remove the Motherboard Screws.
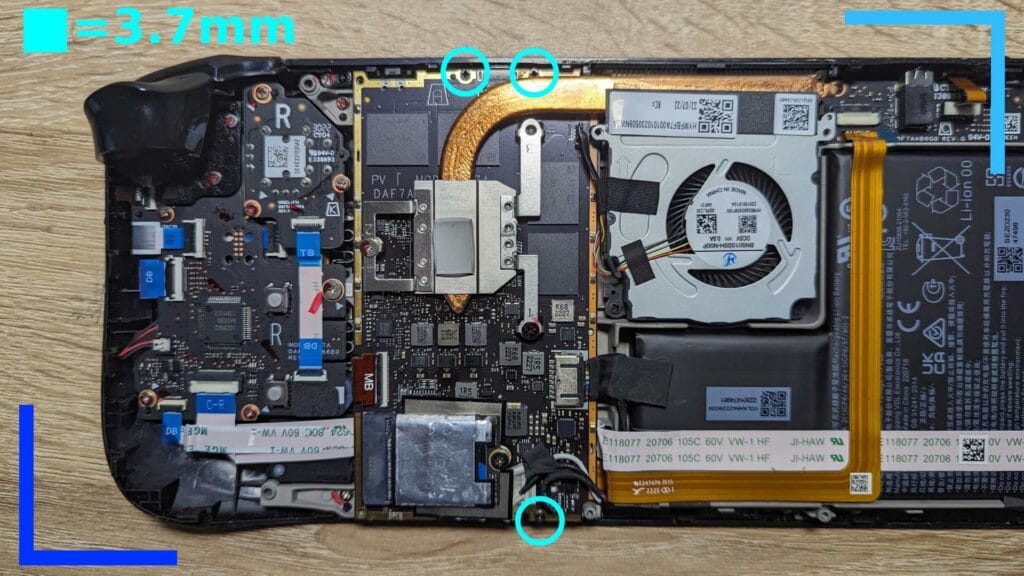
We’ve now got three 3.7mm screws to remove. Doing this will let us move the motherboard to the side and get access to the screen’s connector cable.
Two screws are found slightly up from the heatsink, while another is to the bottom right of the 2230 SSD (the SSD should be covered in a foil jacket).
Step 6: Move the Motherboard to One Side.
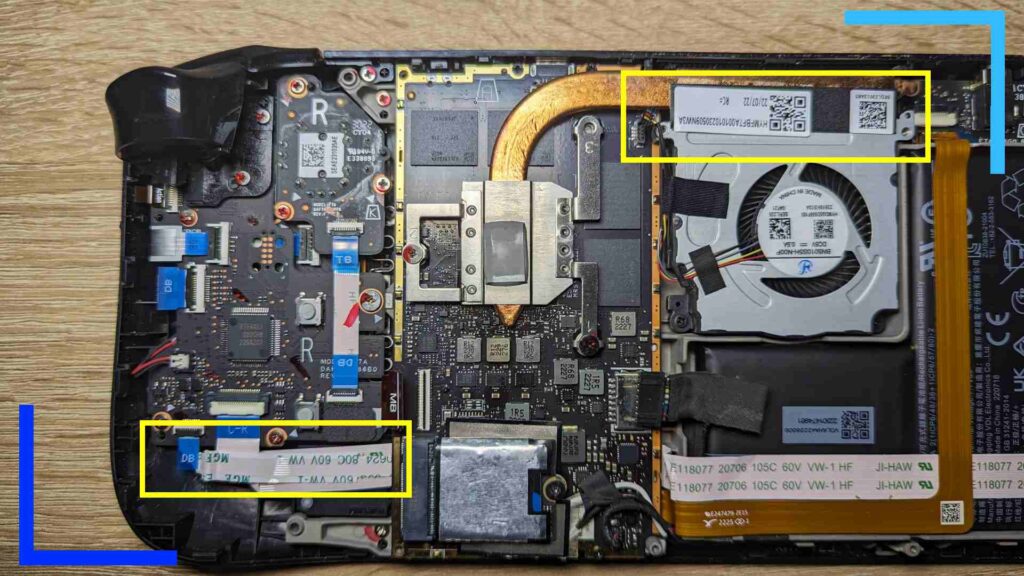
Do not rush this part. It’s not difficult but it will have you shimmying the motherboard, so take it slow, yeah?
Start by making sure the white cable on the left is unstuck from the white cable below it. Now take a look at the fan. See that black sticker with a QR code on pictured above? Use your tweezers to get under where it sticks to the fan casing. I found it’s made from a strong card, so don’t worry about it ripping if you apply a bit of pressure.
You should be able to lift the bottom half of the sticker and leave the top half attached to the heatsink.
Once both stickers are good to go, let’s move the motherboard to the side.
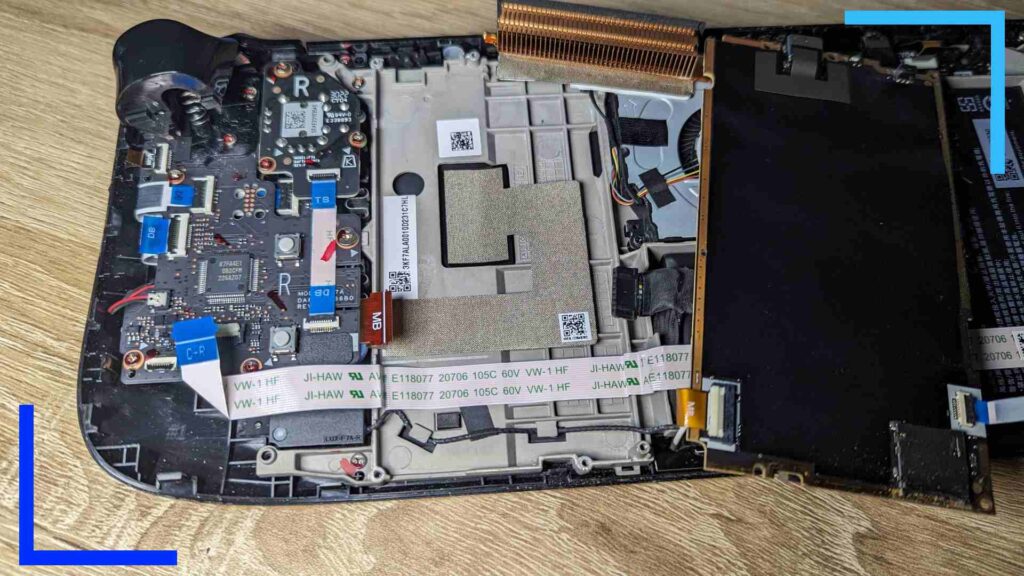
You should be able to lift the motherboard at this point. The white cable will move with the board, but the cable on the bottom right (before you flip the board over) will remain attached.
Carefully lift the motherboard then flip it over and place it down to the right of the area you just got access to.
Important: Please be aware of any cables still connected to the motherboard. One of these is your speaker cable and it’s welded onto the board, meaning if you’re not careful it’ll come off and you’ll need to weld it back into place.
Step 7: Remove the Screen Connector.
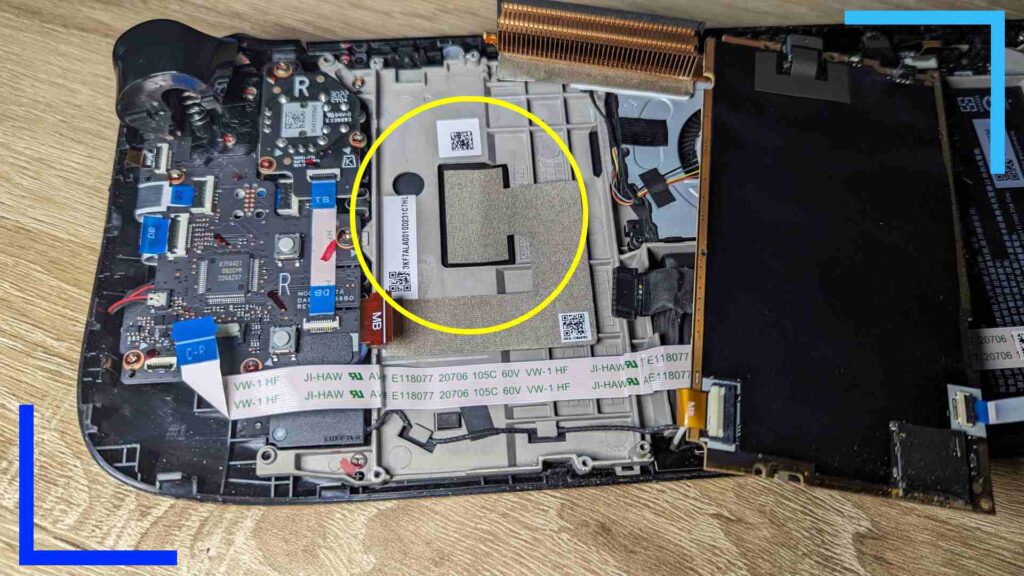
Take a look at that big sticker with a QR code above. Grab your tweezers again and from the bottom left corner, lift it up.
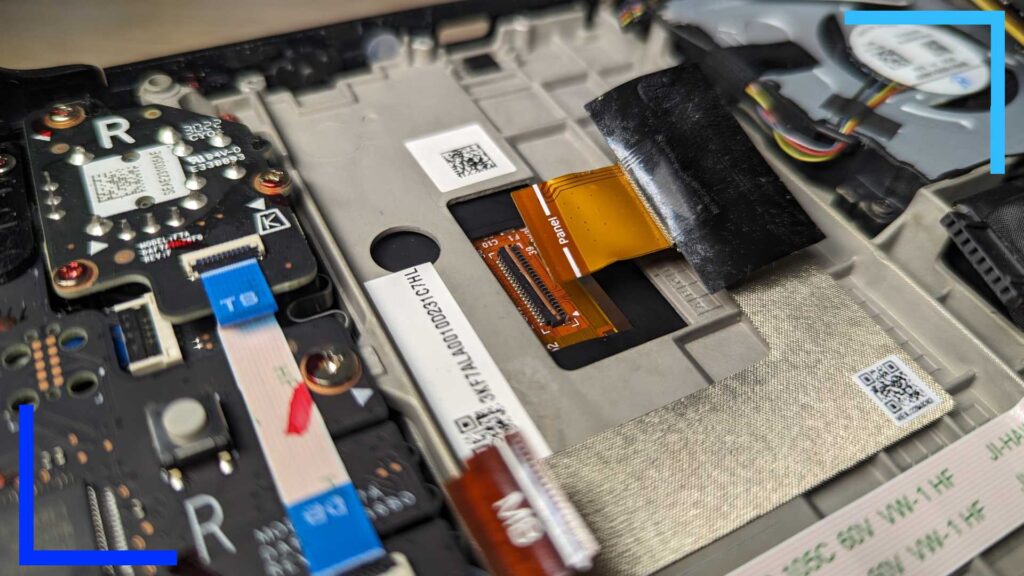
Underneath is an orange cable connected to an orange connector. Carefully flip the orange lid on the black part of the connector and slowly pull the cable to the right to release it.
Once this cable has been disconnected, flip the motherboard back into its position and screw back in the three 3.7mm screws to attach the board back in place (refer to Step 5 if you’ve forgotten what we did).
We will need to remove them again shortly but if you don’t reattach them now the cable could break and the motherboard will be left dangling when you flip the Steam Deck over.
Step 8: Remove the Screen.
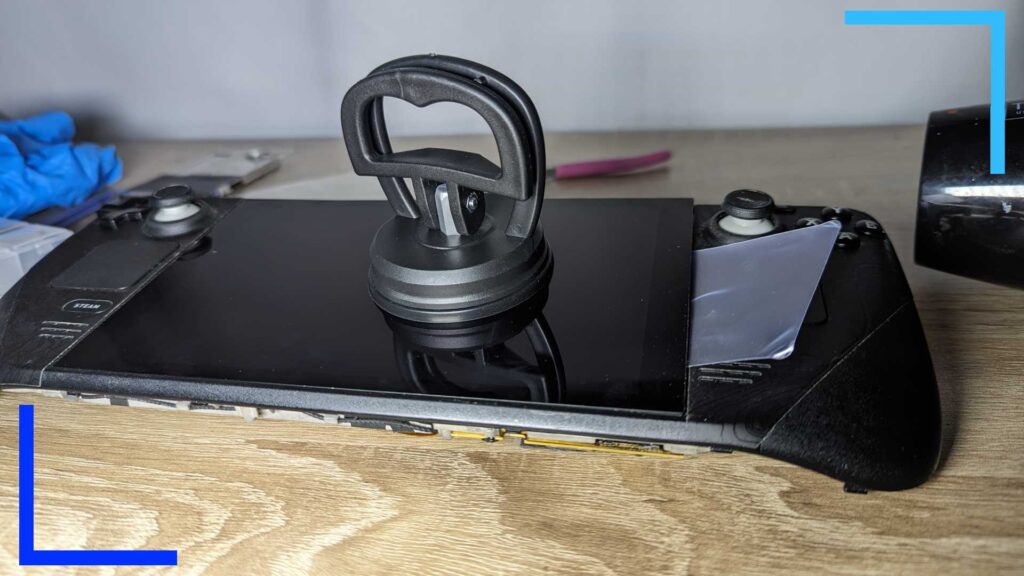
Turn your Steam Deck over and grab your hairdryer. The goal here is to heat the main screen so the adhesive below becomes unstuck.
It took me 25 seconds of heat per corner to get it loose enough. Just don’t hold it in one spot for too long as that could damage the Deck. Wave it from side to side along the natural shape of the screen and when the screen feels hot, go get the suction cup.
I found attaching it to the upper right corner works best. To use it, flip the switch down, push it onto the screen, then pull the lever back up. It should attach rather snugly.
Now grab your pry tool and run it in the groove around the screen you’ve heated while lifting on the suction cup. If it’s hot enough you should be able to wedge the pry tool under the screen. When that happens, move it around the underneath until you feel like it can’t move it further.
At this point get the hairdryer back out and heat up the next section for the same amount of time. Do this for all four corners and the screen will lift off.
Step 9: Add new Adhesive.
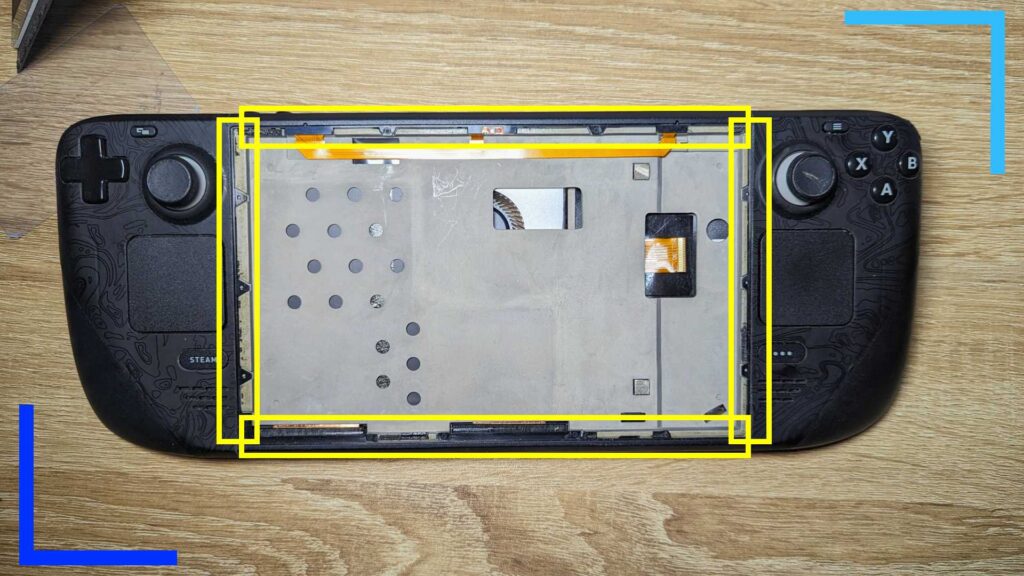
If you’re not installing the JSAUX screen, your adhesive may be different from mine. But before you do anything, try to scrape up any residual adhesive so the new layer can sit on the casing rather than the old adhesive that could push the screen up unnaturally.
When you’re ready, grab the new adhesive and peel it off the backing paper. The Steam Deck requires specific shapes for the left, right, top, and bottom, so be sure to make note of which adhesive strip goes where.
Now just carefully lay the adhesive on the jutting in parts where the screen originally sat. Check out the picture above to see where I mean in more detail.
Once your strips are all laid down, grab your tweezers and run them over each one horizontally or vertically to make sure they’re stuck down. Now remove the upper layer of plastic off the adhesive while making sure the adhesive itself stays in place.
Step 10: Install the new Screen.
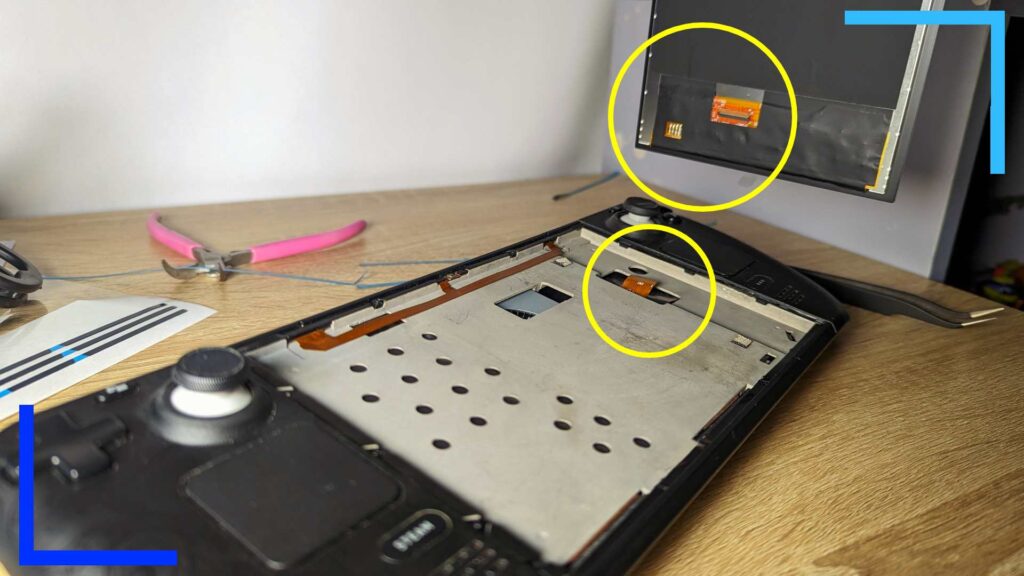 Grab the screen and flip it over. You’ll see an orange cable just like the one from the original screen. This doesn’t need connecting yet, but it does need to be roughly lined up with the other orange cable poking through the metal shielding. Doing this will also mean your screen isn’t upside down, which is pretty important I’d say.
When the screen is lined up, slowly press it into place. Run your finger around the outside of the screen to press it down and make the adhesive stick to it. Give it a minute to set then you can move on.
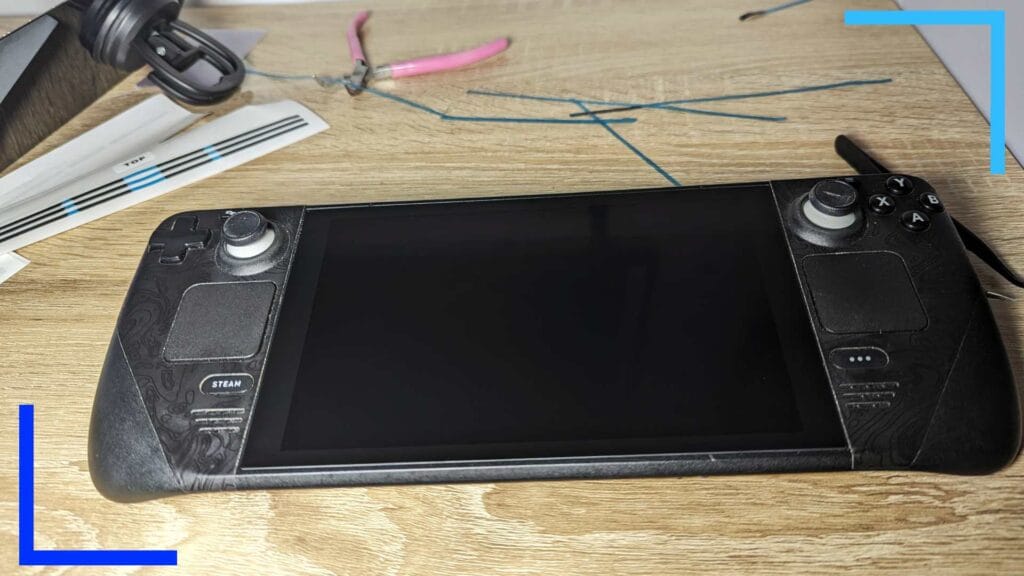
Your screen is now almost fully installed. But first, let’s connect it to the Steam Deck’s motherboard.

Flip the Steam Deck over with your hand under the screen in case the adhesive isn’t installed correctly.
Remove the three 3.7mm screws holding the motherboard in place (as seen in Step 5) and flip the motherboard over and to the right as we did earlier.
Lift up the flap and connect the orange cable to the orange connector. You’ll be doing this in reverse to how we did it earlier. So this time push the orange cable into the orange connector and flip the black lid down to lock the cable in place.
Cover it over with the sticky lid and that’s the screen fully installed. Now let’s put the Steam Deck back together and test this thing out.
Step 11: Put the Steam Deck Back Together.

To put everything back together we’ll be doing what we previously did, only in reverse. It’s not that difficult at all, and a lot of this will now be second nature to you. Let’s start.
Flip over the motherboard and screw the three 3.5mm screws into the empty sockets. When you first lock the motherboard into place, double check you still have access to the cables we removed. Most will move naturally and not be an issue but the brown cable labeled “MB” and the upper right black cable can get stuck beneath the board.

Connect all four cables, while leaving the battery connector until last. Make a note to push the connector levers down after you’ve inserted the cable if required. Also be sure to gently press the stickers back down.

Grab the motherboard shielding and align it with the two remaining screw holes on the left and the main screw hole in the upper right of the shielding.
Now screw in the two 3.7mm screws and the single 3.4mm screw after that.

Lock the backplate into place then finish up by screwing in the four outer 9.5mm screws and the four inner 5.8mm screws.
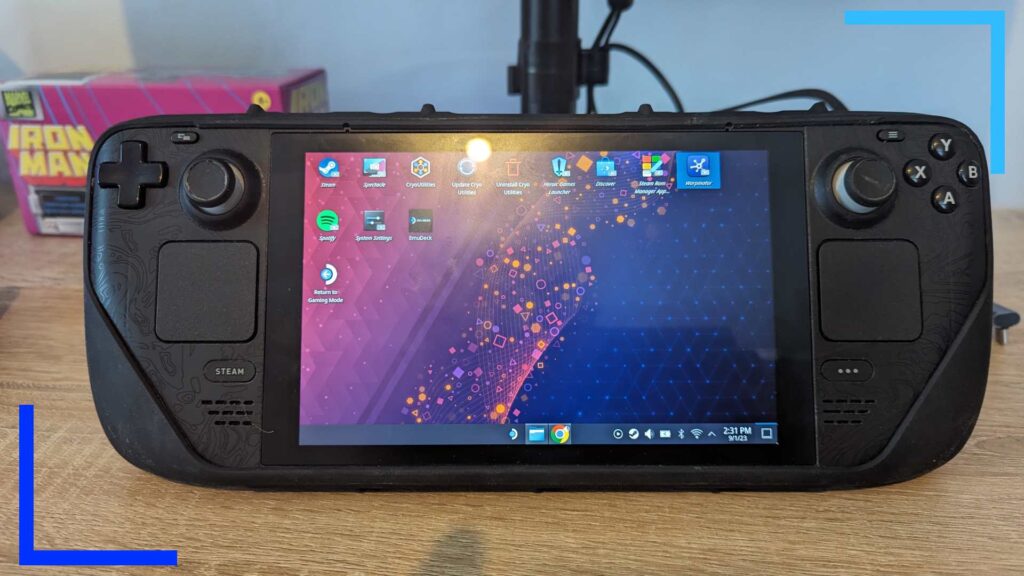
Once completed you’re now safe to turn on the Steam Deck. Your screen should now light up as it did before. If it didn’t, read on for some troubleshooting tips.
Troubleshooting Tips.
If your screen isn’t turning on, or the Steam Deck isn’t beeping to let you know it’s booting, the problem is almost certainly going to be a cable hasn’t been reconnected correctly.
When I did my first Steam Deck mod a long time ago I had this exact problem. In my case, it was that the battery wasn’t connected correctly. With this guide to replace your Steam Deck screen, it’s worth taking the backplate off again and checking all four of the cables to make sure they’re inserted correctly and the little black levers on the connectors are all down so everything is locked in place.
Nien times out of 10, a loose cable is the cause of most problems. So check them all over and give it another go. That should, hopefully, fix any issues and let the Steam Deck boot normally.
If you find the Steam Deck boots and the screen is acting weird (think double vision or it’s the wrong orientation), then you may need to install a custom BIOS update. You’ll get this from the individual manufacturer and there should be information in your quickstart guide on where to download it from and install it.
How Hard Is Replacing a Steam Deck Screen?
I’ve modded my Steam Deck a lot and everything comes with a level of challenge. Replacing the screen wasn’t actually as difficult as I was expecting. It’s time-consuming for sure, and a bit terrifying. But if you’re following a guide, that takes a lot of the guesswork out of it.
Replacing the screen is more difficult than a simple backplate swap, but it’s not anywhere near as difficult as a full shell replacement. Still, I’d advise anyone thinking of getting a replacement screen to take their time with it. It doesn’t matter how quickly you can get it done, what matters is you do it right.
All photos were captured by Wesley Copeland.

