Want to get better game performance on the Steam Deck? With CryoUtilities on Steam Deck you can tweak specific settings to get more out of the device.
A caveat before we start. CryoUtilities is at its best when it’s dealing with AAA, open-world games. That indie game which already runs at 60 frames per second isn’t going to look or handle that differently. But for the bigger games, expect framerate boosts, less hitching, and generally stronger performance out of the box all thanks to the brilliance that is CryoUtilities.
Step 1: Run Maintenance Tasks
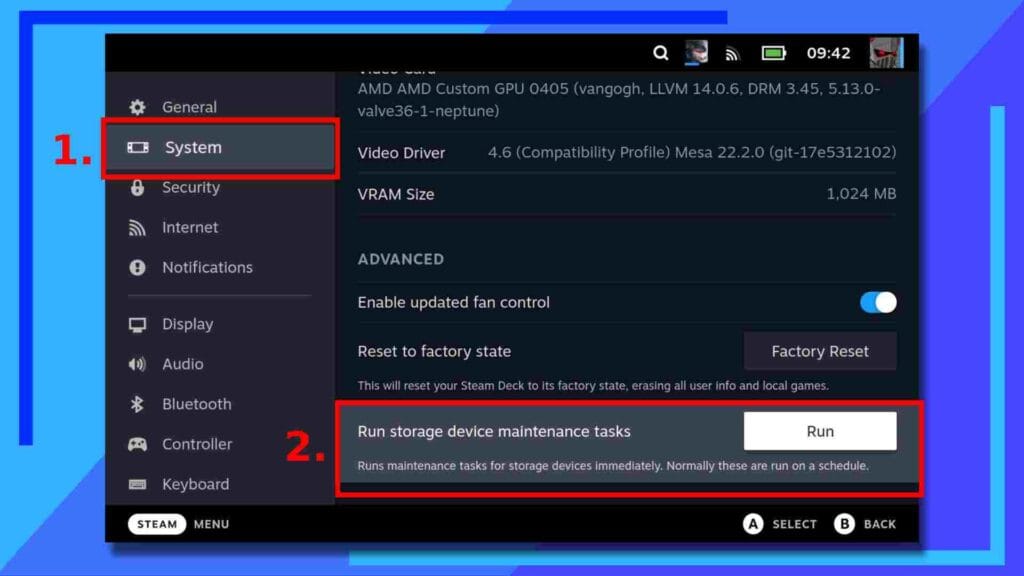
Before we do anything, we’re going to run a task that will make one of the later sections run a lot smoother and faster.
Power on the Steam Deck and once it’s loaded up, press the Steam Button and head into Settings. First click on the System (1) tab found on the left of the screen, then in the right-hand column, scroll down to the very bottom.
You should see a section titled “Run storage device maintenance tasks”. Next to this will be a button marked Run (2). Click on Run and the Steam Deck will launch the task.
Think of this as akin to disk defragmentation on a Windows PC. It’ll sort your files and make other tasks – like using CryoUtilities on Steam Deck – all the faster. Do note, this may take a while to complete, so don’t panic if you need to leave it running for a few minutes. That’s normal.
Step 2: Boot into Desktop Mode
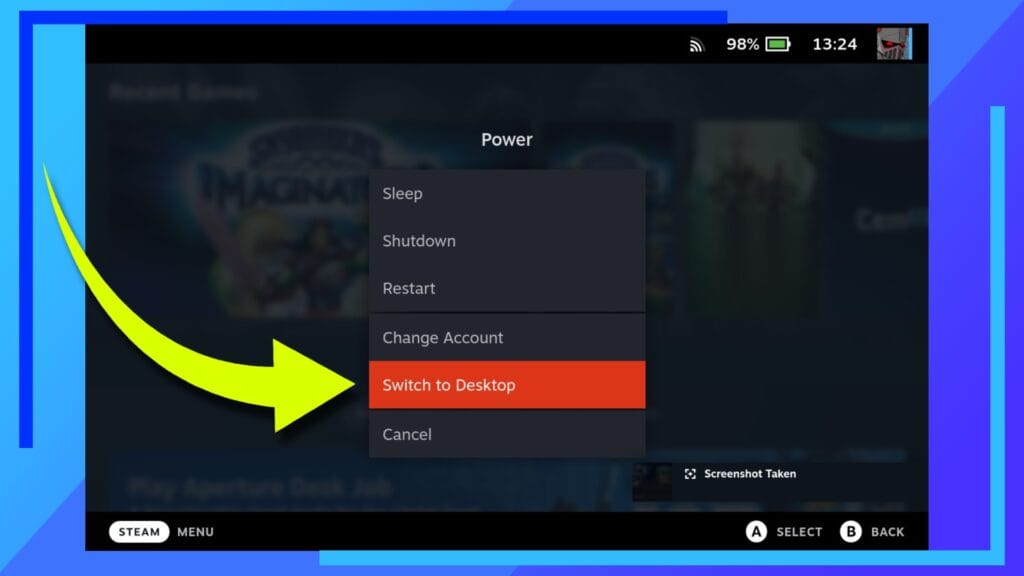
Once the task has finished, hold down the Power Button located along the top of the Steam Deck and when the menu appears in the center of the screen, select Switch to Desktop found at the bottom of the pop-up box.
After a few short moments, the Steam Deck will boot into the Linux desktop environment.
Step 3: Download CryoUtilities
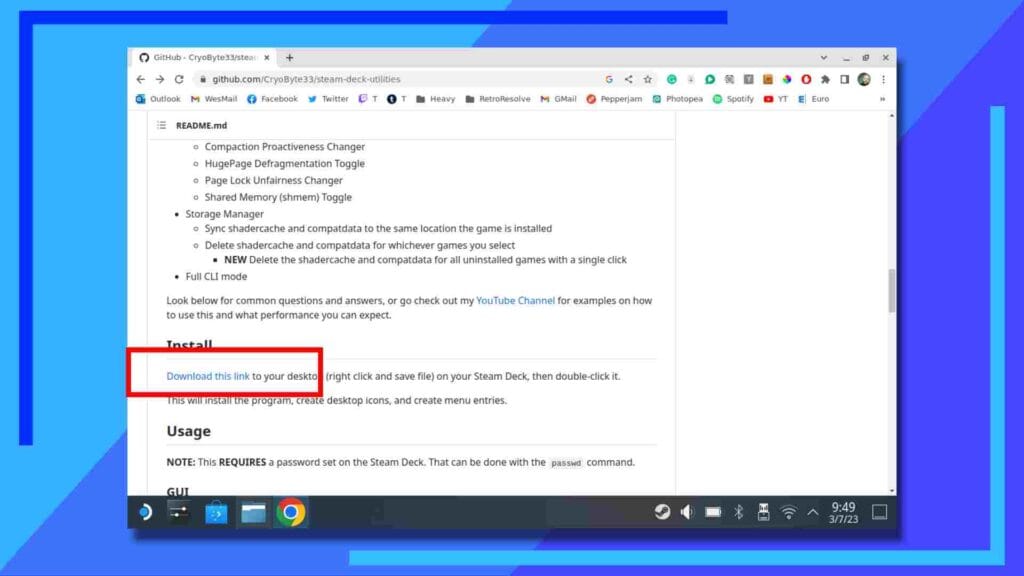
For this next part you’ll need a web browser installed. I use Chrome, but Firefox also works. If you’re yet to grab an Internet browser, you can find them in the Discover Store (the blue shopping bag icon). Just search for “Google Chrome” or “Firefox” and hit the install button when they show up.
Next, go to the CryoUtilities GitHub web page, and around halfway down the page is a link that says “Download this link.” Don’t click on it. Instead, use the left trigger to click on it and select Save as Link.
Doing this will let you save the file to a designated place on your Steam Deck (I went with the Downloads folder to keep things simple).
Step 4: Install CryoUtilities
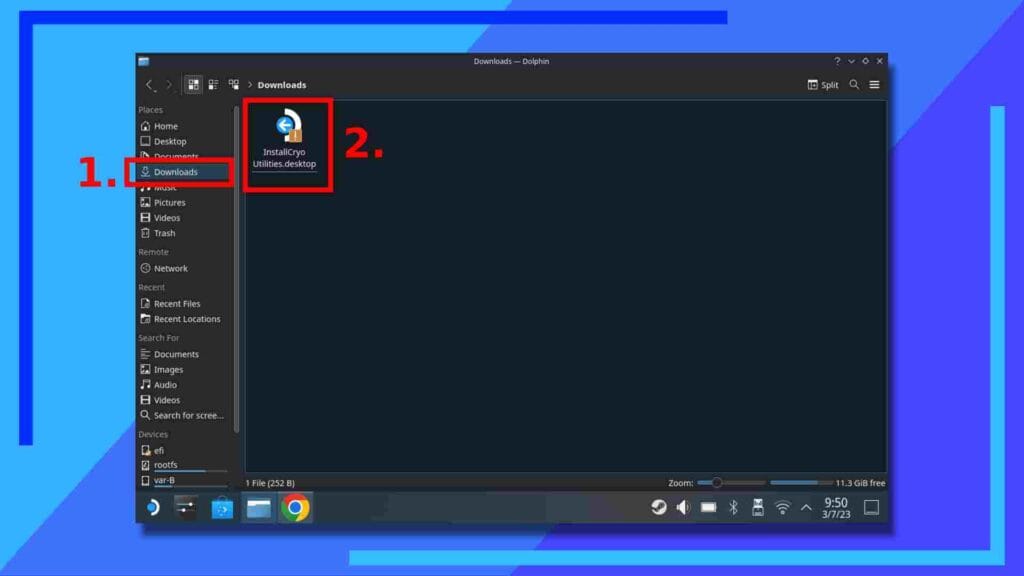
The CryoUtilities installer file is only 252 bytes in size so it should download quickly. Once it’s finished, open up the Dolphin File Explorer (the blue folder icon) and navigate to where you downloaded the file.
With the right trigger, click on the file CryoUtilities file twice and click on Execute when the next window pops up.
Follow the on-screen instructions and let CryoUtilities do its thing.
Step 5: Set a Linux Password
Now, before we go galavanting into CryoUtilities let me ask you a question. Do you have a desktop password set up? If you answered yes, skip this step. If not, keep reading.
To perform certain tasks that require administrator privileges, you’ll need to have a password set up, so let’s do this now.
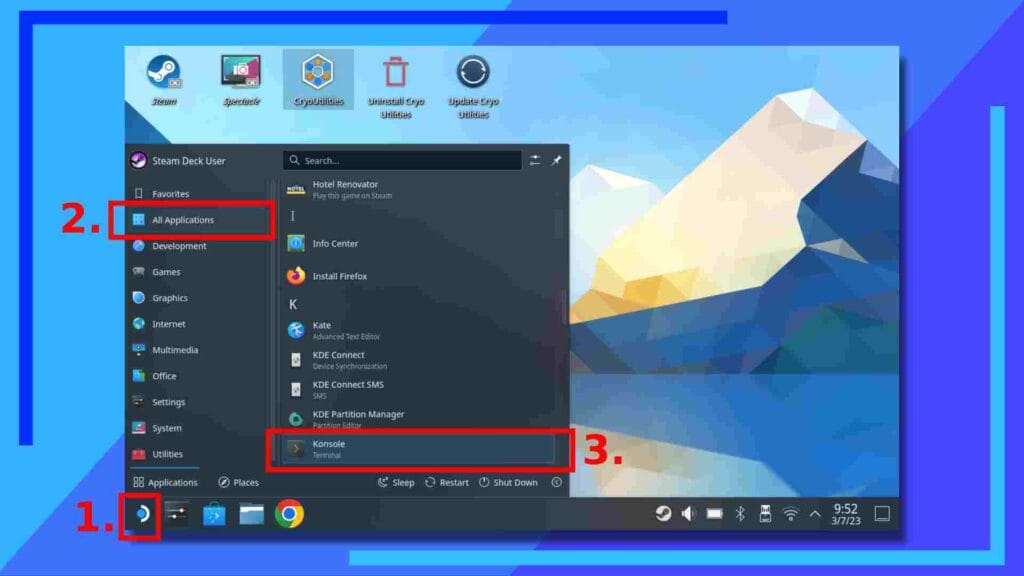
Click on the Start Menu (1), and under All Applications (2) scroll down to “K” and click on Konsole to launch the app.
Tip: You may want to maximize the Konsole app so you can see more of what you’re doing.
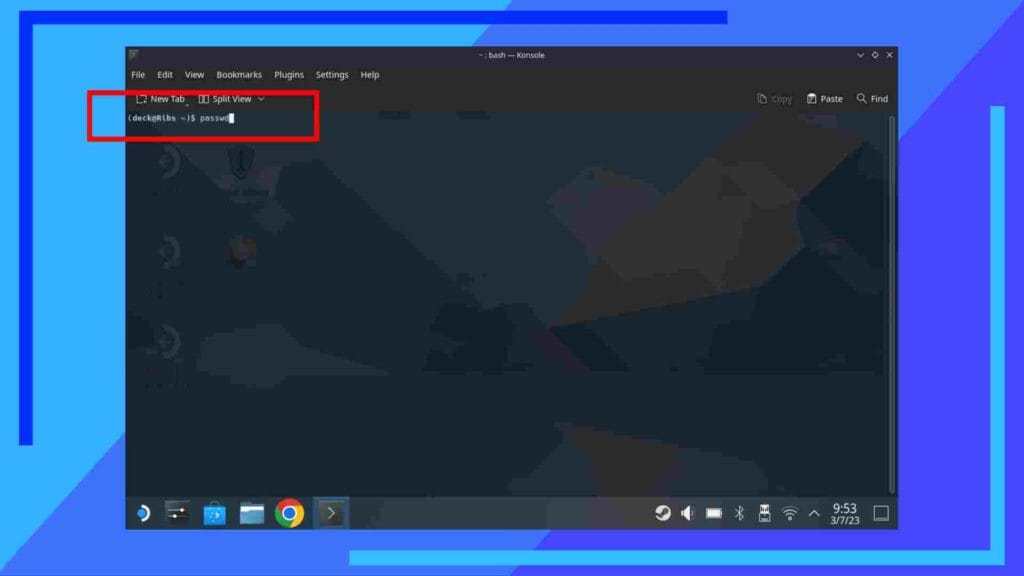
Once Konsole launches, click on the app then bring up the on-screen keyboard by pressing the X button. Next type in “passwd” exactly like you see it minus the quotation marks and press the right trigger to execute the command.
You’ll then be asked to set a password and confirm it. Once that’s all done, you’re safe to close the Konsole window.
Step 6: Boot and Set Up CryoUtilities
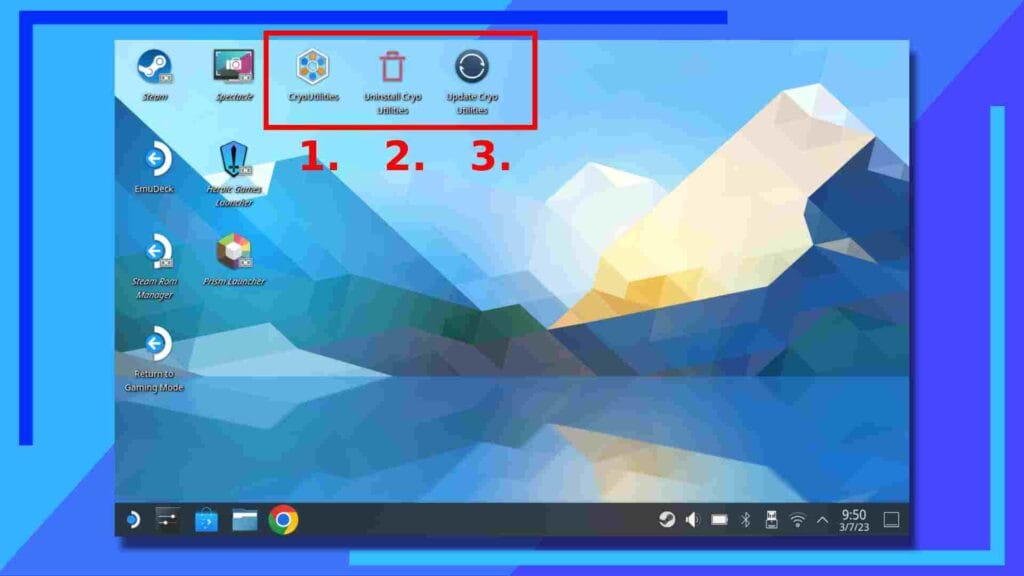
Close Konsole and take a look at the desktop. You should see three different CryoUtilities icons have appeared. Let’s take a moment to work out what icon does what:
- Opens up CryoUtilities
- Uninstalls CryoUtilities
- Updates CryoUtilties
These are all fairly self-explanatory, but it’s worth discussing the uninstallation process.
Uninstalling CryoUtilities will completely remove it from the Steam Deck and set almost everything back to how it was. That is, with the exception of any moved game folders and the UMA buffer.
None of that will make any sense to you just yet, but once you’ve finished this guide both of the above will make sense. In simplest terms, you’ll need to transfer any games you’ve moved back to the Steam Deck’s internal memory if you want to after uninstalling CryoUtilities.
With the UMA frame buffer, I’ll outline how to change that later on. To set it back to the original 1G, just follow the instructions and change 4G to 1G. Again, this will make more sense as we progress. Just try to keep this in the back of your mind for now.
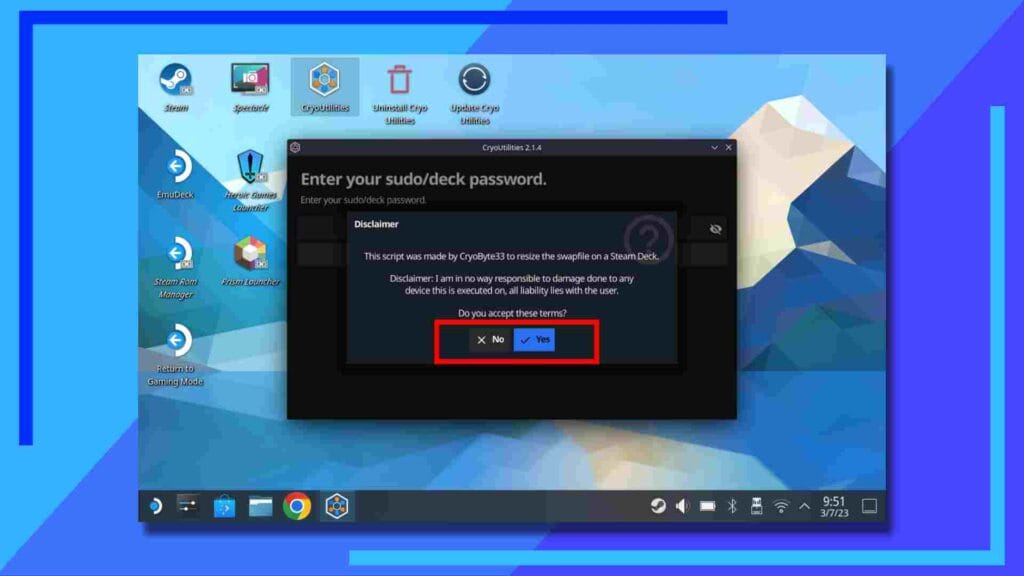
Use the right trigger to click on CryoUtilities (1) to open it up. The first thing you’ll be greeted with is a warning saying CryoByte33, the developer behind CryoUtilities, takes no responsibility for any problems the software may cause.
In my experience, I’m yet to hear of any stories where CryoUtilities has damaged a Steam Deck, and when I did it for this guide everything worked without a hitch. Still, the warning’s there for those who may not want to risk it.
If you decide to move on, click Yes.
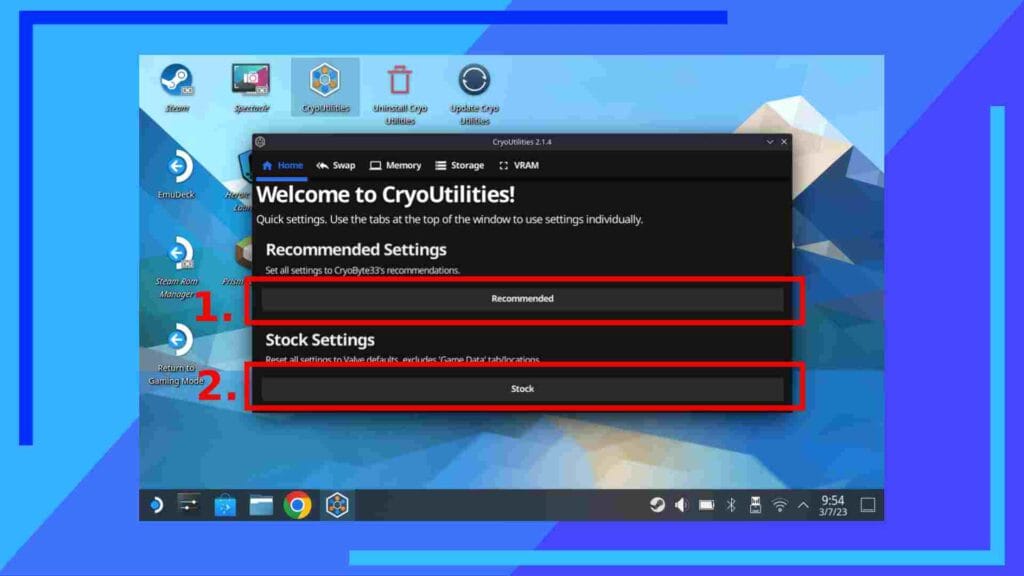
On the first tab are two options. These are the bread and butter of CryoUtilities.
Under “Recommended Settings” you’ll spot a button marked Recommended (1). Click on this and CryoUtilities will install to the Steam Deck with the recommended settings.
While you can change settings individually, I don’t recommend this unless you know what you’re doing. Chances are it won’t damage the Deck in any way, but you could end up making performance worse as a result.
Once you’ve hit the recommended button, it may take a while for this process to finish. Thankfully, you did the maintenance task earlier, though, so it should be faster than it would normally be.
The second option worth knowing about is Stock (2). This button won’t remove CryoUtilities completely like the uninstall function does, but if you want to get back to the default Steam Deck settings, this is the button you want.
Step 7: Understanding CryoUtilities and Its Uses
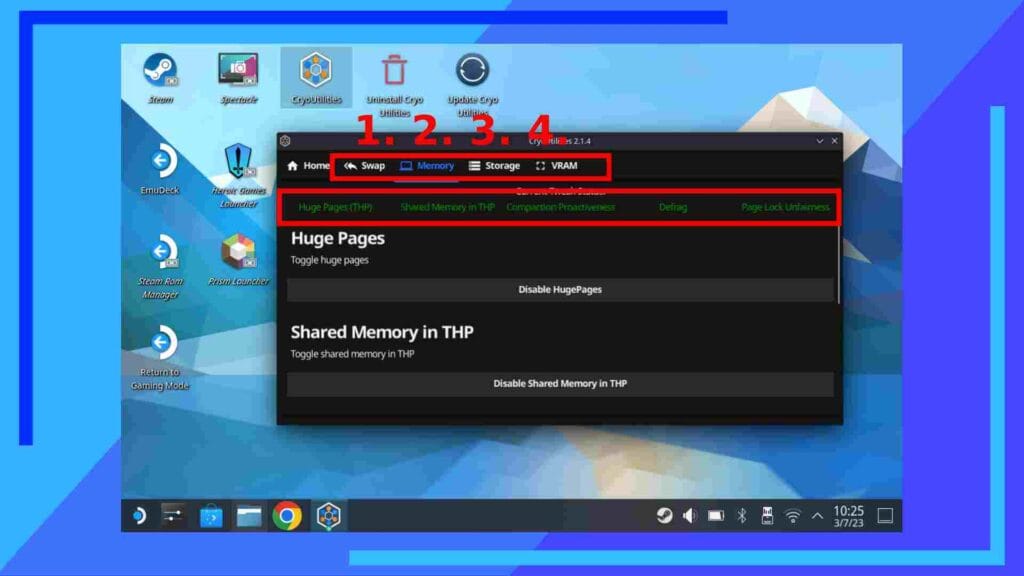
Have a flick through the four different areas shown above to get an idea of what CryoUtilities is capable of. Once you’re ready to move on, let’s go through what matters.
First up, let’s take a look at what the different colored text means:
- Green – Optimal
- Red – Not fully Optimal
- Grey – Could not be determined
Ideally, you want everything green, but that isn’t always possible. For example, when I installed CryoUtilities, I did so on my 64GB Steam Deck. That meant I didn’t have enough storage space left to use the full recommended swap function, so CryoUtilities dropped me down to 8GB of storage to offset my lack of space. Handy, right?
Moving on, let’s take a look at the different options available to us. Don’t feel you need to change any of these settings, I didn’t and it ran great. But if you want to, here’s what’s available:
- Swap – Change the Swap and Swapiness settings
- Memory – Changes huge pages and shared memory
- Storage – Lets you transfer data to a memory card and delete unwanted Steam folders
- VRAM – Explains how to change the UMA buffer size
As I say, most people won’t need to change any of the settings after hitting Recommended, but it’s good to have the options for those who want to tweak individual settings for different games.
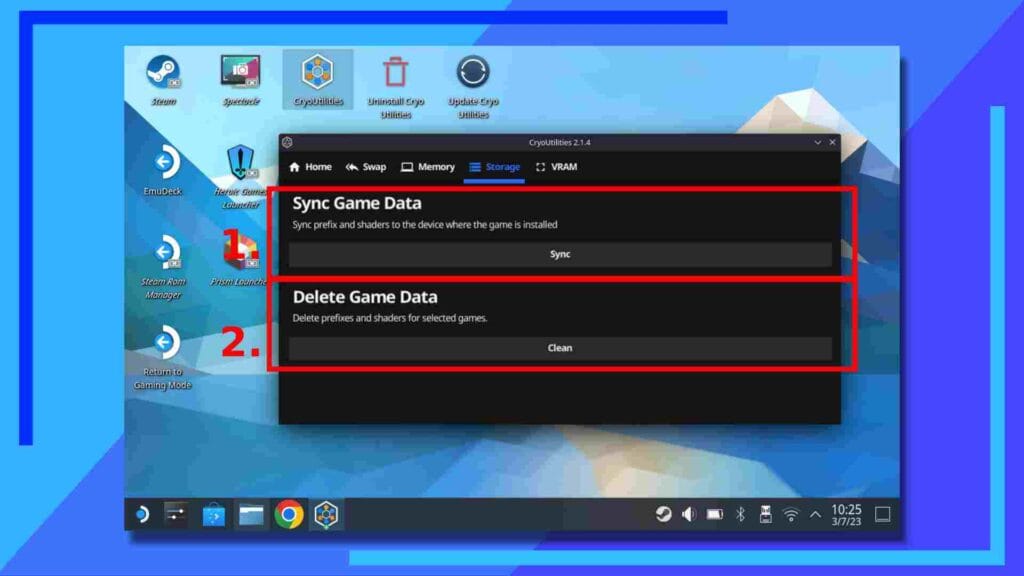
One area I absolutely recommend diving into is the Storage tab.
For those with a larger SSD installed, this may not be an issue. But for those of us on the 64GB model who are constantly running out of space, this streamlines the process of creating a symlink.
In simple terms, a symlink – or symbolic link – lets the Steam Deck pretend a file is where it should be without it actually being there.
Explanation: Let’s say to save space you move the shader cache to a memory card. When the game is launched, Steam will ignore where it’s been moved to and create a new shader cache in its place. But by creating a symlink from the shader cache on the SD card back to the original folder, the Steam operating system will act as if nothing’s changed.
That’s what the Sync Game Data process does. It will move games, the compat data, and shader caches over to a microSD card and create a symlink so you get the storage space back but without breaking compatibility.
The other area, Delete Game Data, is a godsend. If you’ve noticed you have hundreds of random numerically-numbered folders in your Steam folder, that’s because when Steam uninstalls a game, it doesn’t delete everything. More often than not, remnants can be left behind.
By using the delete game data function, you can manually go in and properly delete the leftover data with the click of a button. How cool is that? One thing to note, though, be sure to back up any game saves that aren’t saved to the cloud.
Step 8: Change the UMA Buffer Size
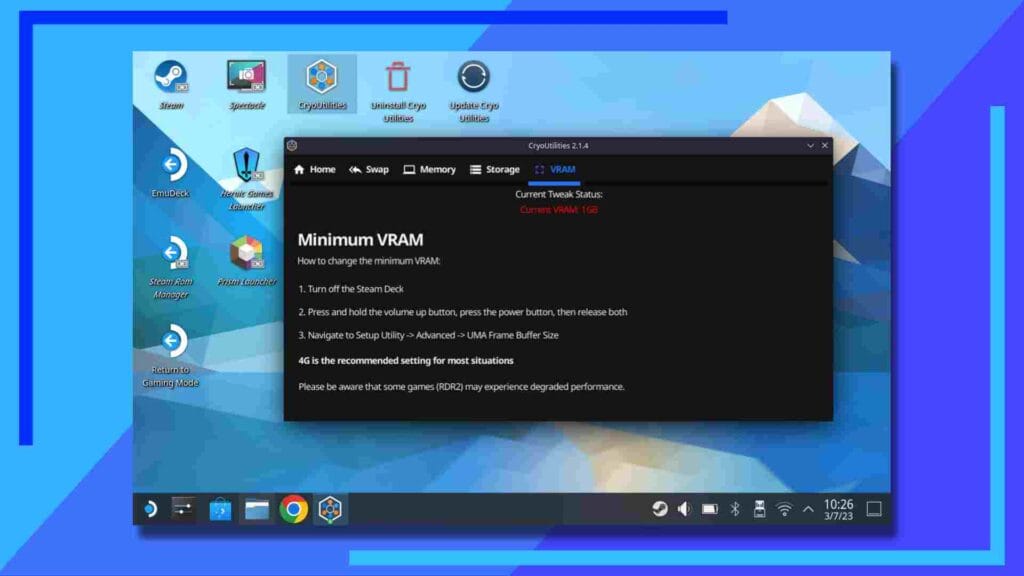
By default, the Steam Deck uses 1G for its buffer size. While that’s enough in most cases, if you want to get the most out of CryoUtilities as you can, you’re going to want to change it.
One thing to point out, as CryoByte33 says in the video at the top of the page, Red Dead Redemption 2 may suffer frame drops from changing the UMA frame buffer size, specifically near watery areas. That, so far, is the only major game this causes any adverse effects in.

Begin by turning the Steam Deck off. Once it’s fully powered down, hold down the Volume Plus button and tap the Power Button once to turn it on. If you keep the volume plus button held down, instead of booting into SteamOS, you will be faced with the BIOS (pictured above).
Next, click on Setup Utility, found at the bottom right of the four icons.

You’ll now be faced with another BIOS screen. Start by clicking on Advanced (1), then on the right side of the screen will be UMA Frame Buffer Size (2). Click on that and change it to 4G instead of 1G.
Now all that’s left to do is hit the Back Button to save your progress and the Steam Deck will reboot.
Once it’s loaded back up you’re free to go off and test out some of the more intense games like Horizon: Zero Dawn, Marvel’s Spider-Man, or Cyberpunk 2077 and see just how much of a difference CryoUtilities has made.
*All images captured on Steam Deck hardware. Steam Deck Photos by Wesley Copeland.

