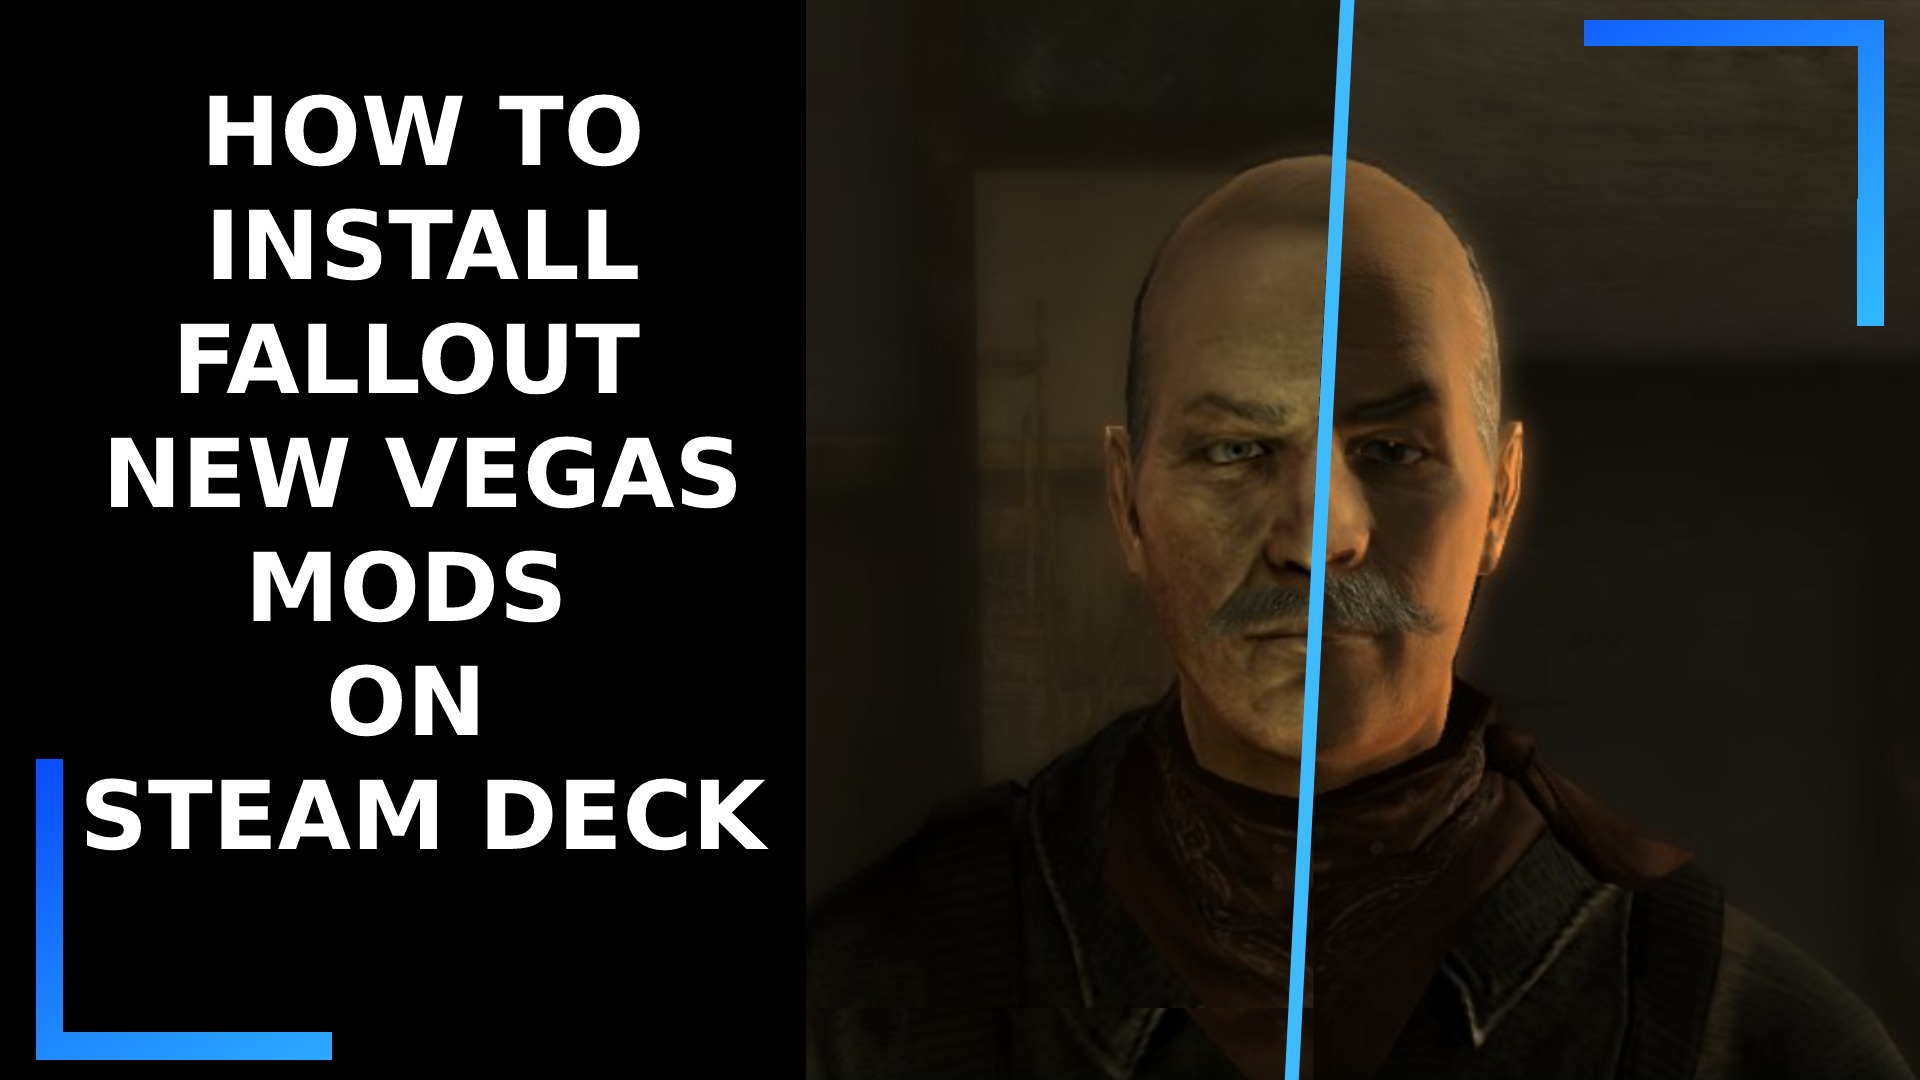
Looking to make Fallout: New Vegas a little more stable? How about installing the latest graphical mods to make everything look more modern? If so, you absolutely want to install Fallout: New Vegas mods on Steam Deck.
Below is everything you need to know complete with screenshots to walk you through every step.
Before We Begin
The main purpose of this guide is to install everything you need to get Fallout: New Vegas mods working on Steam Deck. There are other ways to achieve this, but if you’re new to the Steam Deck or new to Linux in general, I found this to be the easiest method. It is long, but it’s not difficult, and I’ve taken loads of screenshots to help visualize what to do.
It’s also worth noting, if you follow this guide, you’ll also be able to use what you’ve learned to install Skyrim mods and Fallout 4 mods on Steam Deck as well, so it’s definitely worth it.
Step 1: Boot into Desktop Mode
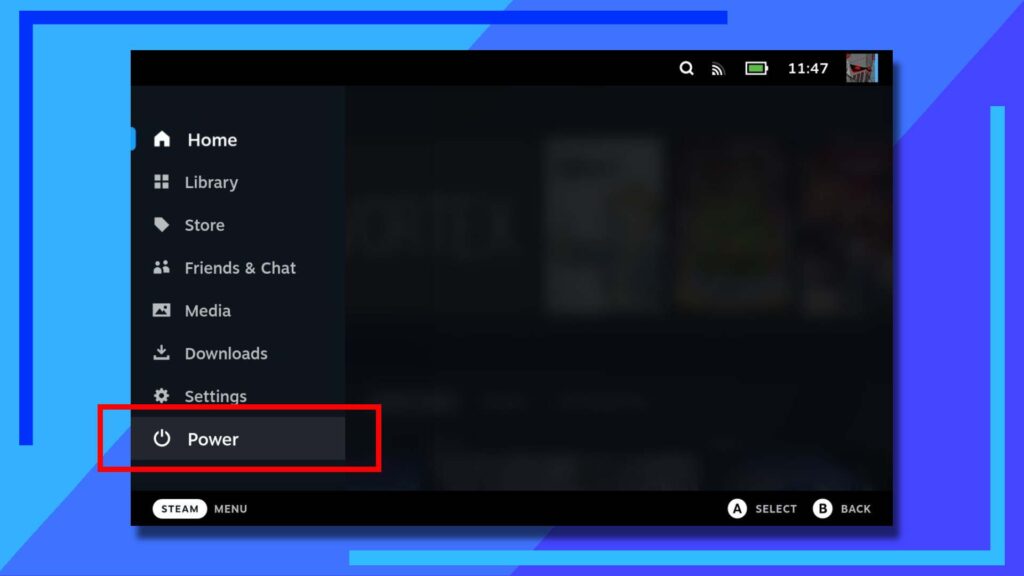
If you’ve got any experience with modding, you’ll know almost all Steam Deck guides start in Desktop Mode.
To enter the Linux desktop environment, hold down the Power Button and select Switch to Desktop from the menu that pops up.
Alternatively, hit the Steam Button and click Power, then Switch to Desktop.
Step 2: Get ProtonUp-QT
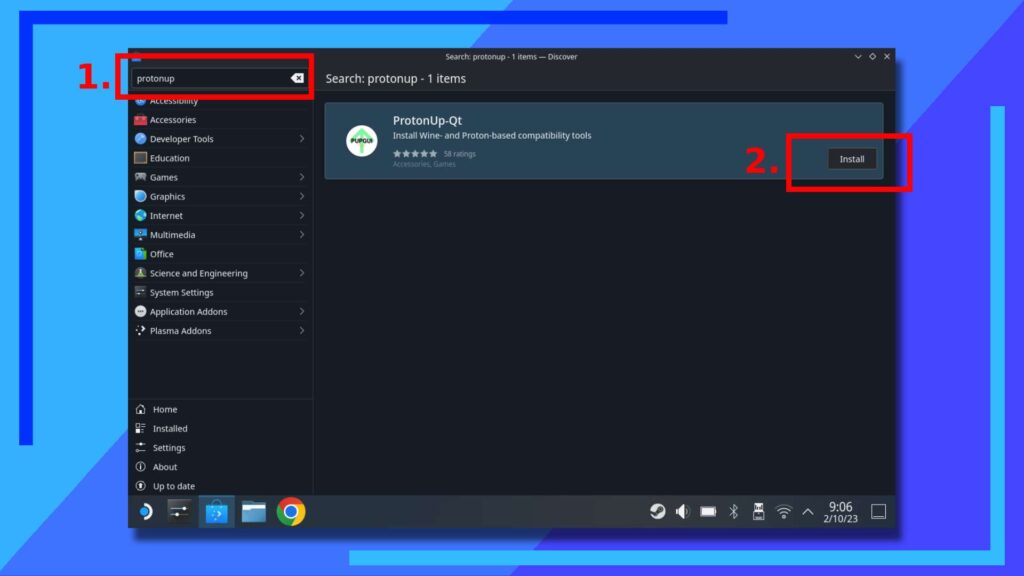
For this next part we’re going to download an app that will let us install something called SteamTinkerLaunch. The app we need first goes by the name of ProtonUp-QT and allows us to install different custom versions of Proton (the package that lets Windows games and apps run on the Steam Deck).
To install ProtonUp-QT, open up the Discover Store (the blue shopping bag icon) and search for “ProtonUp-QT” in the top-left search box (1). If the on-screen keyboard doesn’t automatically appear when clicking on the search box with the right trigger, press the Steam Button and the X button to bring it up manually.
Upon pressing Enter to start the search (the right trigger), ProtonUp-QT should appear on the right side of the screen. You should spot an Install Button (2) on the right side of the window. Click on that and ProtonUp-QT will install.
Step 3: Install SteamTinkerLaunch
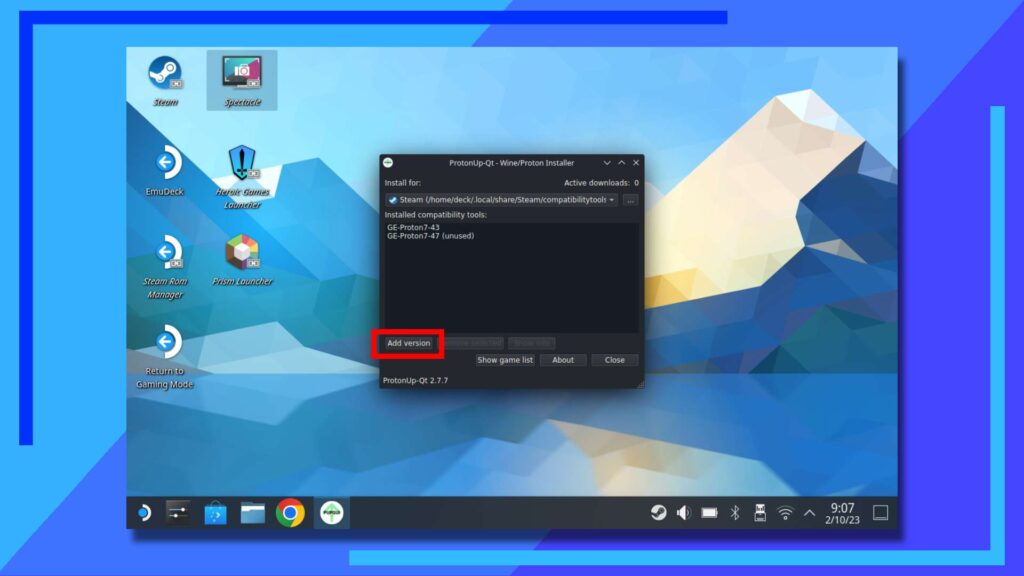
Now that ProtonUp-QT is installed, we can get SteamTinkerLaunch up and running, which will allow us to – as the name suggests – tinker with Fallout: New Vegas and its launch options.
You’ll find ProtonUp-QT in the Start Menu (the blue and white Steam Deck logo in the bottom left corner of the screen) under All Applications, then under ‘P’. Open it up by clicking on it with the right trigger.
Once it opens, click on the Add Version button.
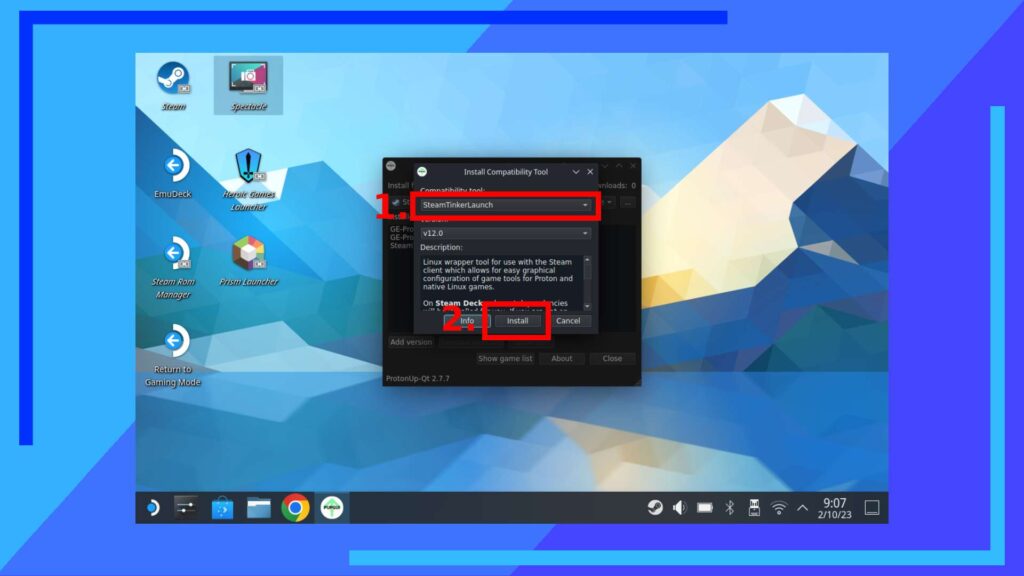
Under the Compatibility Tool section, click with the right trigger on the drop-down box and select SteamTinkerLaunch (1). It should auto-default to the latest version. Handy, I know!
Now just click on the Install Button (2) and SteamTinkerLaunch will install. Once that’s finished, feel free to close ProtonUp-QT.
Step 4: Enable SteamTinkerLaunch
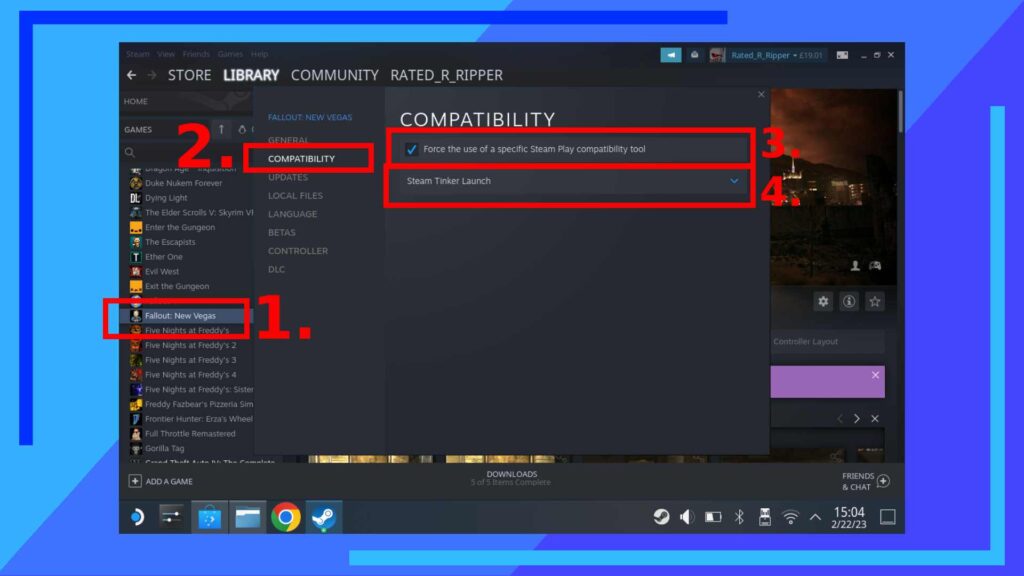
For this next part, we’re going to need to change the Proton version of Fallout: New Vegas to SteamTinkerLaunch.
Open up the main Steam app and head into Library and find Fallout: New Vegas in the left-hand column (1). Using the left trigger, click on it once to open up the submenu and select Properties.
A new window will open. From here, hit Compatibility (2) then click on the tick box (3). This will add an option below where you can then select SteamTinkerLaunch (4).
Step 5: Install NVSE
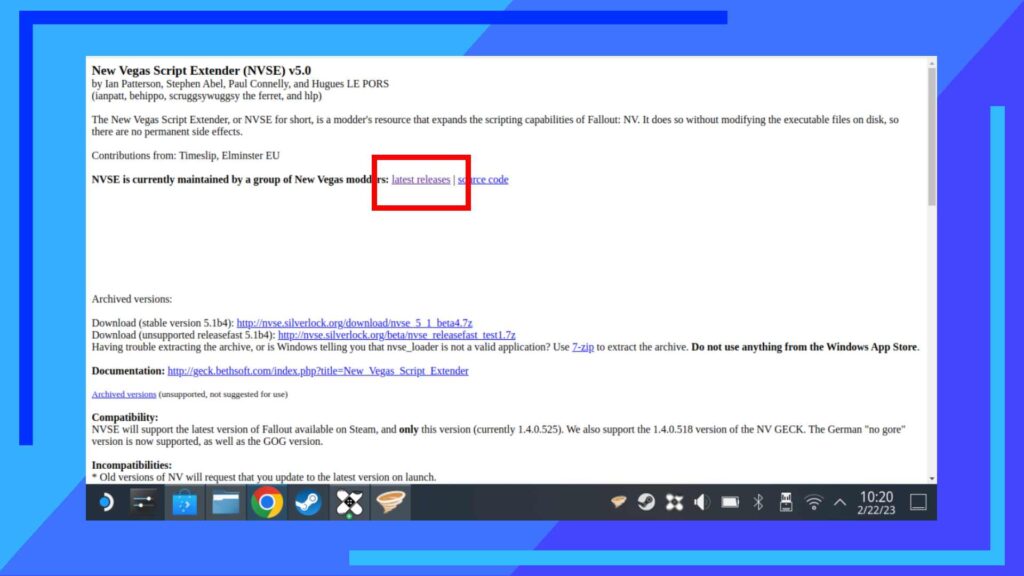
Before we launch Fallout: New Vegas with SteamTinkerLaunch, we’re first going to need to install a plugin called NVSE. This is a small bit of code that will let us run an even greater selection of mods. It’s not needed for everything, but if you want to save yourself a headache down the line, it’s definitely worth installing now.
Head on over to the NVSE website and click on the Latest Releases section. As you probably guessed, you’ll need a web browser like Firefox or Chrome installed, either of which you can grab from the Discover Store.
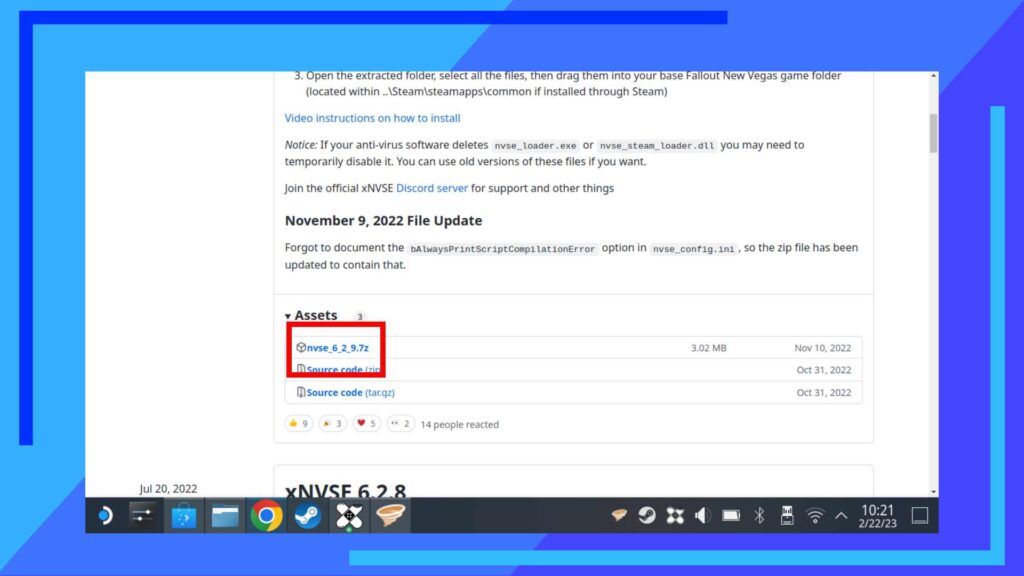
Once the new page opens you should find yourself on the NVSE GitHub page. Under Assets, there should be a downloadable file. In my case it was “nvse_6_2_9.7z”, though it could be different for you depending on if the file has been updated.
Click on that to start the download process.
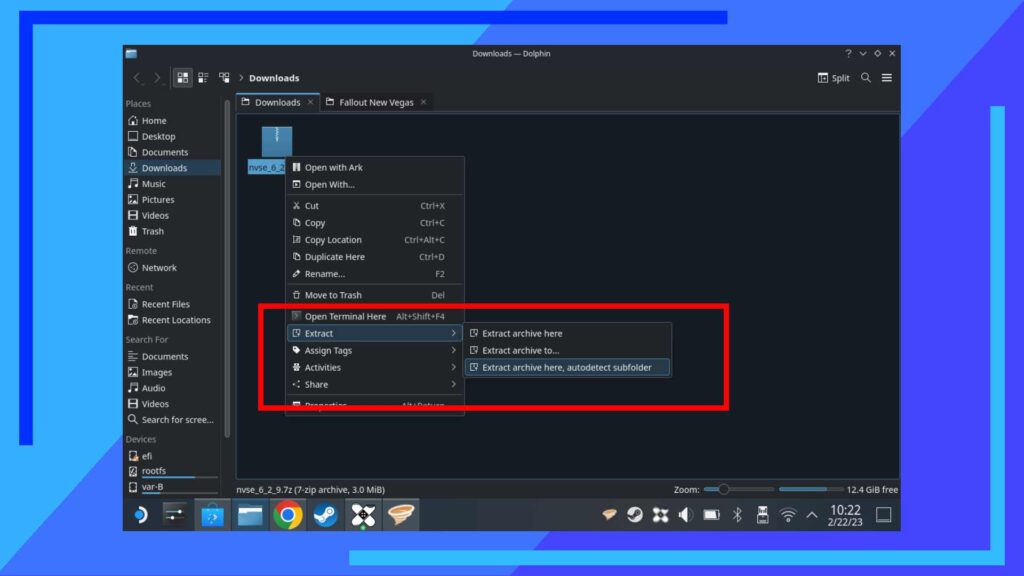
Next open up the Dolphin File Explorer (the blue folder icon) and navigate to your Downloads folder on the left side of the screen.
Inside Downloads will be the file we downloaded. Use the left trigger to click on it once to open up the submenu, then click with the right trigger on Extract, then Extract Archive Here, Autodetect Subfolder.
Doing this will extract the NVSE file to its own folder.
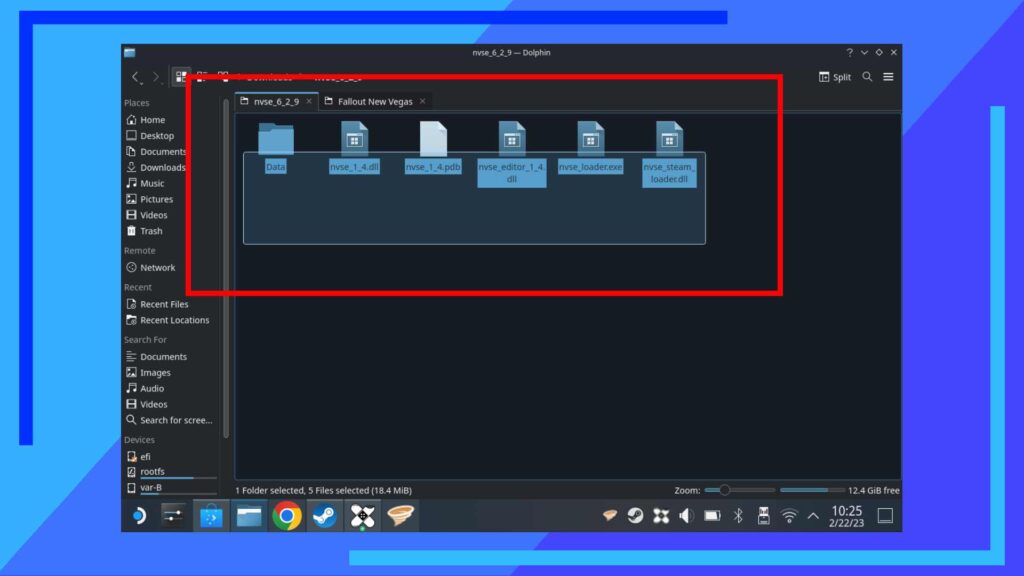
Enter the newly-created folder. You should see a bunch of files. That’s good. We’re now going to move them to where they need to be.
Hold down the right trigger on an empty space then, while still holding it down, drag a square across all the files to highlight them.
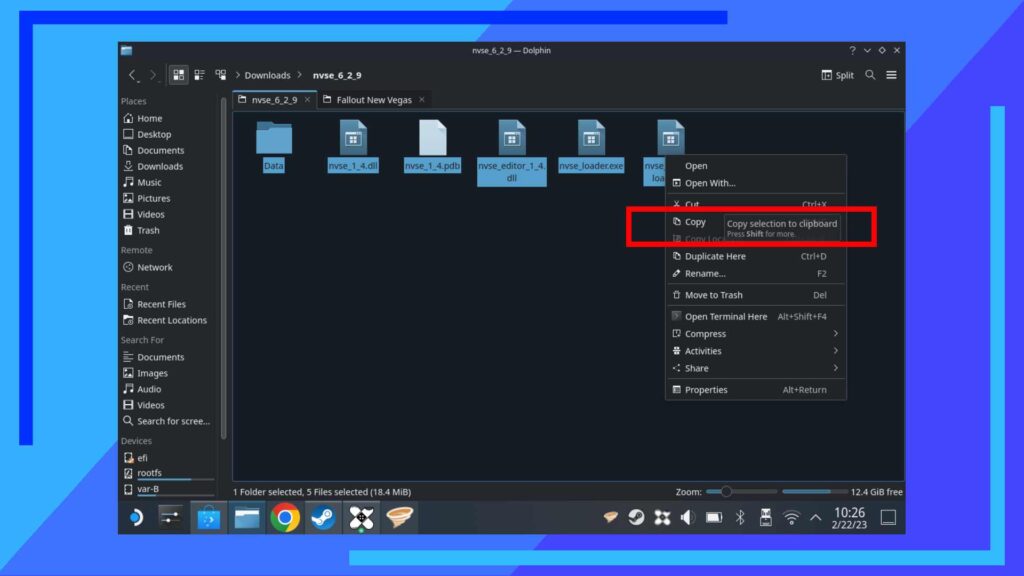
Next, click with the left trigger on any of the highlighted files and select Copy from the submenu that pops up.
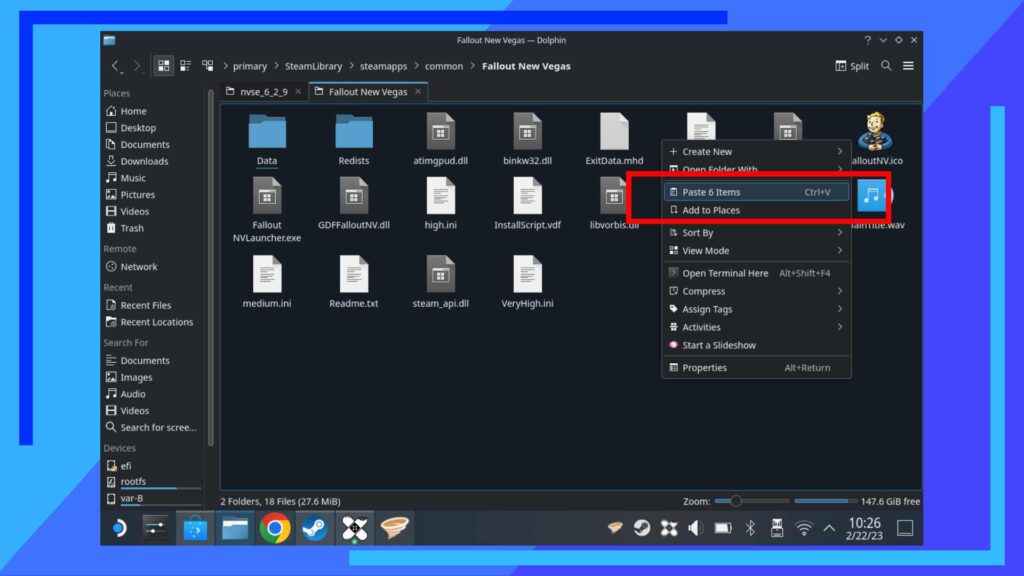
For this part we’re going to Paste the files into the main Fallout: New Vegas folder.
Depending on your setup, your main folder’s path could be different. I have my games installed on an SD card due to only having 64GB of internal storage, so my path is as follows:
Primary / SteamLibrary / steamapps / common / Fallout New Vegas
If you can’t find it, click on Home then use the search box and try typing in “SteamLibrary” or just “Steam”.
Once you’re inside the main Fallout: New Vegas folder, use the left trigger to click on an empty space and select Paste to copy the files in.
You’ll next get a pop-up asking you what you want to do with files that share the same name. Select Write Into and the files will find their way to the right place.
Step 6: Install Vortex Mod Manager
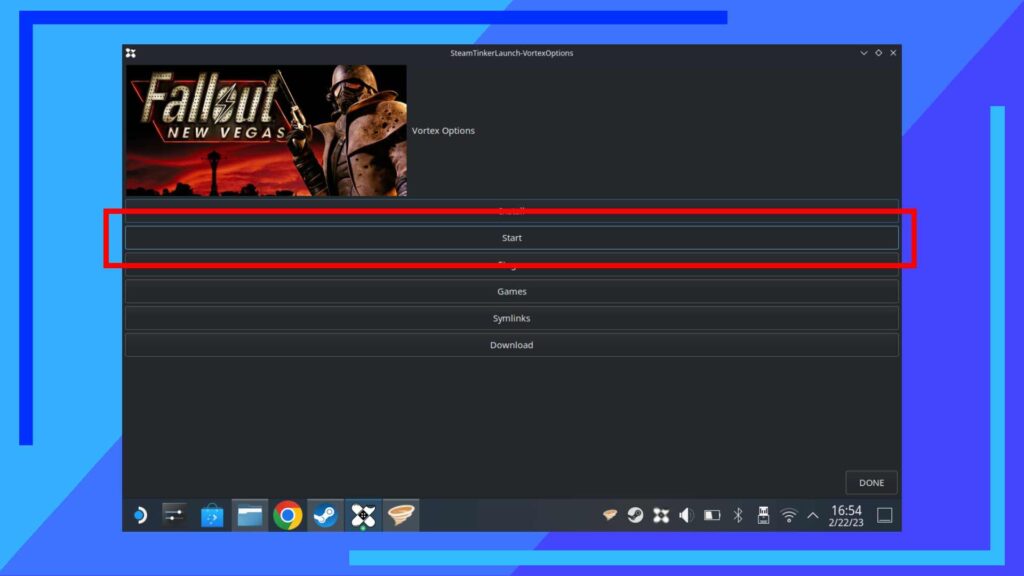
Now we’ve got all the parts in place, we can finally launch Fallout: New Vegas. Do this now.
Upon the game booting, a new window will appear. That’s SteamTinkerLaunch, and it’ll only be open for a few seconds so don’t take too much time admiring your handy work.
You should spot a button named Main Menu next to Skip. Hit Main Menu and one of the next options should be Vortex. Click on Vortex and a new window will eventually open.
Click on Start and Vortex will be downloaded, installed, then booted up.
One quick point to note: From the main menu you also have access to Mod Manager 2 – another popular modding program. Feel free to check that out once you’re completely done. I prefer Vortex, but some people swear by Mod Manager 2.
Step 7: Add Fallout New Vegas to Vortex
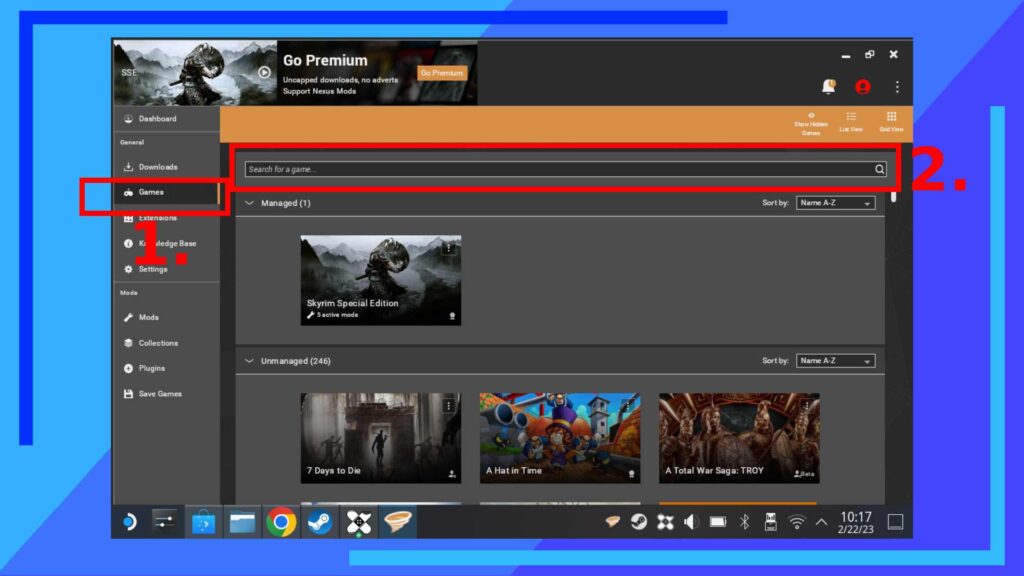
When Vortex opens, the first thing we want to do is add Fallout: New Vegas to it.
You can achieve this by clicking on Games (1), then in the Search Box (2), type “Fallout”. The game will then be one of the games that populate the list below.
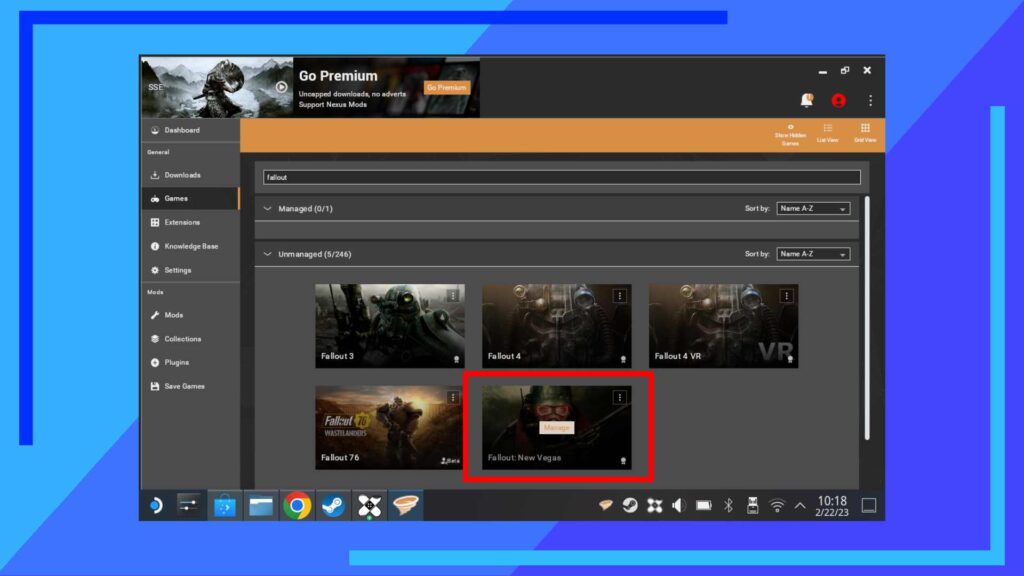
How do we add Fallout: New Vegas to Vortex? It’s simple. Hover the mouse cursor over Fallout: New Vegas and the image will darken and a button named Manage will appear. Click on Manage and the game will be added to Vortex.
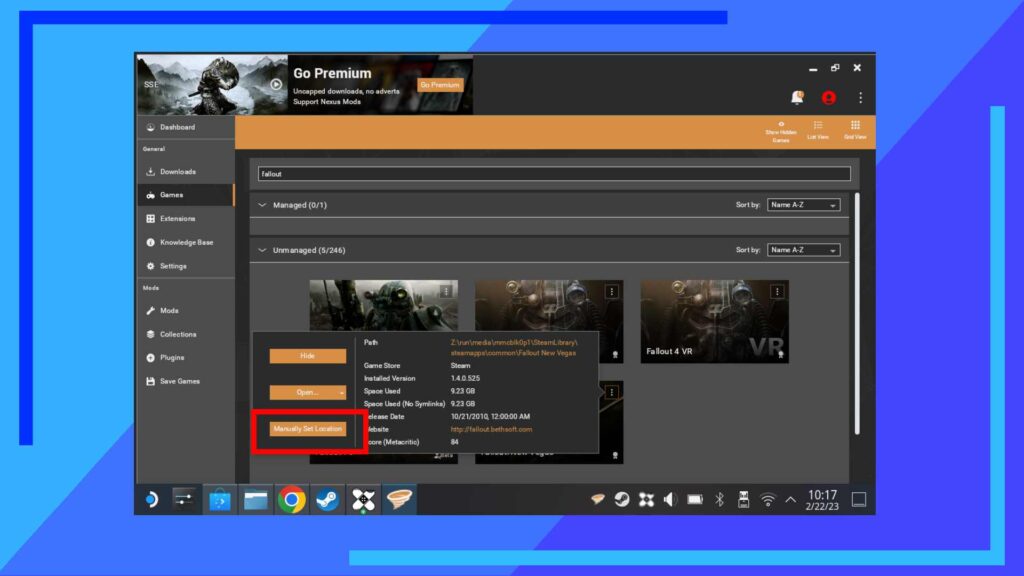
Another quick, optional point: If you click on the vertical three dots on Fallout: New Vegas, you can manually set the location of the game. You shouldn’t need to do this, but if you end up moving games and folders around, this is how you relink Vortex with Fallout: New Vegas in the future.
Step 8: Understanding Vortex Mod Manager
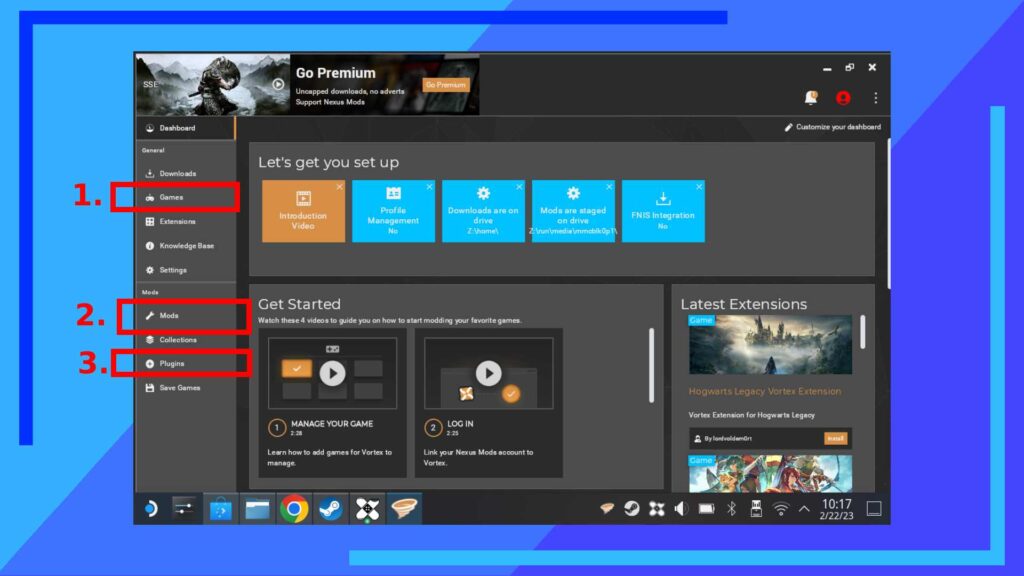
Now for the fun stuff. Let’s use Vortex to install Fallout: New Vegas mods on Steam Deck.
First is the Games tab (1). This is where you add games and tweak the file location if necessary.
Mods (2) is the area you want. This is the main area where we can install, enable, and disable different mods we’ve downloaded. It’s also the area we’ll focus on in the next step.
Plugins (3), meanwhile, is where you can turn plugins on and off. A rough way of thinking about this is a mod uses new files and code to create something new, but a plugin only uses code. As an example, an armor mod uses new files to build something not in the game, but an unofficial patch uses code to manipulate already-existing code.
Step 9: How to Install Fallout: New Vegas Mods on Steam Deck
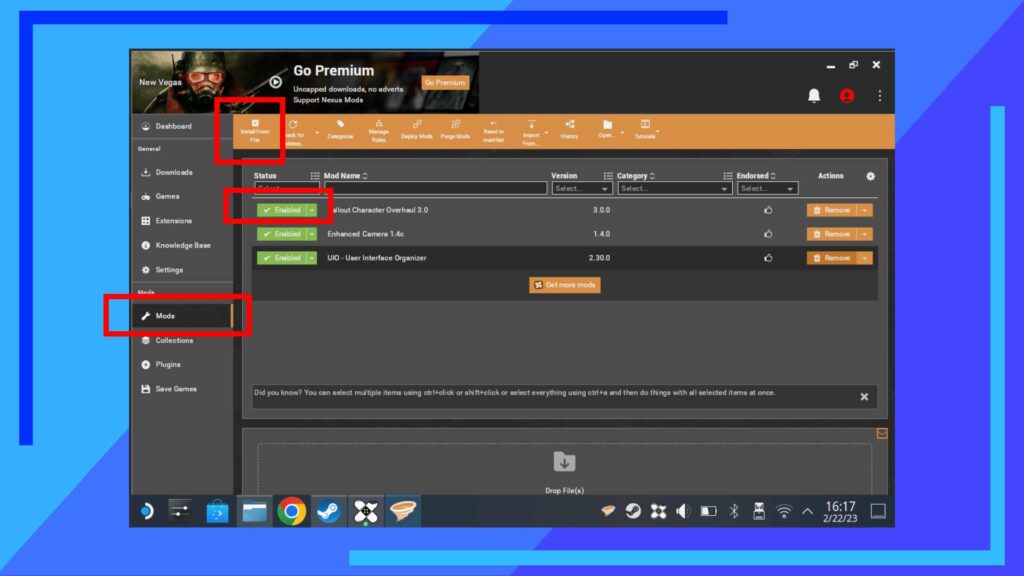
Let’s install some mods! Click on the mods tab, then Install From File in the orange bar. This will bring up the file explorer. Navigate to your downloads folder or the folder you store mods then click on the mod file twice to open it up and load it into Vortex.
When it’s finished installing the mod should be enabled and ready to go. I have, however, also highlighted the Enable Button in the image above so you know where it’s located. Reason being, if a mod causes the game to crash, the quickest way to find out which mod is causing problems is to disable all of them, then enable them one by one to see what the culprit is.
That’s it! You’ve now got everything you need set up and working and can install your favorite Fallout: New Vegas mods on Steam Deck.
Where to Get Mods
The best place for Fallout: New Vegas mods is the website NexusMods. That’s where I got the Character Overhaul mod as seen in the image at the top of the page.
I’d also recommend grabbing the 4GB RAM patch to let Fallout: New Vegas use more of the Steam Deck’s RAM than the base game normally would, and Yukichigai’s Unofficial Patch to make the game less buggy.
Always Download Mods Manually
Vortex Mod Manager has a handy feature that lets users install mods from the Nexus website with one click. How great, right? Don’t use this, though. Ever. It doesn’t work on Steam Deck.
Instead, just download the file from NexusMods manually and use the install from file button outlined in Step 9. That way works. The other doesn’t.
All original images captured on Steam Deck hardware.

