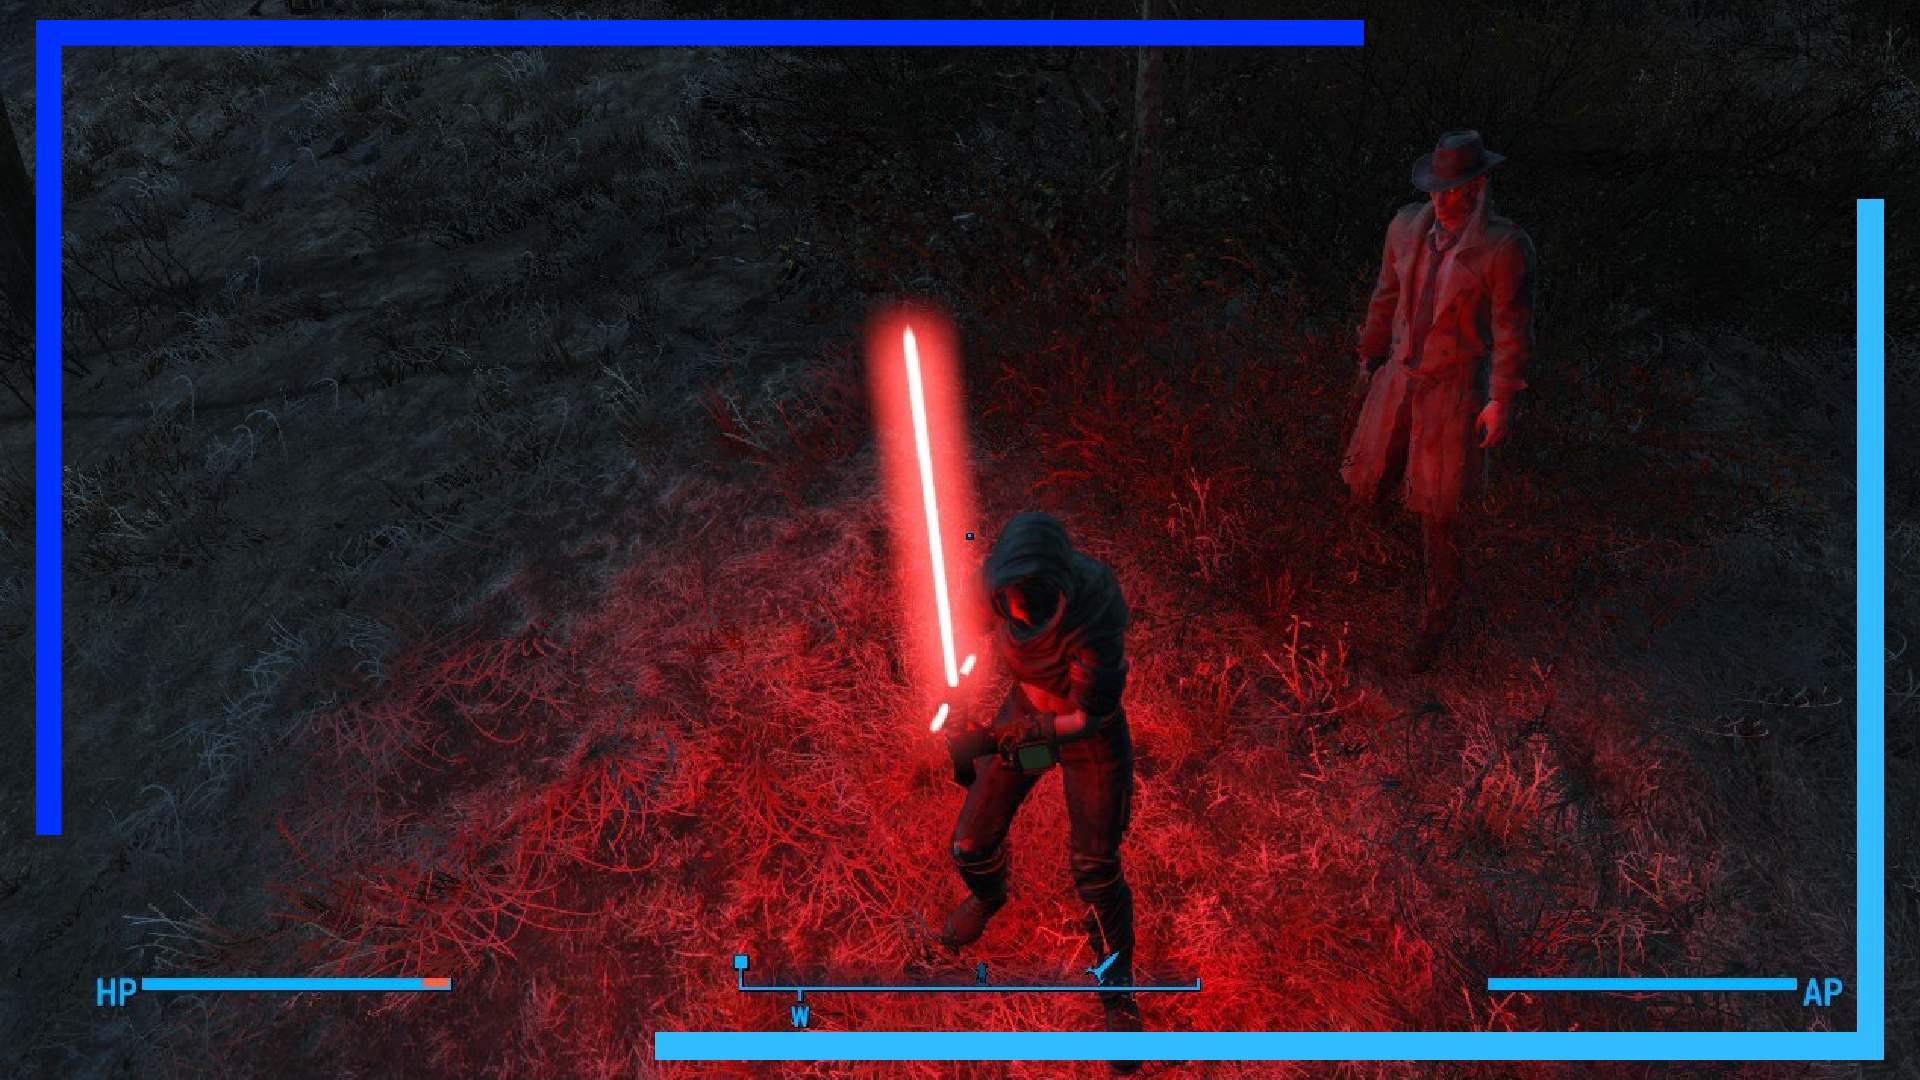
Fallout 4 remains one of the biggest shocks on Steam Deck. It runs brilliantly, and being able to take it on the go feels almost futuristic.
But what about when you want to mod Fallout 4 on Steam Deck? There are several options available, some terribly complex, some that lead to a dead-end.
That’s why I’ve put together this beginner’s guide to help you get Fallout 4 mods up and running on the Steam Deck in the simplest way possible. It’s a little time-consuming, but it’s not anywhere near as technical as it looks.
Step 1: Download and Install F4SE
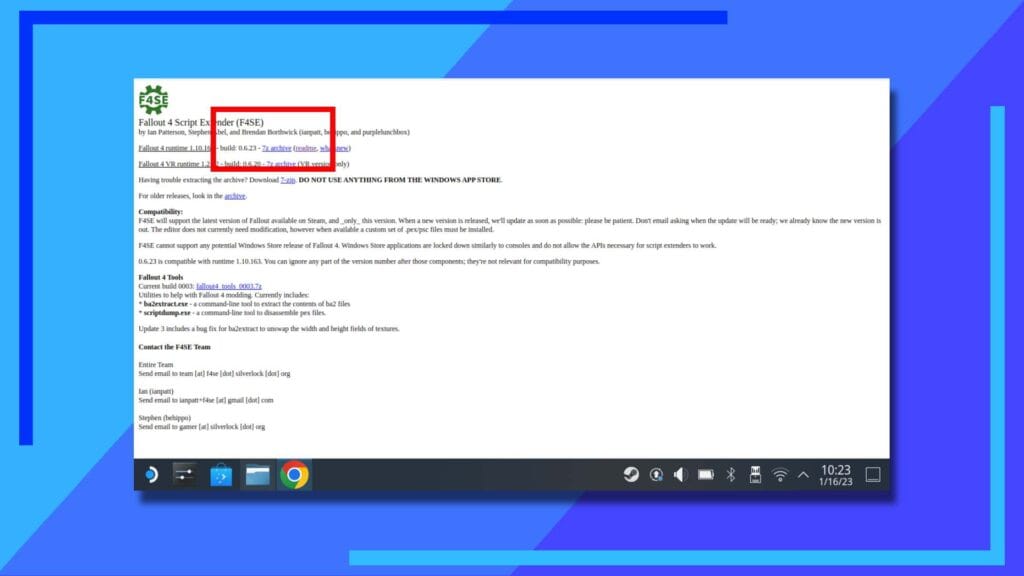
Before we begin, we’ll be doing all of this in the Steam Deck’s Desktop Mode. You’ll also need an Internet browser like Chrome or Firefox installed.
If you’ve got all of that sorted, the first part of this guide is to head over to the F4SE website and download the F4SE file shown in the screenshot above.
F4SE is, essentially, a script extender that allows us to modify files in Fallout 4 in a way that’s recoverable. If, say, you download a mod that breaks everything, you can uninstall the mod and revert the game back to a workable state. Handy, right?
Note: You want to grab the non-VR version of F4SE.
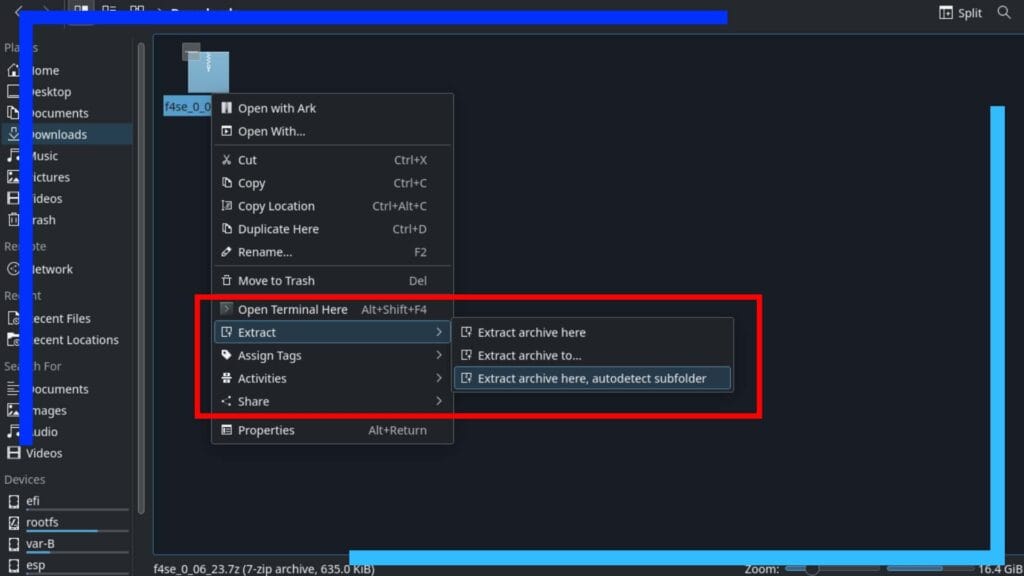
The file we downloaded can be found in the Downloads folder. Access this via the Dolphin file explorer (the blue folder icon).
Once you’ve located it, use the left trigger to click on the file then select Extract from the menu. A new menu will pop up to the right. From here, click on “Extract archive here, autodetect subfolder.” This will extract the files from F4SE and place them into their own folder.
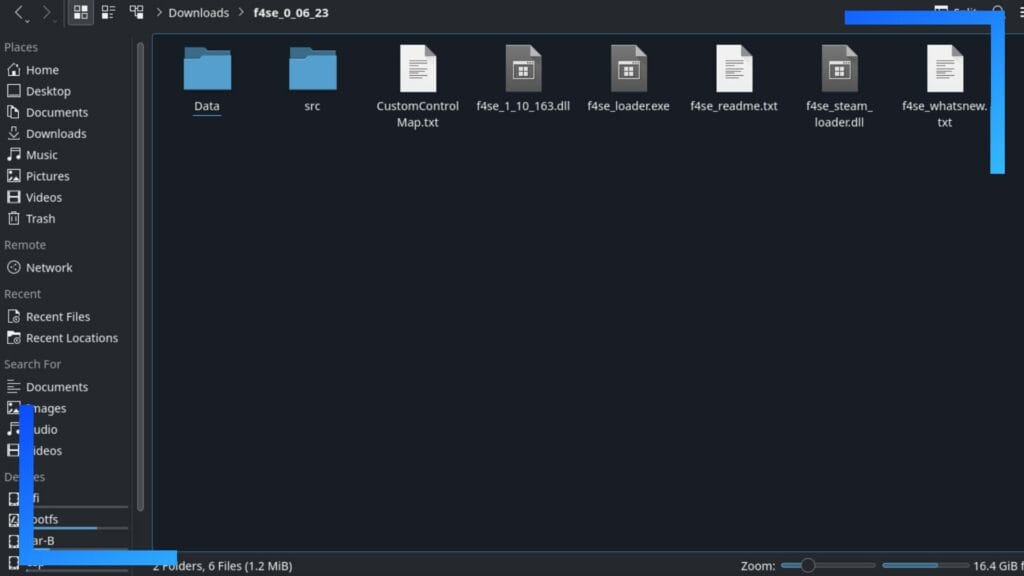
Still in the Downloads folder, a new folder will have been created. Click on this new F4SE folder twice to access it. You should now be looking at all the files (pictured above).
Using the right touchpad and the right trigger, click-and-hold anywhere and drag the box across all the files to highlight them all. Next, use the left trigger to click anywhere to bring up the sub-menu and select Copy.
This will copy all the files needed and will make the next part that much easier.
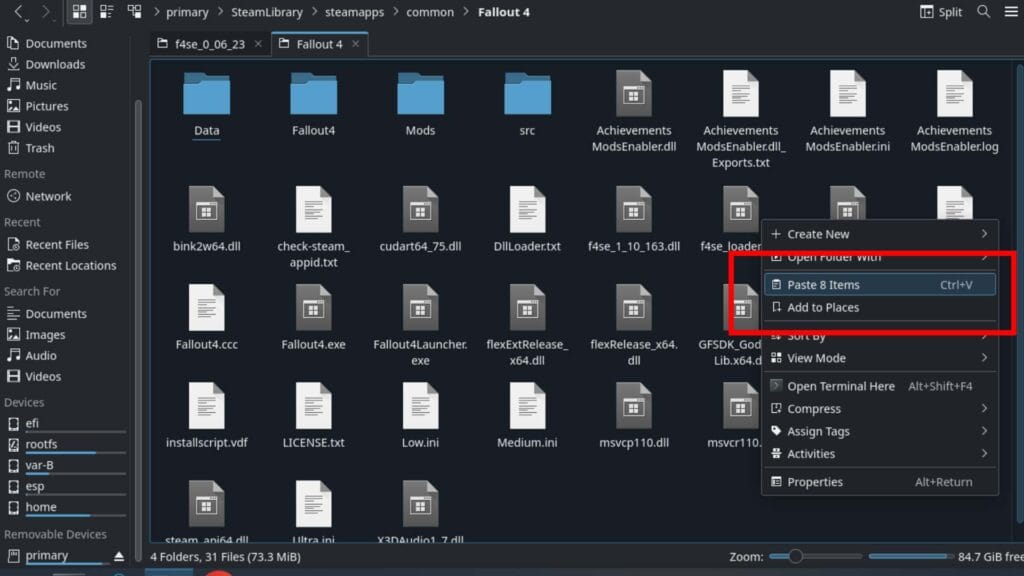
Now what we need to do is find the main Fallout 4 game folder. I have my games installed to an SD card, so the file path may be different if you’ve got it installed onto the Steam Deck’s internal storage.
For me, the path is as follows:
Primary > Steam Library > Steam Apps > Common > Fallout 4
If you’re unsure of the location of your Steam Library, head into Home and use the search function near the top-right of the screen to search for “Steam Library”.
Once you’re inside the Fallout 4 folder, use the left trigger to click anywhere and select Paste. This will copy all the necessary files across, and thanks to the layout of F4SE, the files will be dumped into the correct locations.
Step 2: Add ProtonUp-QT to Install SteamTinkerLaunch
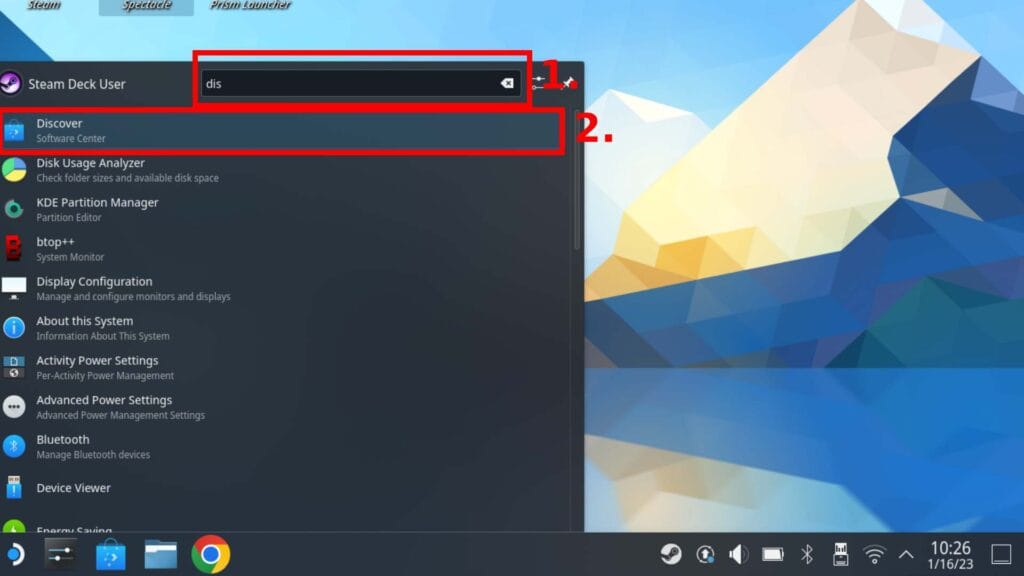
The main reason we’re able to get Fallout 4 mods working on the Steam Deck is thanks to a little plugin called SteamTinkerLaunch. But to get that file, we’re going to need to install something called ProtonUp-QT. This is a program that can download a host of different Proton versions, including Proton-GE, and tools to tinker.
To grab ProtonUp-QT, click on the Start Menu (the Steam Deck logo in the bottom-left corner), and in the search box, type “Discover”. Once the Discover app appears, click on that to open it up.
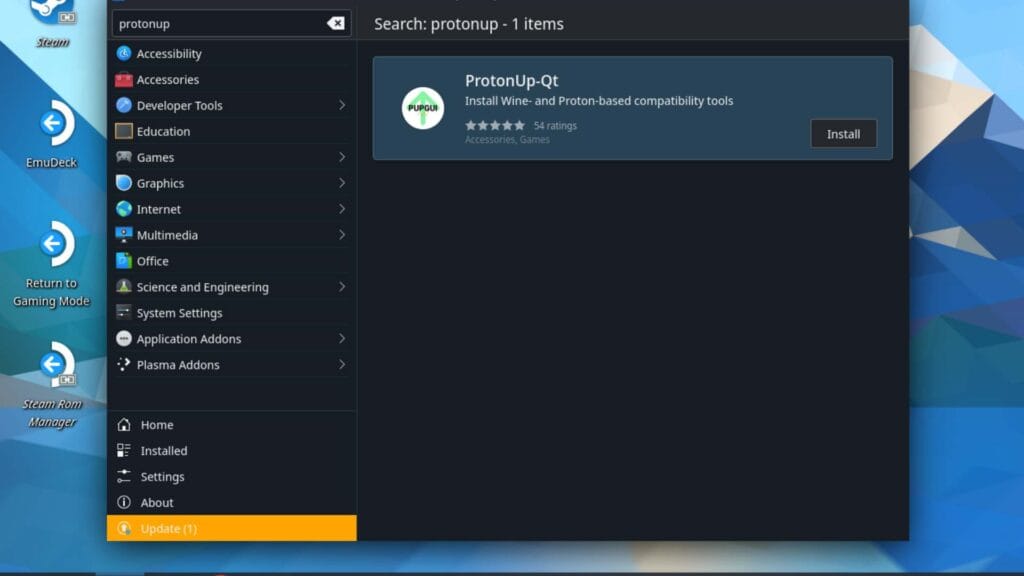
In the top-left search box, type in “ProtonUp-QT”. Doing so will find ProtonUp-QT, then it’s just a case of clicking the Install button.
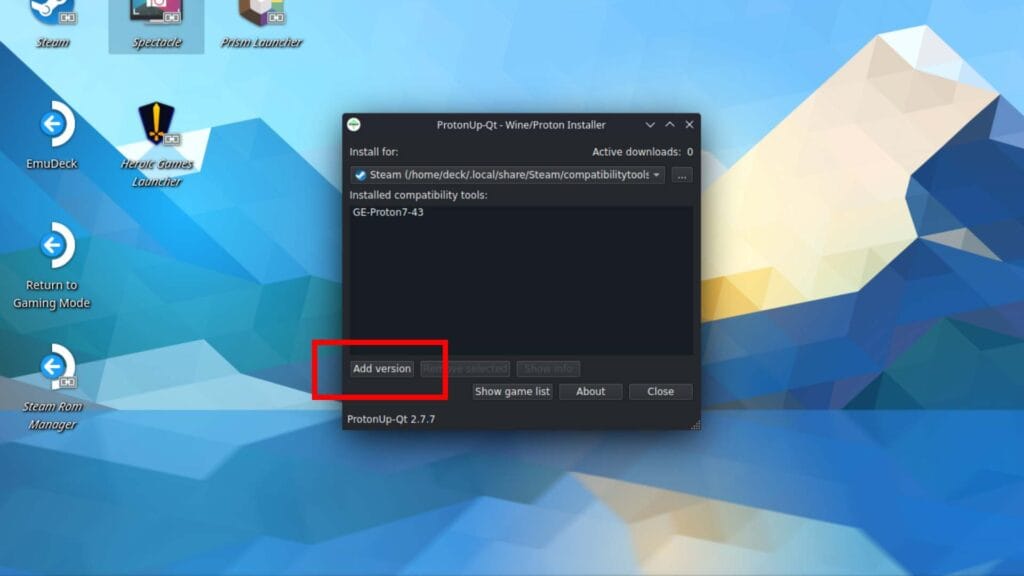
Open ProtonUp-QT from the Start Menu and you should see what’s pictured above.
Towards the bottom-left corner is a clickable button that reads “Add version.” Click that to begin this part of the guide.
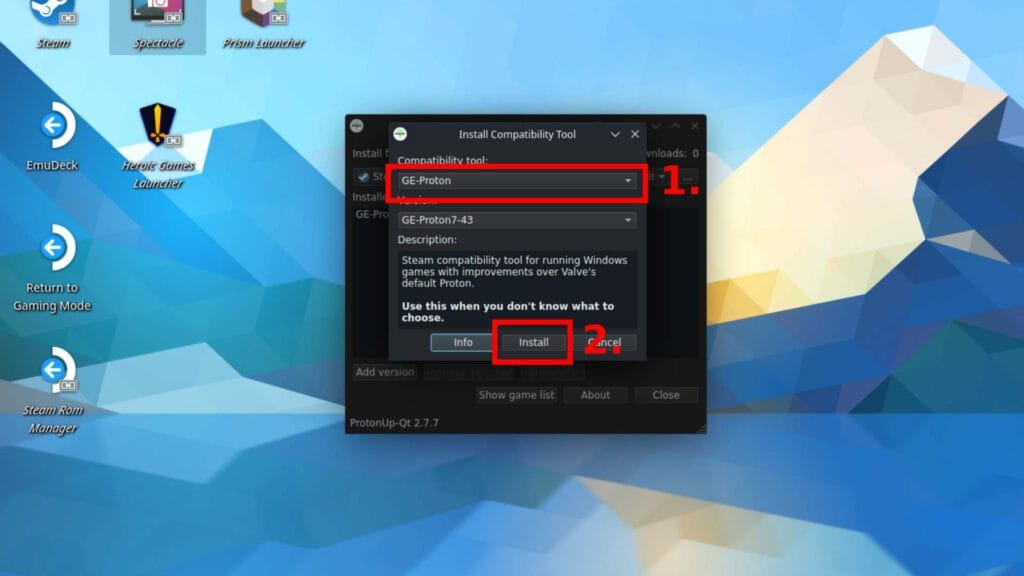
A new menu will pop up. At the top, under Compatibility Tool, click on the drop-down box and select SteamTinkerLaunch.
See those three buttons at the bottom? Hit Install and let ProtonUp-QT do its thing. After a few moments, SteamTinkerLaunch will be installed and ready to go.
Step 3: Change the Proton Version to SteamTinkerLaunch
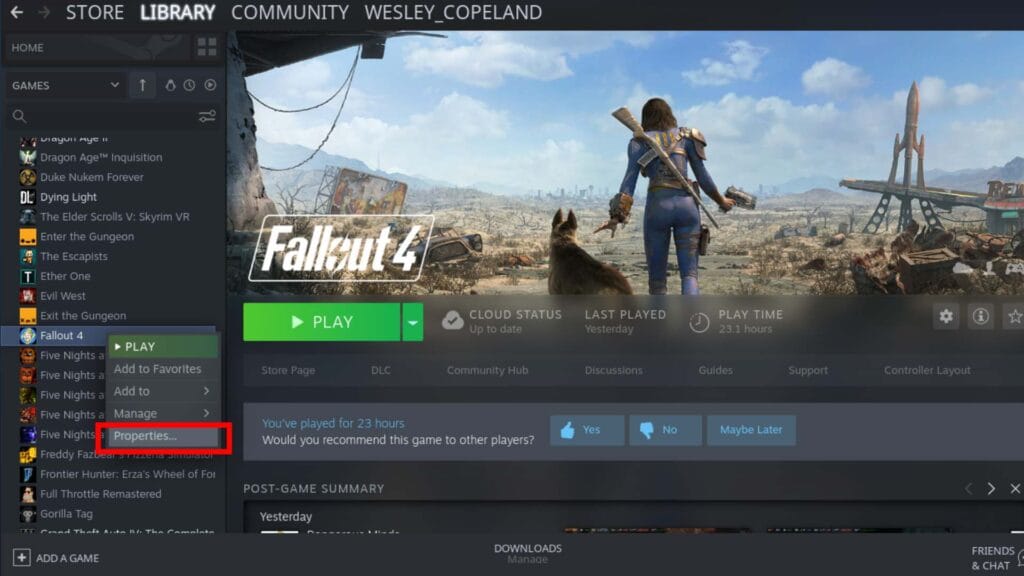
If you’ve ever switched Proton versions before, this next part will be a breeze.
Simply load up Steam, head into Library, then find Fallout 4 in the left-hand column. Use the left trigger to click on Fallout 4, then whack Properties.
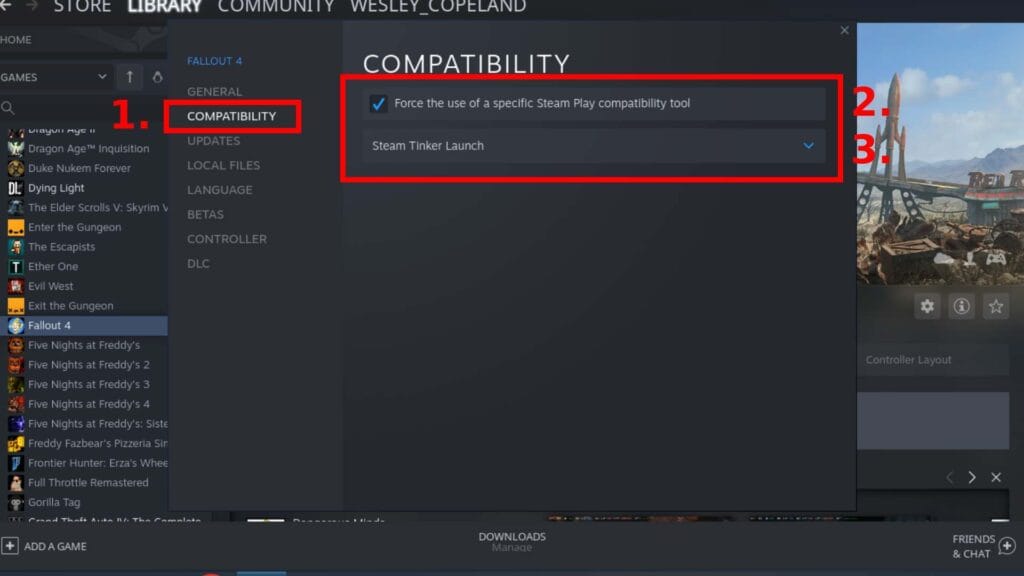
Click on Compatibility, then Force the use of the Specific Steam Play compatibility tool. From the drop-down menu select SteamTinkerLaunch. Once that’s done, close the pop-up window but keep Steam open.
Step 4: Use SteamTinkerLaunch to Install Vortex Mod Manager
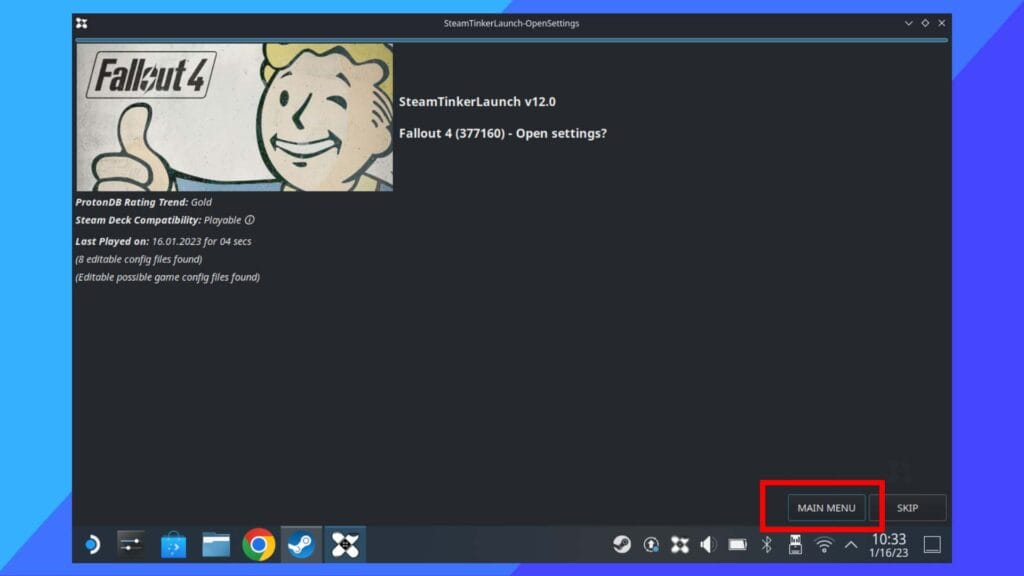
With the Properties window closed, the next step will be to hit the big green Play button to launch Fallout 4.
Instead of loading directly into the Fallout 4 launcher, you’ll now instead get a new window. That’s SteamTinkerLaunch.
You have roughly five seconds to do this next part. Once SteamTinkerLaunch opens there are two buttons in the bottom-right of the screen: Main Menu and Skip.
Main Menu is what we want to click on.
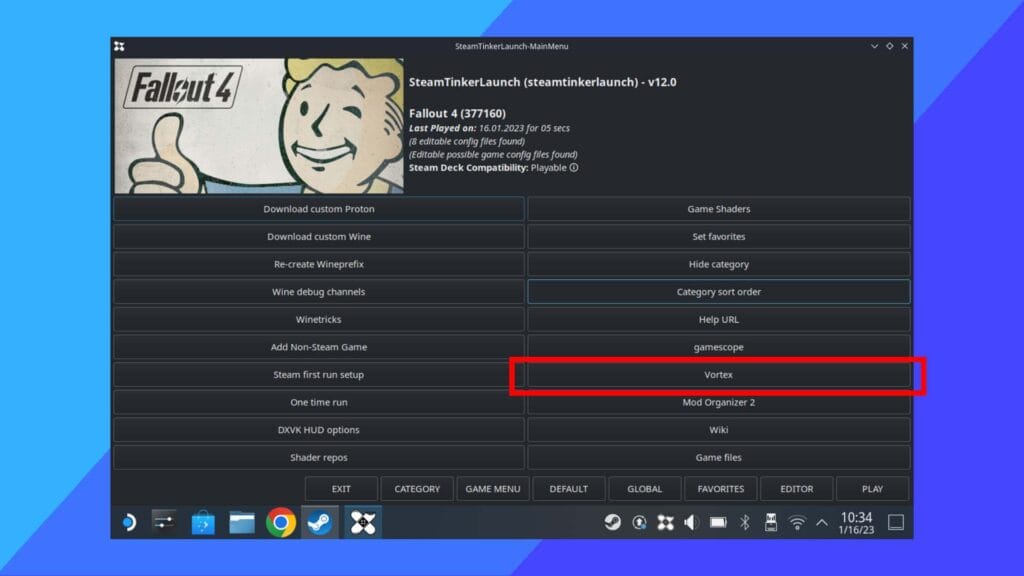
A new menu will pop up and it’s worth taking a moment to see what SteamTinkerLaunch is capable of, as it also includes compatibility with Mod Organizer 2 as well.
When you’re ready to move on, click on Vortex.
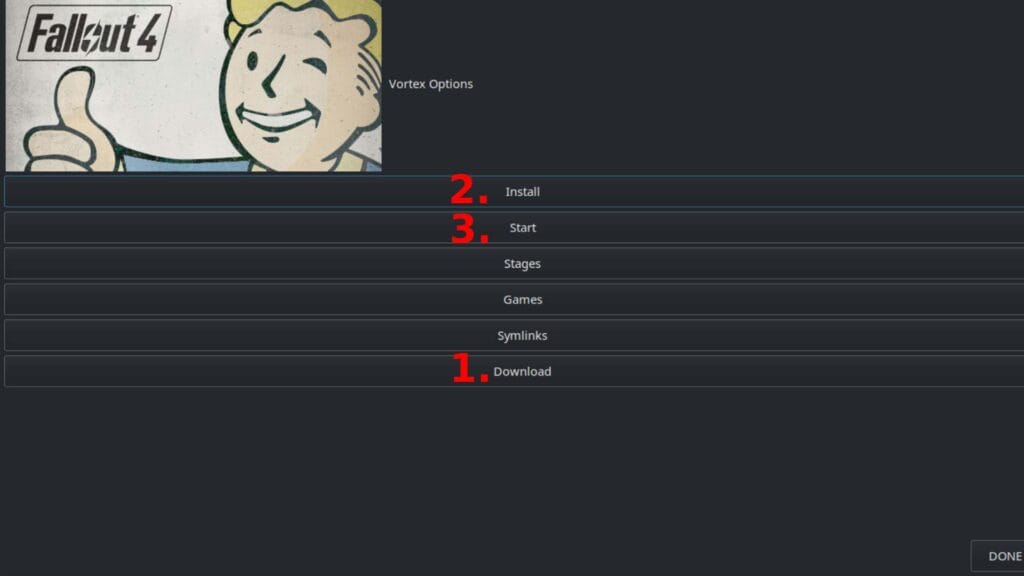
You’re now staring at a wall of options. Don’t panic, there are only really three we need to focus on.
First click on Download to download Vortex. Once that’s complete, hit Install.
One thing that’s worth mentioning here, my progress bar never moved while I was installing Vortex. So if you see no movement, that could be normal. Just give it five minutes and it’ll eventually change.
Once that’s all complete, all that’s left to do now is click on Start. After a few seconds of nothing happening Vortex will open.
Step 5: Understanding and Using Vortex Mod Manager
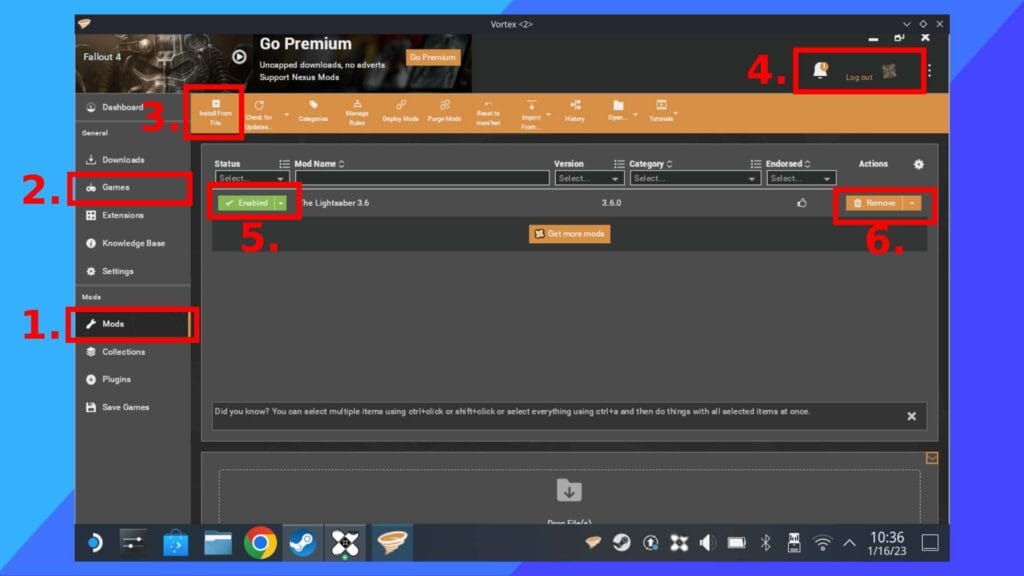
Vortex Mod Manager can be quite daunting at first. There are loads of options and it’s very easy to get lost. Thankfully, the first-time setup when you first load helps to make sense of it all.
If you’re still finding yourself a little confused, here’s all you need to focus on.
- This is your list of mods that are currently installed and how you add mods.
- This is your games section. Depending on your setup, you may need to manually add Fallout 4. If you do need to, search for the game in the Games section. Add it, then define the path to the game. The path in question here is the main Fallout 4 folder which contains the .exe launch file.
- In the Mods section, click on this box to add a new mod you’ve downloaded. Mods are, normally, downloaded to your Downloads folder.
- This is where you can sign into your Nexus Mods account.
- Click this button to enable or disable mods.
- Click here to delete any installed mods.
Do Bethesda.net Mods Still Work?
Yes! Bethesda mods installed through the main menu of Fallout 4 will still work. They may all be deactivated when you installed Vortex, though. That’s what happened to me.
If that does happen, head into Mods in the Fallout 4 menu, then enable each of the mods you want turned on. Easy stuff.
Mod Compatibility
I’ve currently tried 23 different mods. Overall, the vast majority work without any additional effort. Sometimes I needed to change the load order in the mods menu on the main Fallout 4 title screen, but that’s a general mod worry than a Steam Deck-specific problem.
Of course, I can’t test every single mod, so expect some compatibility issues to rear their head at some point.
What I can say is most of the top mods work, including CBBE body mods, extra weapons like lightsabers, and several different outfits. Oh, and I changed the main title screen music to the Doom Patrol theme, which works surprisingly well.
One other thing I’d like to point out as well, once mods are installed through Vortex or Mod Organizer you’ll need to enable them in the main mods section when you load up Fallout 4 (the same area you get Bethesda.net mods from). By default, all your mods will be turned off until you activate them from the Fallout 4 main menu.
Can You Install Vortex as a Standalone?
The first thing I tried when trying to get Fallout 4 mods running on Steam Deck was to install Vortex as a non-Steam game. It worked, as in it loaded, but it didn’t have the access to write and delete files as it needed.
I tried several workarounds and no matter what I tried, I couldn’t get it working. You may be able to get it running with a Wine wrapper, but that’s not beginner-friendly, is it? The easiest way I could find is what I’ve outlined above.

