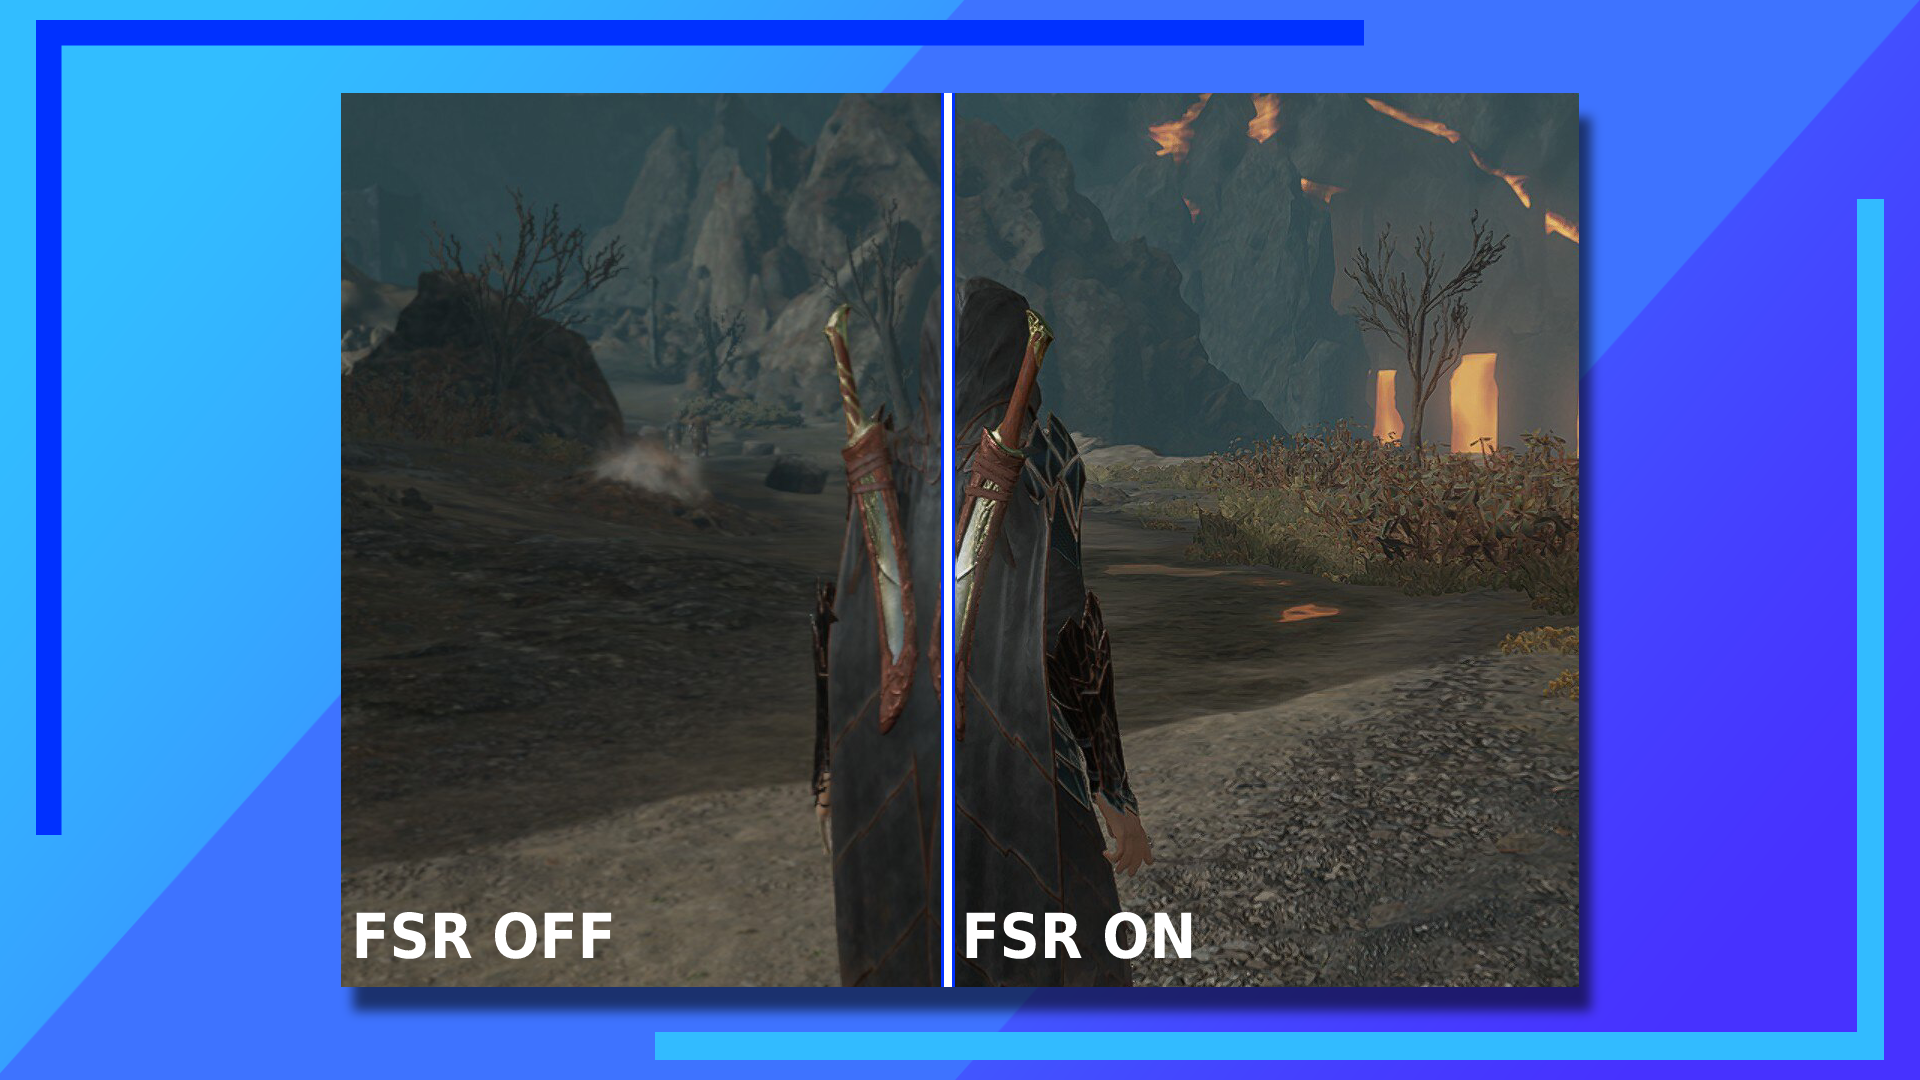
FSR is the Steam Deck’s secret weapon. When games are too demanding, FSR steps in to upscale the image quality from lower resolutions without putting pressure on the internal memory. It’s the difference between low framerates and a fan that won’t stop whirring and peace and smoothness.
But as is customary with the Steam Deck, it’s not always clear how to enable and set up FSR on Steam Deck. And in some cases, users are getting the rules for doing so the wrong way around.
How to Enable FSR on Steam Deck
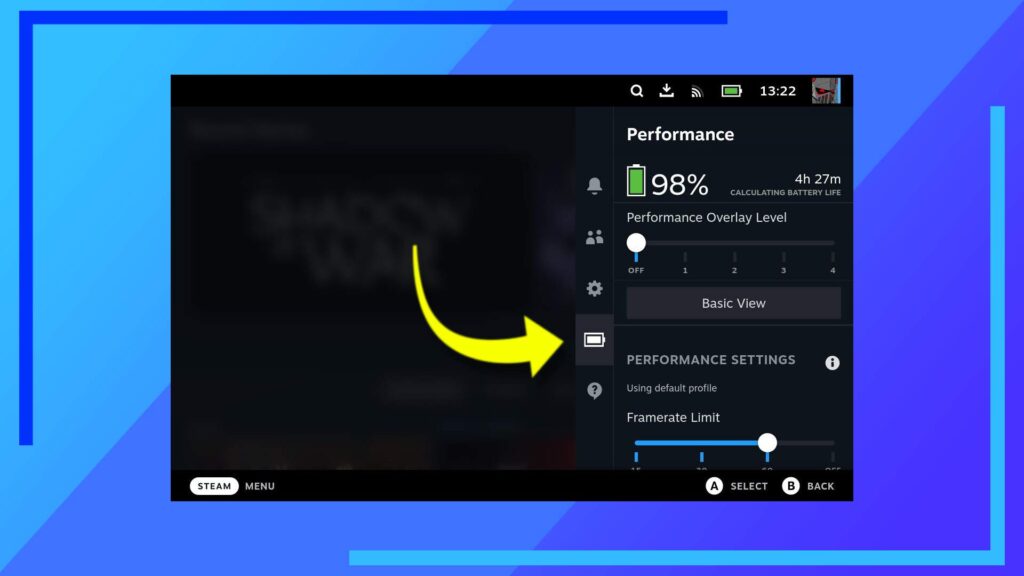
Enabling FSR on Steam Deck is a pain-free process. Simply press the quick access menu (the “…” button), then scroll down to the battery icon. By default, you’ll be on the settings gear. The battery icon is one below that.
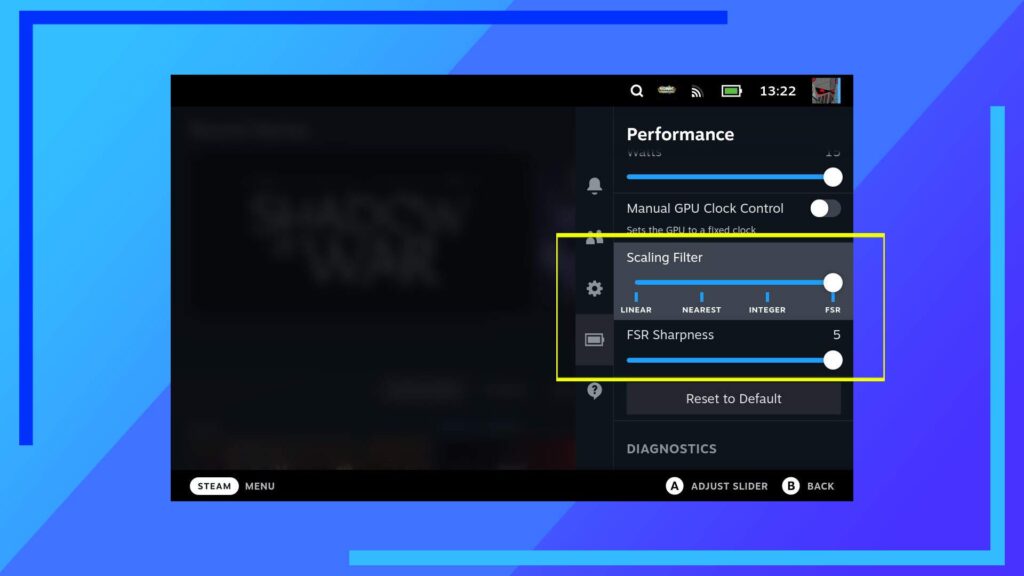
Next, scroll down to near the bottom of the menu. Here you’ll find a setting called scaling filter. The options you’ve got are linear, nearest, integer, and FSR. Drag the slider across to FSR and that will turn it on.
Below this setting you’ve got FSR sharpness. This controls the clarity of FSR. For all the games we’ve tested, we slide it all the way to five for maximum clarity.
Now, this is how to enable FSR on the Steam Deck but it’s not the whole picture. In the next section, we’ll next walk you through how to use it properly.
In short
- Press the quick access button (…)
- Click on the battery icon on the left
- Scroll down to Scaling Filter
- Drag the slider to the far right to enable FSR
- Change the FSR sharpness to a value between zero and five
How to Set Up FSR Properly
It’s important to note, enabling FSR in the quick access menu is all well and good but you need your Steam Deck to take advantage of it to see any real differences.
The general rule users need to adhere to is this: The system resolution should be high, while the in-game resolution should be low.
If you don’t follow this rule, you could end up with FSR doing nothing or weird mushy visuals, and no one wants that.
Now, because most games look great on the Steam Deck, we’ve found FSR really shines brightest when you’ve got the Steam Deck docked.
To set up FSR when docked, below is how we did it.
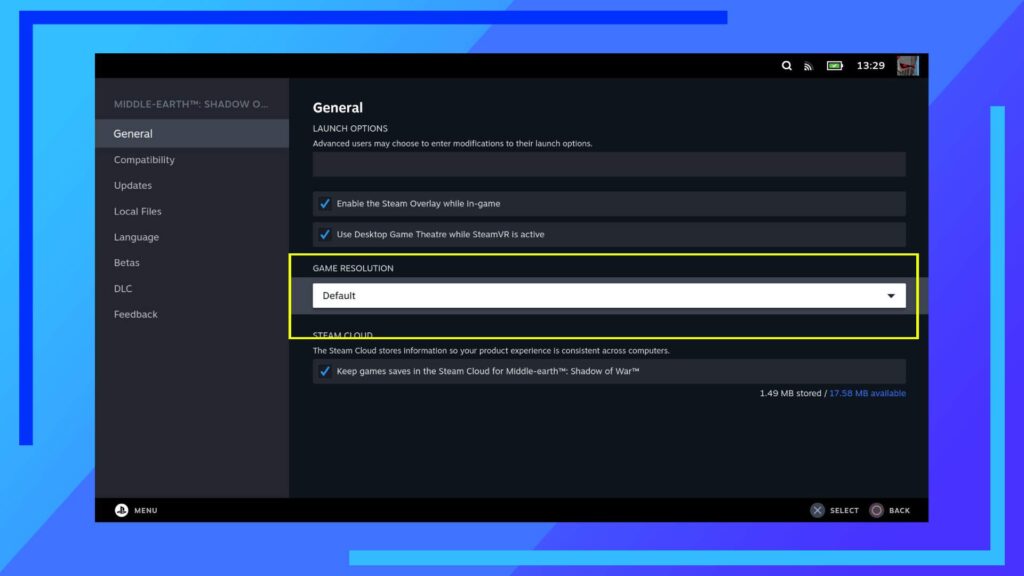
After you’ve connected and configured a Steam Deck for TV play, head into the properties for the game you’re looking to upscale with FSR and make sure the game resolution setting is set to default. Normally you can get away with native but with FSR, default works best.
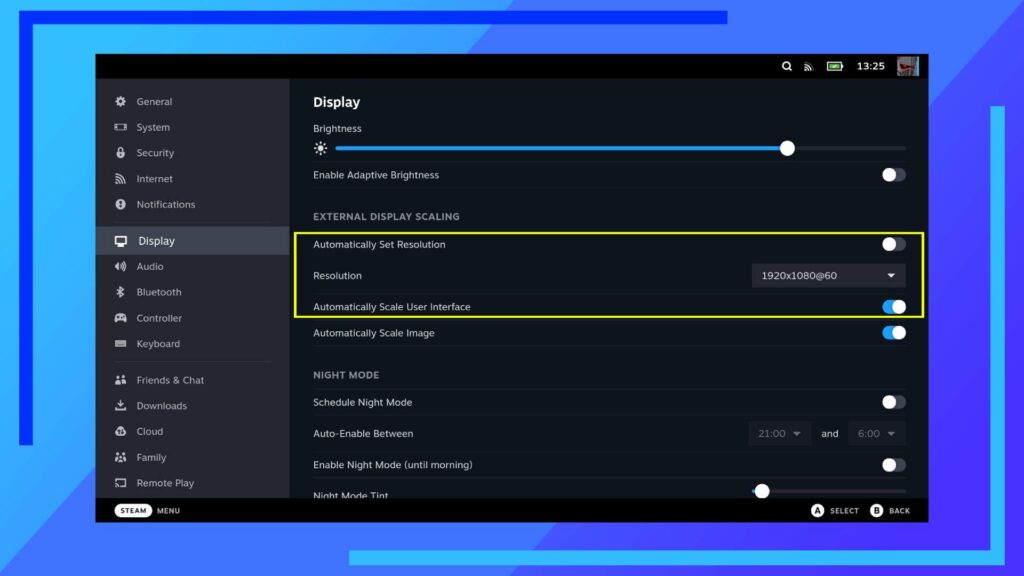
For the next part, press the Steam button and select Settings. You’ll notice because the Deck is docked, display now has some extra settings options. All we need to focus on is automatically set resolution.
Untoggle this setting and set the resolution to something higher than what we’ll be telling the game to run at.
For example, in Shadow of War, we changed this setting on the Steam Deck to 1920 by 1080. This tells the Steam Deck we want the operating system to run in 1080p now it’s connected to a TV.
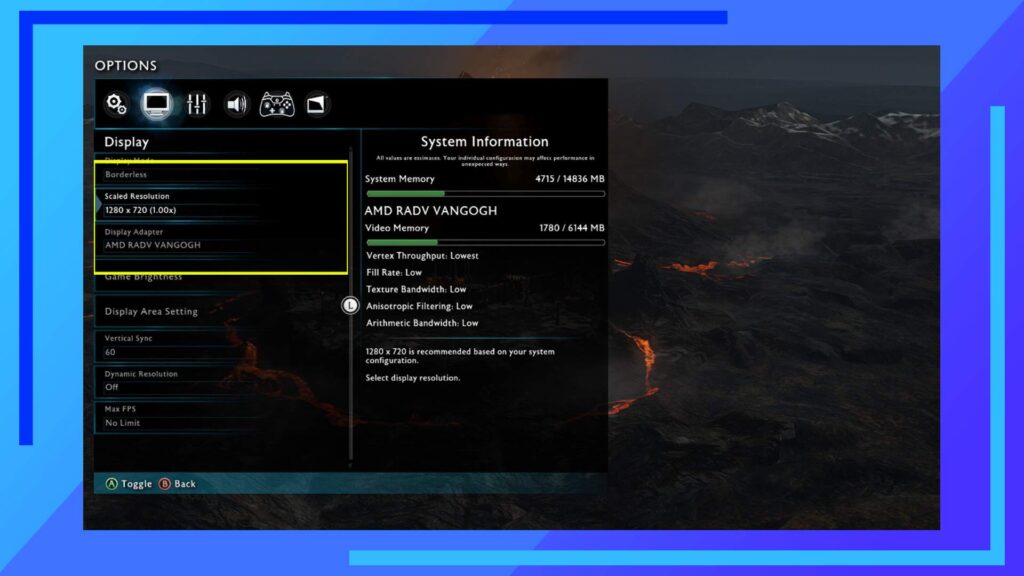
Still with us? Next load up your game of choice. Go into the settings menu and find where you can change the resolution option. This will be different for every game but the above image shows where it is in Shadow of War.
For the next part, we want to drop the resolution down to something lower than what we set in the Steam Deck settings menu. As we set our Deck to 1920 by 1080 (1080p), we want the game to output lower, so we change it in-game to 1280 by 720 (720p).
Now the magic happens. FSR will take the in-game resolution of 720p and upscale it to match the system setting of 1080p with next to no effect on performance.
One final note: With FSR it is possible to scale an image up to 4K. This is, however, quite demanding, and that’s the point we noticed our performance started to take a hit. Feel free to test it out, though, it’s easy enough to change back if you do notice the game starts to lag a bit.
Why FSR Is Important
The Steam Deck has limits. If we go back to Shadow of War as our example, users have a choice of stunning graphics and a painfully low frame rate, or great graphics and a smooth 60 frames. This is, essentially, what makes FSR so important.
On high settings, Shadow of War drops to 20 to 30 frames per second. When you dock the Deck and try to output it to a larger screen, those frames dip even further. The experience is utterly miserable.
How did we fix it? By turning the settings down to mostly low (and some medium), we can get much better performance. The problem then becomes the game looks muddy. We can fix the jagged edges by cranking up the anti-aliasing in-game, but that won’t help with the muddiness.
To get rid of the muddiness and make textures really pop, we set the in-game resolution lower, then used FSR to upscale it to 1080p. The result is pure magic and instantly noticeable if you’ve set it up correctly.
By removing the need to change the resolution in-game to a higher setting to get better visuals, FSR allows us to bypass settings that would normally take up a large whack of the memory.
Key Takeaways
- FSR takes a lower-resolution in-game image and upscales it to make it look better
- FSR uses far less memory than natively changing the resolution in-game
When Not to Use FSR
FSR can cause problems if you’re using a game that already has FSR built in. If that’s the case, make sure FSR is turned off in the quick access menu and only use the FSR setting in-game.
You’ll find some of the top games that come with built-in FSR support below. For a full list, check out the AMD website.
- Assassin’s Creed Valhalla
- Asterigos (FSR 2.1)
- Deathloop (FSR 2)
- Far Cry 6
- God of War (FSR 2)
- GODFALL
- Horizon Zero Dawn Complete Edition
- Resident Evil Village
- Sniper Elite 5
- Terminator: Resistance
- The Riftbreaker (FSR 2.1)
- UNCHARTED: Legacy of Thieves Collection (FSR 2.1)
- World War Z: Aftermath
- Red Dead Redemption 2 (FSR 2)
- Resident Evil 2
How to Check FSR Is Enabled and Working
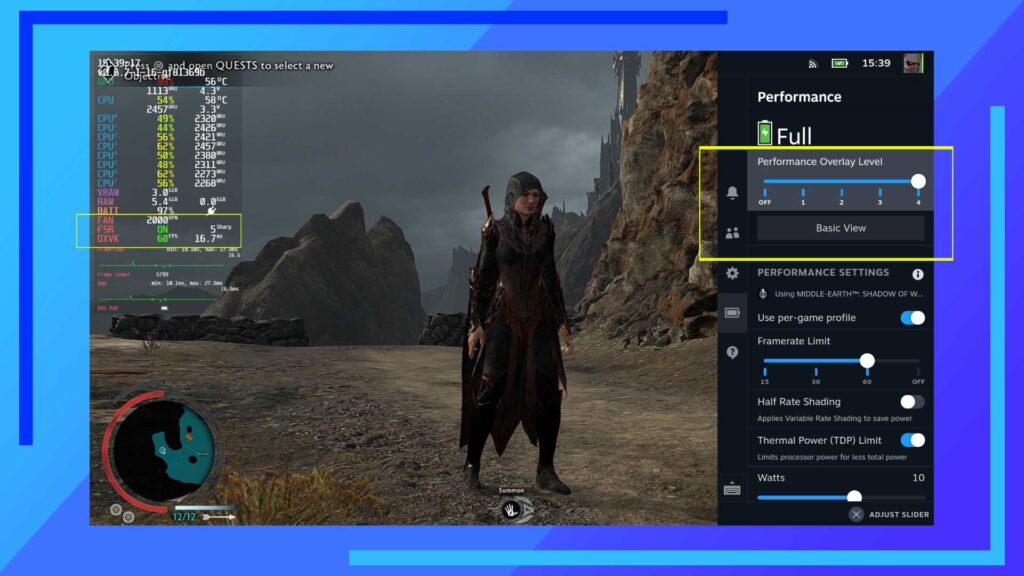
If you’re struggling to tell the difference in image quality, it’s worth checking to make sure FSR has been enabled and is working as it should.
To do this, open the quick access menu (the “…” button) and click on the battery icon.
You’ll see a setting called performance overlay level. Inside are several options to test different performance elements. What we want is the setting on the furthest right of the slider, option five. Toggle that on and a list of different elements will appear on the right of the screen.
Towards the bottom of this big info dump is the FSR setting we’re after. If FSR is enabled, it’ll be green and say “On.” If it’s red and says “Off,” chances are FSR hasn’t been set up correctly or the game in question already has FSR built-in.
What Is FSR?
AMD Fidelity FX Super Resolution (FSR) utilizes the latest tech to upscale visuals and boost performance. Here’s how AMD describes it.
“[FSR] uses cutting-edge upscaling technologies to help boost your framerates in select titles and deliver high-quality, high-resolution gaming experiences, without having to upgrade to a new graphics card.”
Normally when you set a higher resolution, the internal memory takes a hit. FSR bypasses that issue through upscaling. The rough idea is to take a game, lower the settings to get better performance, then FSR will make the performance more stable and upscale the image quality to something much cleaner.
On the Steam Deck, it’s a game-changer when docked, and can be noticeable in handheld mode, too. The Steam Deck, in handheld mode, outputs at 1280 x 800 pixels. So if you drop the in-game resolution to half that, you can use FSR to fill in the gap. This isn’t needed for every game, but for the more demanding titles, it’s a godsend.
We’ve played through several of the best Steam Deck games and FSR really changes the experience when set up correctly. Especially if you’re like us and don’t want to hear that screaming internal fan every time something demanding happens. With FSR, you can lower the in-game settings and play on a much more fan-quiet TDP setting like eight or 10 watts. What more could you ask for?

