Looking to upgrade your ASUS ROG Ally storage to a more manageable amount? I’ve just installed a 1TB SSD on my Ally and the whole process is surprisingly simple. In fact, it’s even easier than installing a new SSD in the Steam Deck.
Read on to learn what you need to know about installing a new ASUS ROG Ally SSD, complete with pictures to guide you through every step.
Before We Start.
Although swapping the ASUS ROG Ally SSD for a new one is super quick, I recommend making a large amount of time free. The actual SSD replacement takes around 20 minutes. But reinstalling Windows 11? That took me around four hours to complete. So definitely clear an afternoon if you’re attempting this.
In terms of what you’ll need, it’s really just the basics:
- A size 0 screwdriver.
- A new 2230 SSD (don’t cut larger SSDs down!).
- A pry tool (a guitar pick or spudger is ideal).
As noted, your new SSD must be a 2230 NVMe drive. Do not get larger devices with similar numbers as they won’t fit inside the ASUS ROG Ally.
It’s also recommended that you discharge (empty) the battery to at least 25 percent before attempting any of this.
Disclaimer: RetroResolve is not liable for any damage that occurs to your device as a result of this guide.
Step 1: Remove the Back Screws.
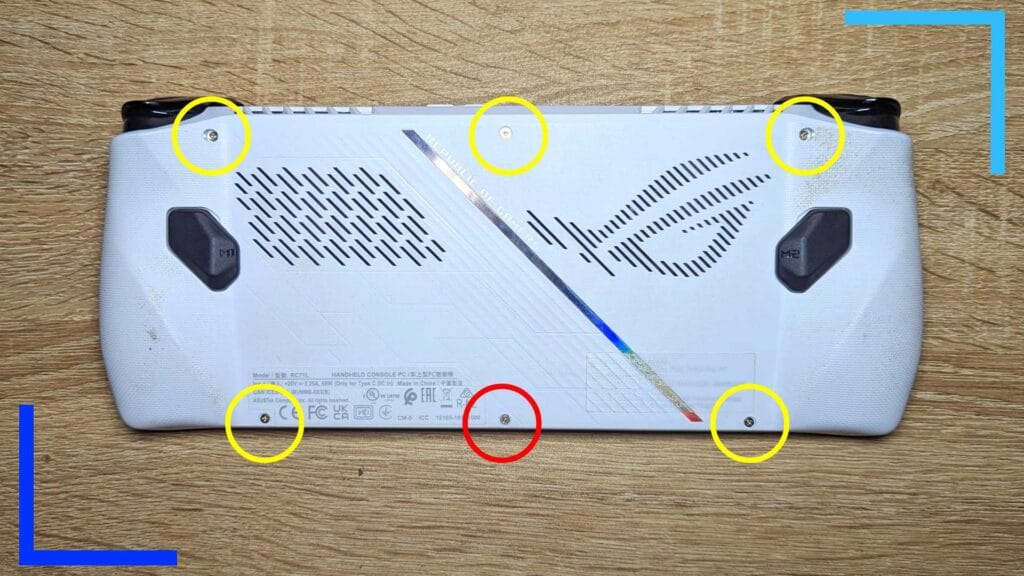
Begin by removing the six back screws with a size zero screwdriver.
I’ve highlighted all the screw holes in the image above and the five yellow circles represent the 16mm screws, while the red single red circle is where you’ll find the 10mm screw.
The bottom two yellow screws should come out with ease. The top three, however, are a little more troublesome and may require turning the ASUS ROG Ally upside down after you’ve unscrewed them to let them drop out.
Also, that red screw doesn’t come all the way out. There’s a latch inside that keeps it attached, so just unscrew it as normal and leave it in the screw shaft.
Step 2: Remove the ROG Ally Backing Shell.
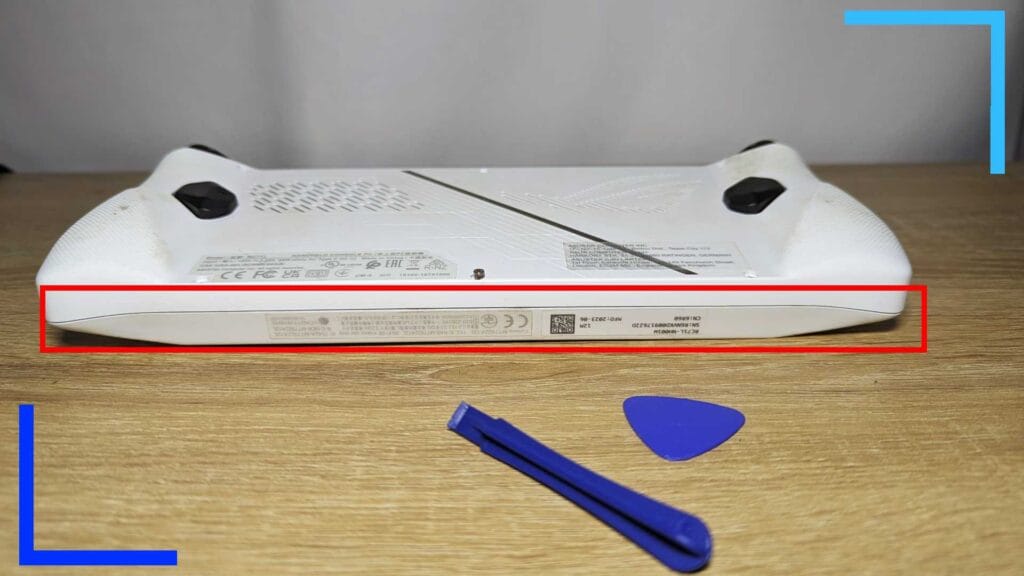
Once all the screws are out, place them to one side. You can do this next part with a guitar pick, but I strongly recommend using a spudger instead as it fits deeper into the groove.
Start in the center of where the front and back shell connect and push the spudger into place. Next apply a small amount of force and run it along the entire bottom of the console. As you move it around, the back will loosen before eventually unclipping itself.
Once that happens, work around the left and right sides, up towards the triggers. Again, the shell will disconnect itself from the front.
After that, you can easily lift it up. Do that now and place the back shell to one side.
Step 3: Remove the Black Cover.
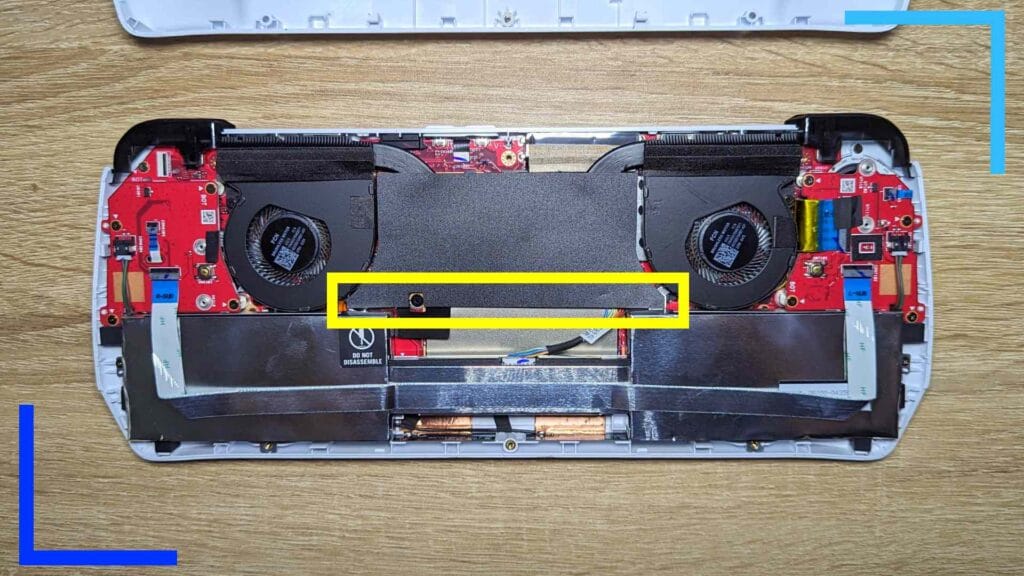
When you look inside the ASUS ROG Ally you’ll spot a piece of black vinyl in between the two fans. This is only attached by some weak adhesive, so grab the bottom and lift it up before carefully peeling it off and placing it to one side.
Doing this will grant us access to all the important stuff beneath, like the SSD drive and the battery.
Step 4: Disconnect the Battery.
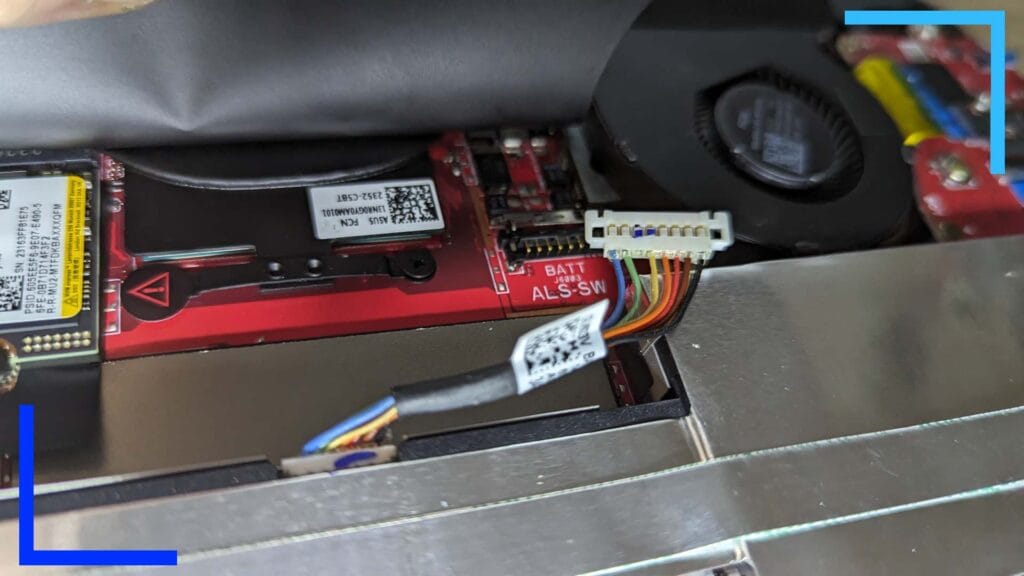
After the black backing is removed you’ll spot the NVMe SSD drive and a multicolored set of cables running into a white connector on the right. That white connector is the battery connector, so let’s disconnect it now.
Take a closer look at the connector and there’s a small silver latch holding it in place. Slide this latch backward, away from the white connector, then the white connector can be removed by lifting it vertically.
Step 5: Remove the Original SSD.
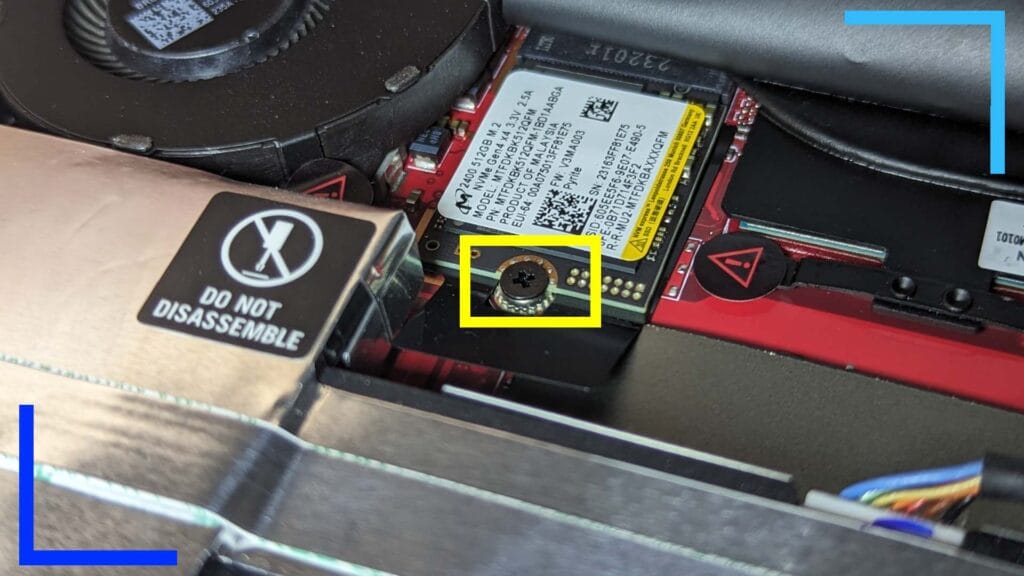
Now for the fun stuff. Look to the left of the battery connector to find the SSD. As pictured above, at the base of the SSD is a small screw. Unscrew that now.
Put the screw to one side (don’t lose it) and carefully grab the original SSD on both sides. Now just pull the SSD in the direction of the bottom of the console to eject it.
Don’t discard the original SSD as there’s a way to turn it into an external storage device (more on that below).
Step 6: Install the new ROG Ally SSD.
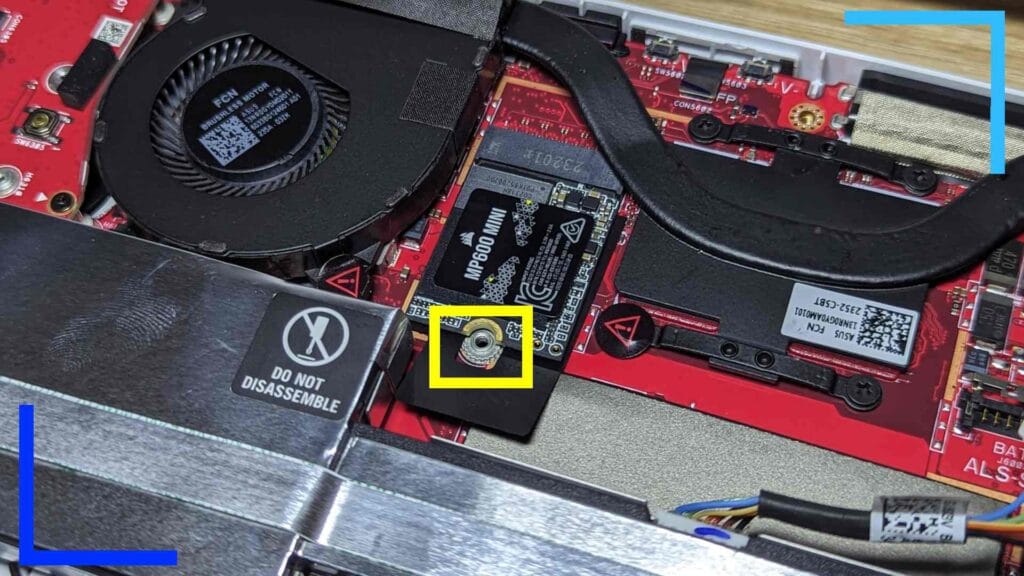
Take the new SSD out of the packaging and push it sticker-side facing up into the drive. Screw the SSD screw back in and that’s the new ASUS ROG Ally SSD installed.
For this guide I went with the Corsair MP600 mini. It’s a 2230 PCIe Gen4 SSD that boasts 1TB of space compared to the original’s measly 512GB. If you’re curious how this device compares in terms of speeds, I’ve got all my benchmarking results further down the page.
Step 7: Put the ASUS ROG Ally Back Together.
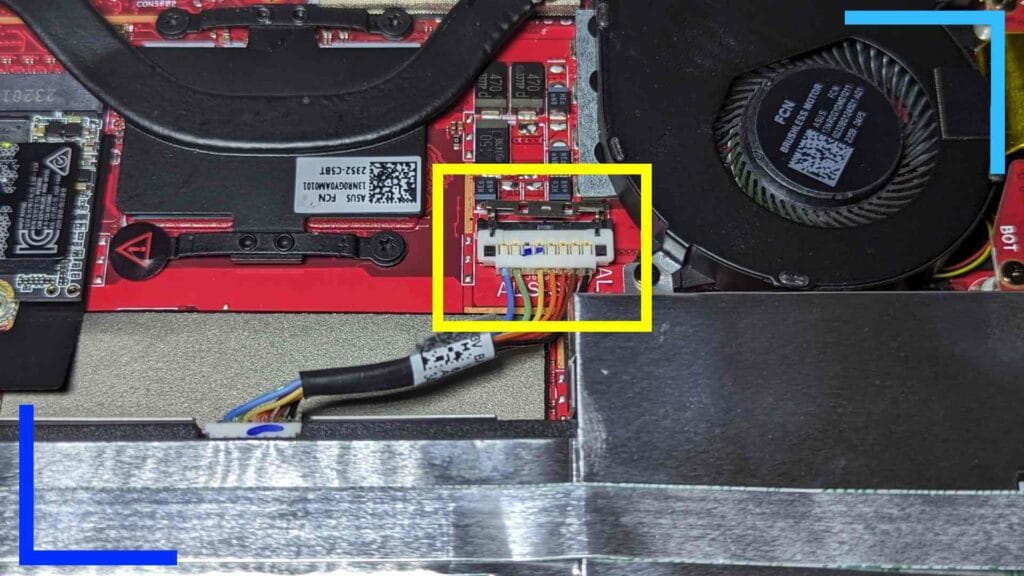
All that’s left to do now is put the ASUS ROG Ally back together. We’ve already got the SSD fixed back in, so let’s turn our attention to the battery.
Push the white connector back into place. If you look closely, there are two small square cutouts on either side of the connector. These will fit onto the board below.
Once the connector is in firmly, slide the silver latch into place. Make a point of making sure both of the prongs on the far left and far right of the latch slide into the top of the connector.

Grab the back shell and drop it down into place. Run your fingers around the outside of the shell and you’ll feel a click as the front and back shells reconnect.
Once that’s done bring back the five screws you set aside earlier and screw them, along with the single screw to make them up to six in total, into place.
You’ve now successfully installed a new SSD into the ASUS ROG Ally, but as the SSD doesn’t have an operating system yet, it won’t currently boot.
Keep reading if you want to know how to reinstall Windows 11 on the ASUS ROG Ally.
Step 8: Reinstall Windows 11 on the ROG Ally.
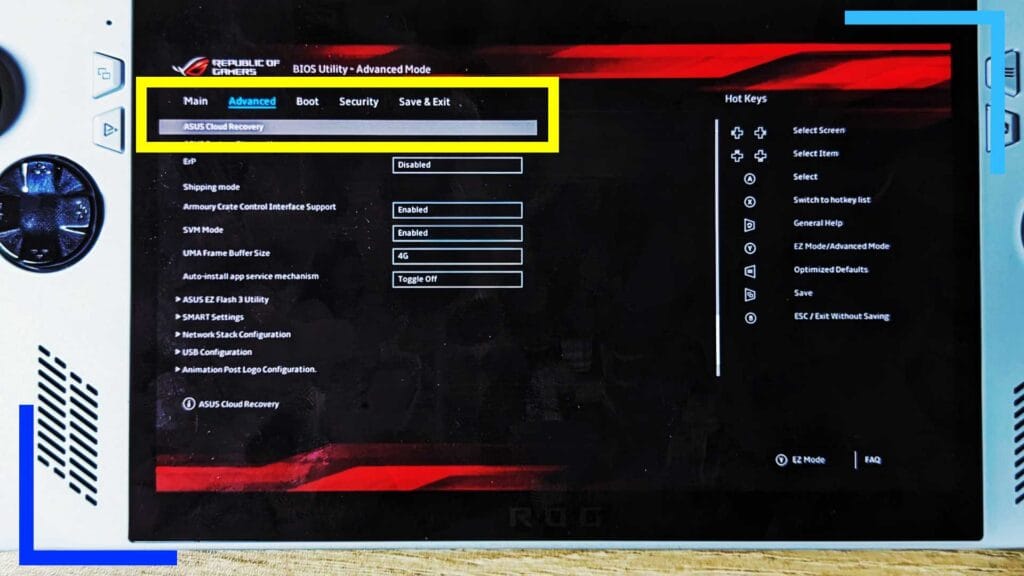
To reinstall Windows 11, we’ll be using the ASUS cloud recovery method. To begin, go and grab the 65-watt charger that came with the ROG Ally. Plug it in then turn the ASUS ROG Ally on.
This should boot the ROG Ally into the BIOS. If it doesn’t, try holding the volume up button when you turn it on. I didn’t need to do that as the Ally should default to the BIOS as there’s no operating system. But just in case, keep that in mind as a backup.
Before we enter cloud recovery, use the d-pad to select the time and date at the top of the screen. Setting this now can help to avoid a problem where the ROG Ally gets stuck on “connecting”.
After that’s done, press the Y button to exit EZ mode then use the right bumper to move over to Advanced. The first option in this menu will be ASUS Cloud Recovery. Select this with the d-pad then click on it with the A button. Follow the on-screen instructions and enter your wifi details and password.
I suggest being in the same room as your modem or router to make this section go as swiftly as possible.
The rest of installing Windows 11 is a simple case of following the on-screen instructions. There’s nothing difficult here, but do keep in mind this can fail, and it takes around three to four hours to complete. The longest parts are downloading the recovery software, then downloading the actual Windows 11 image and installing it.
That said, this is the easiest method and puts the majority of the ASUS ROG Ally software back onto the device. If you do find you missing anything, you can redownload most Ally drivers on the ASUS ROG website here.
What Should You Do with your Orignal SSD?
You’ve got two options with the original SSD. If you’re worried about something in the ROG Ally breaking down the line, keep the old SSD as it is. That way if you need to send the Ally off for a repair, you can stick the original SSD back in and it’ll be like nothing was ever changed.
If you want to put that 512GB storage to work, though, you could always turn it into a super-fast removable storage device.
SSDs are faster than both SD cards and SATA hard drives, so an external SSD would be perfect for gaming. What you’ll need for this is an NVMe enclosure capable of holding a 2230 SSD. I’ve been using this UGREEN enclosure as it’s compatible with 2230 drives and the USB cables are capable of fast speeds. One of the mistakes many make is using a generic USB cable like a mobile charger. That’s no good as they’re not designed for high-speed data transfers. If you use a generic cable, you won’t get those lush super-fast SSD speeds.
One thing to note, as we’ll be using the SSD over a high-speed USB cable, it won’t be as fast as it was when it’s plugged into the NVMe slot (which the ROG only has one of). That’s fine, though, it’ll still be faster than an SD card or SATA hard drive.
Once you’ve got the eclosure set up and connected, you’ll need to enter your BitLocker key in Windows Explorer to unlock it. You can grab the key you need by logging into your Microsoft account and following the official guide on the Microsoft website.
After the drive is unlocked, you can then use the Disk Management app in Windows to format the drive and set it up as a removable storage device.
New SSD Benchmark Results.
I won’t dump a load of tech speak on you, but it’s worth remembering game consoles need SSDs with fast read and write speeds to keep things moving fast. That’s why if you search “SSD” on your favorite online store you’ll see a range of different prices. The cheaper ones are, generally, not suitable for gaming and should be avoided.
That’s why I went with the Corsair MP600 mini. The 1TB storage is almost double that of the ASUS ROG Ally and the read and write speeds are within the same ballpark as the original ROG Ally SSD, meaning the load times I’m used to won’t be negatively affected.
| Read Speed (MB/s) | Write Speed (MB/s) | |
| Original 512GB SSD | 4323.60 | 1808.55 |
| Corsiar MP600 Mini 1TB | 4829.30 | 4852.24 |
I went with Crystal Disk Mark to test out the read and write speeds of both the standard ASUS ROG Ally SSD and the new Corsair MP600 SSD I installed. I ran the test three times on both SSDs to make sure the results were accurate, and I also had the built-in CPU boost disabled for every test.
What the table above confirms is the Corsair SSD is a suitable replacement. It’s in the same ballpark as the stock SSD, and that’s what we want.
It’s worth discussing the higher speeds of the Corsair SSD briefly. While this is accurate, SSDs are at their fastest when there’s plenty of storage space free. The fuller the SSD, the slower it’ll perform. So take the above readings with a pinch of salt.
My original SSD was 50 percent full, but because of the higher capacity of the Corsair SSD, even when I transferred my data over the new SSD was only 25 percent full, hence the higher read and write speeds.
Still, the overall write speeds of the Corsair device were a shock to me. Even factoring in the difference in available space, the Corsair SSD writes data to the drive much faster than the stock SSD.
The conclusion here is that the Corsair SSD is a solid replacement for those looking for more ROG Ally storage. At $99.99 or £89.99, it performs either on par or better than the stock SSD and thanks to how easy it is to install on the ASUS ROG Ally, you don’t need to be a tech wizard to get it up and running. What’s not to love?

